Switching from Honeybook to Dubsado
It’s simpler than you think!
Hi! I’m Abigail, traveling film wedding photographer based in Springfield Missouri.
I’ve been in business since 2019 and have shot weddings all over the U.S. Along with being passionate about documenting people’s lives naturally and elegantly, it’s important to me to keep a smooth, streamlined, and professional workflow for myself. Taking care of yourself well as a business owner is the most certain way to make sure you are serving your clients well, and running a show that can stay running.
If you’re tired of the difficulty Honeybook throws at you, but don’t feel like you have the time or the energy to figure out how to use a new CRM, I’ve taken care of it for you. Here is your easy and simple step-by-step guide to getting familiar with the software, as well as switching over your documents and current clients, complete with screenshots and video links.
CONTENTS
-
It wasn’t because of the price increase….
-
Dashboard
Client Portal
Multi-User
International Settings
Payments and Invoices
Emails
Integrations, custom-mapped fields, and general settings
Account Settings
-
Customizing your dashboard
-
Canned Emails
Forms
Scheduler
Packages
Workflows and Payment Plans
-
Downloading Honeybook Content as PDFs
Starting New Project in Dubsado
Uploading PDFs to Projects
Recreating the Invoice
Finishing Touches
Send it to the Client
-
you got this!!
i didn’t switch because of the price increase . . .
I decided to switch away from Honeybook months before they announced the price increase because of inefficient workflow options, constant glitches in the software, and the absence of common-sense features while complicated and AI-centered features continued to be added. If Honeybook was continuing to add value to my brand and alter my workflow for the better, I would have stayed. After all, as a small business owner who charges my clients thousands for something that I claim adds significant value to their life, it would not have seemed right to move away from something valuable just because of a couple hundred extra dollars a year. However, I did not find that Honeybook was adding value to my brand or my life, but was in fact making it more difficult.
Having to jump through hurdles just to effectively use the software that runs my business, especially when it’s causing problems for my clients as well as me, is frankly unacceptable when trying to appear professional and streamlined. To list just a few of the things that drove me crazy…
The software would not let me delete any default files in my library from 2015, so my whole library was a mess and organization is important to me.
The software would not let me add more than one automation per project, which felt like it was defeating the whole point of automations if I could only automate one part of my workflow.
You were not able to send an email to only one person in a project if there were multiple contacts, you had to send to ALL of them. On multiple occasions, I had clients asking me why they received “so-and-so’s payment receipt” or “how does this apply to them?” I had to apologize on Honeybook’s behalf multiple times, saying that it will not allow me to send emails individually and to ignore it.
I have had clients text me for years “I sent you this message but I wasn’t sure if you got it because the software was being weird!”
On one occasion, Honeybook charged one of my clients twice because they let her pay manually even though the autopay payment had already gone through. She had to dispute it with her bank and it was an embarrassing mess.
This is not everyone’s opinion, but I found the AI emails and updates pointless and unhelpful. They never “learned” to be better for me and would fill my inbox with junk mail. I kept turning them off, but they kept adding new ones.
Whenever clients would schedule meetings, they would be added to my calendar in Mountain Time even though I’m in Central Standard Time. I changed it and updated it many times in settings, but it would switch right back. I would call people at the wrong time or have to ask them what time they actually scheduled. Again, embarrassing.
While I could fill this whole blog with frustrating stories, these were some of the most prominent issues I faced. Again, I know not everyone will share these opinions, and I also know some of these features have been updated by now. I also appreciate that Honeybook is a platform that listens to their clients’ needs and is constantly looking to improve. However, I was tired of waiting for them to “listen” enough to fix what seemed to be common-sense issues. I would happily pay a high price for a high-end CRM, but if they are going to start charging me $600 a year and I’m still apologizing to my clients for glitches, struggling with basic organization, and being overwhelmed by amateur AI features, I’ll take my business somewhere else. I’d rather have a CRM that understands I would rather have something robust and simple than fancy and complicated, and that stops moving features around every three months for “improvement.”
basic set up
I suggest setting aside one 8-hour work day to completely switch over to the platform. It might seem like a long time, but if you follow this guide, taking only one day to make your life and business significantly more efficient is more than worth it. And depending on how many current clients you have, it might take you less time.
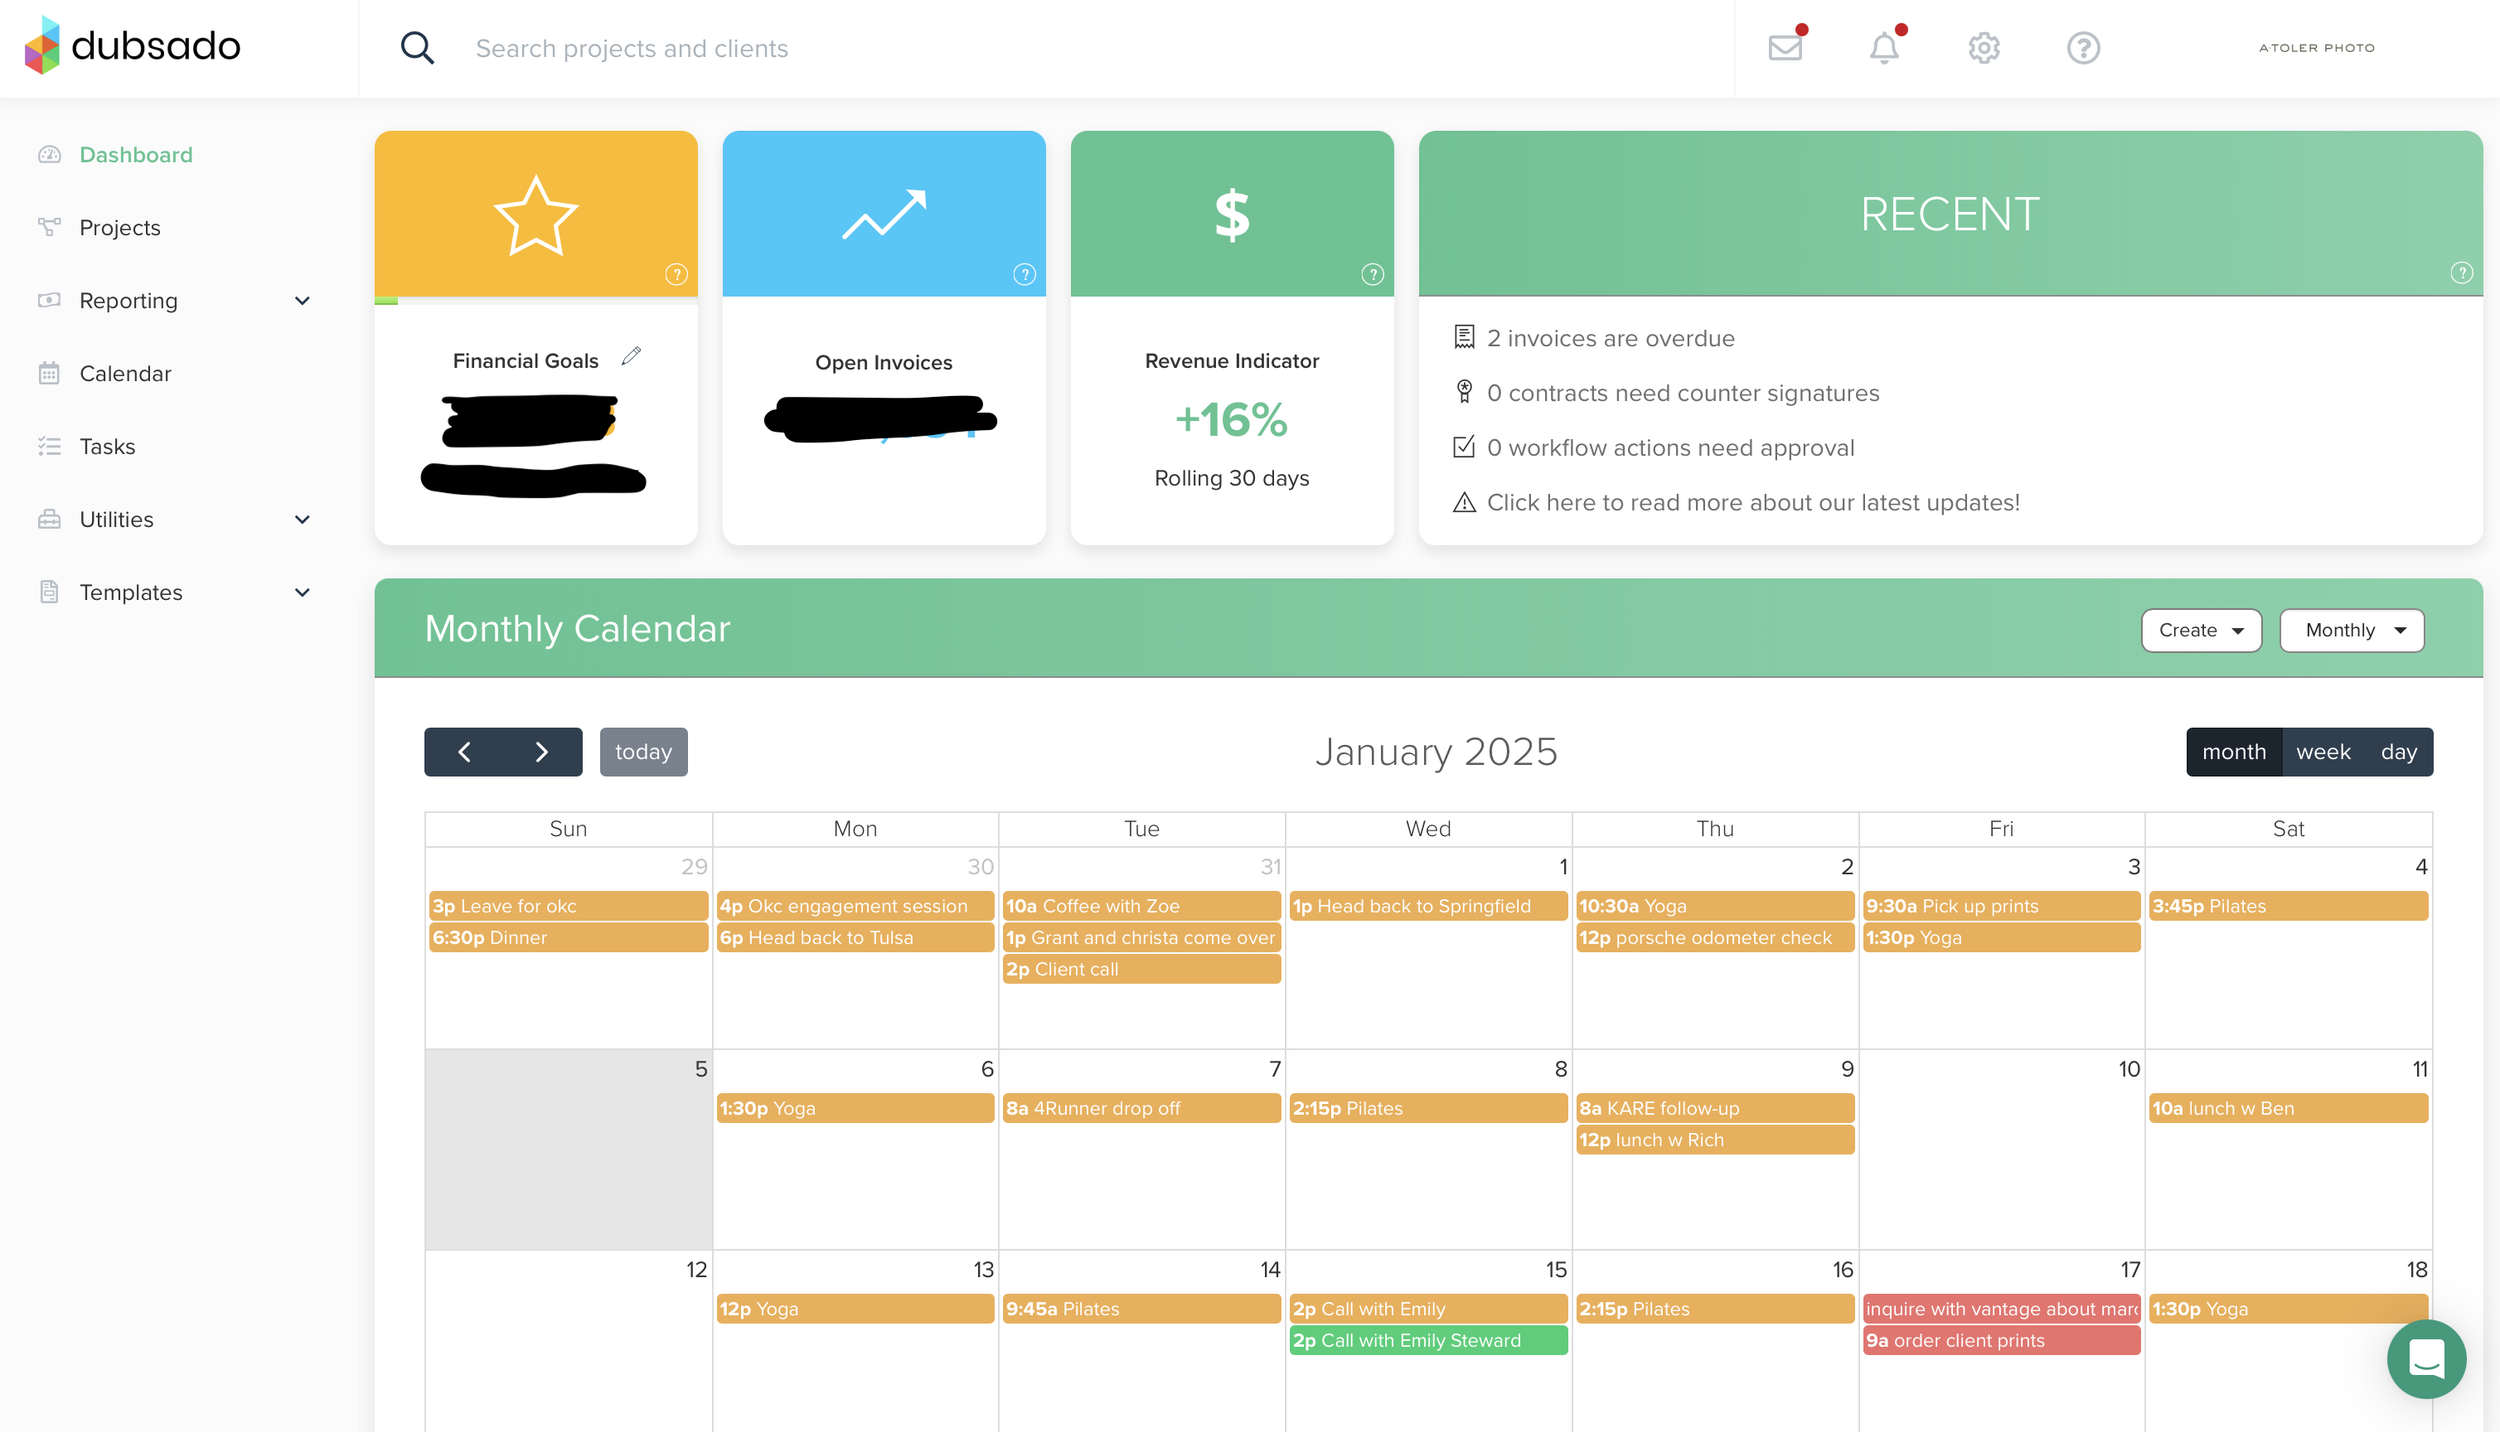
Once you have begun your free trial, you will be shown your new account dashboard. It looks much different than Honeybook and might feel too foreign, but after a few days, it feels much more comfortable and easier to navigate. Later on, you’ll learn how to customize the widgets you want to see.
To get started, click on the settings button in the upper right corner.
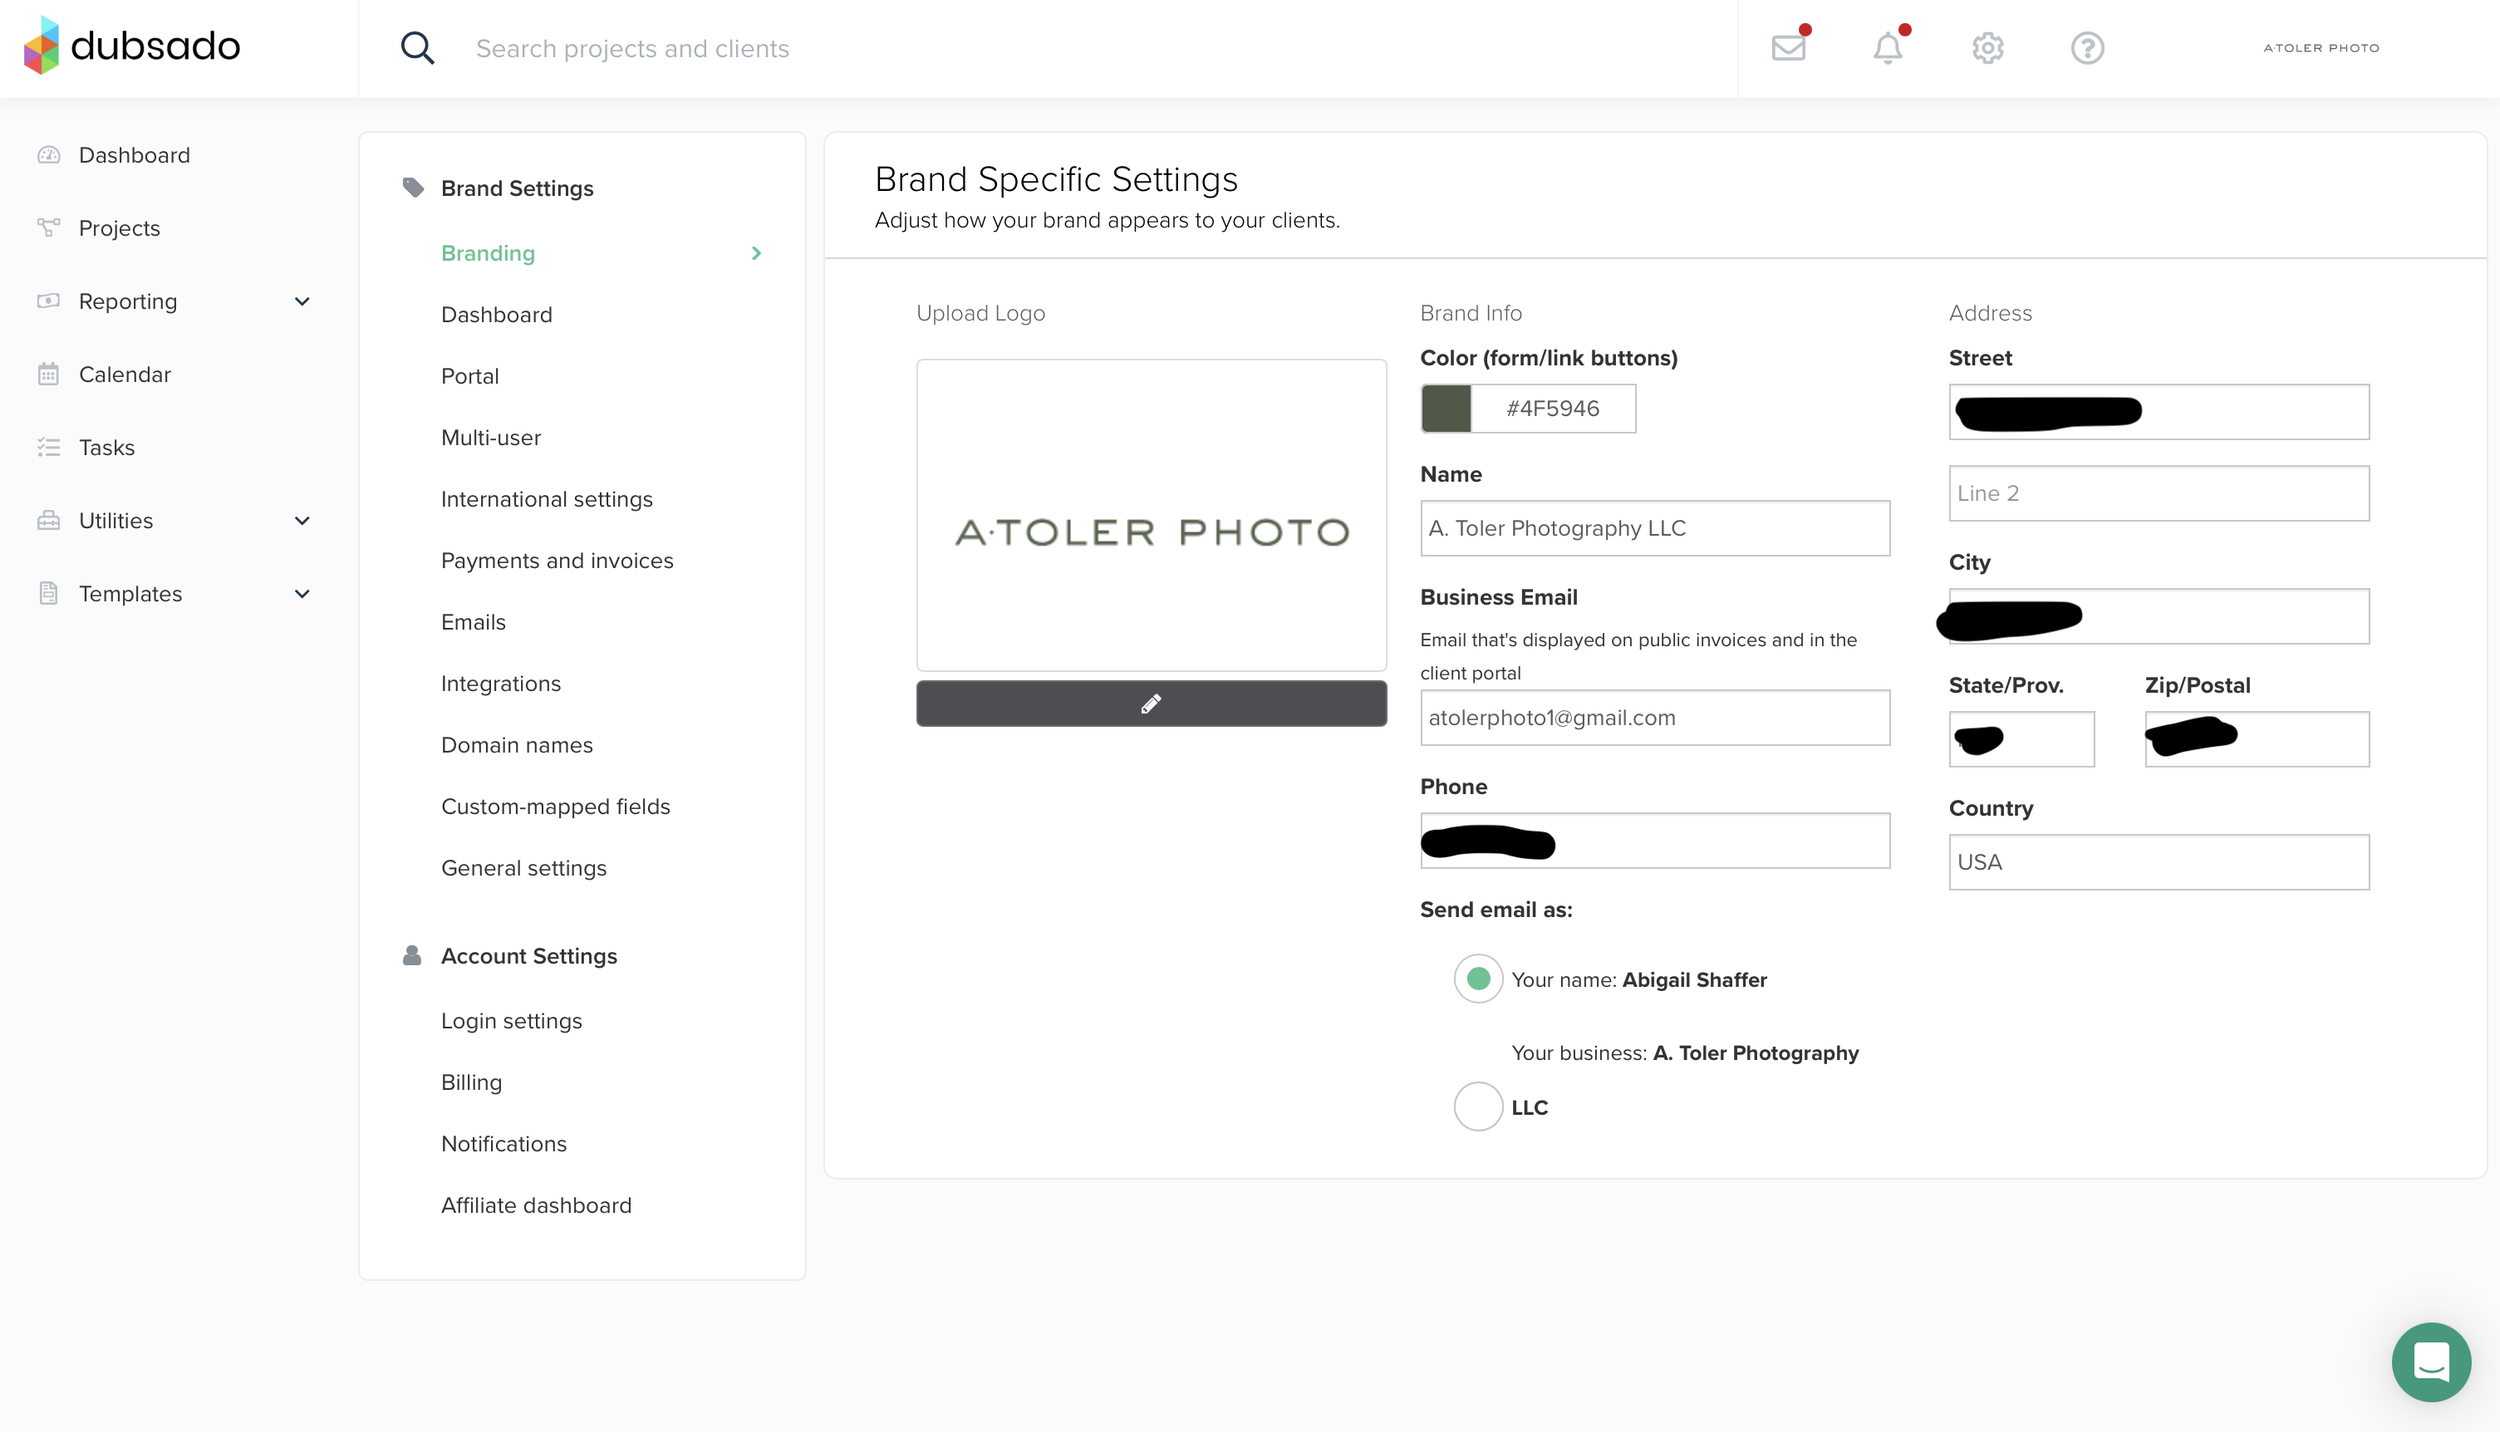
This will now be the page you see.
Start entering basic information like your business name, email, business address, phone number, and how you want your name to appear in your emails to your clients.
Unlike Honeybook, who sends emails through an integrated email domain that is accessible by your client only in their Honeybook portal, Dubsado sends and receives emails directly from your business email - no middle man required. You and your client can access these emails from your Dubsado portals, and also in your regular inboxed. This keeps things simple for you, and keeps your client from having to learn something new just to converse with you.
You can also add the logo you would like to appear in the upper corner of your Dubsado interface, as shown below.
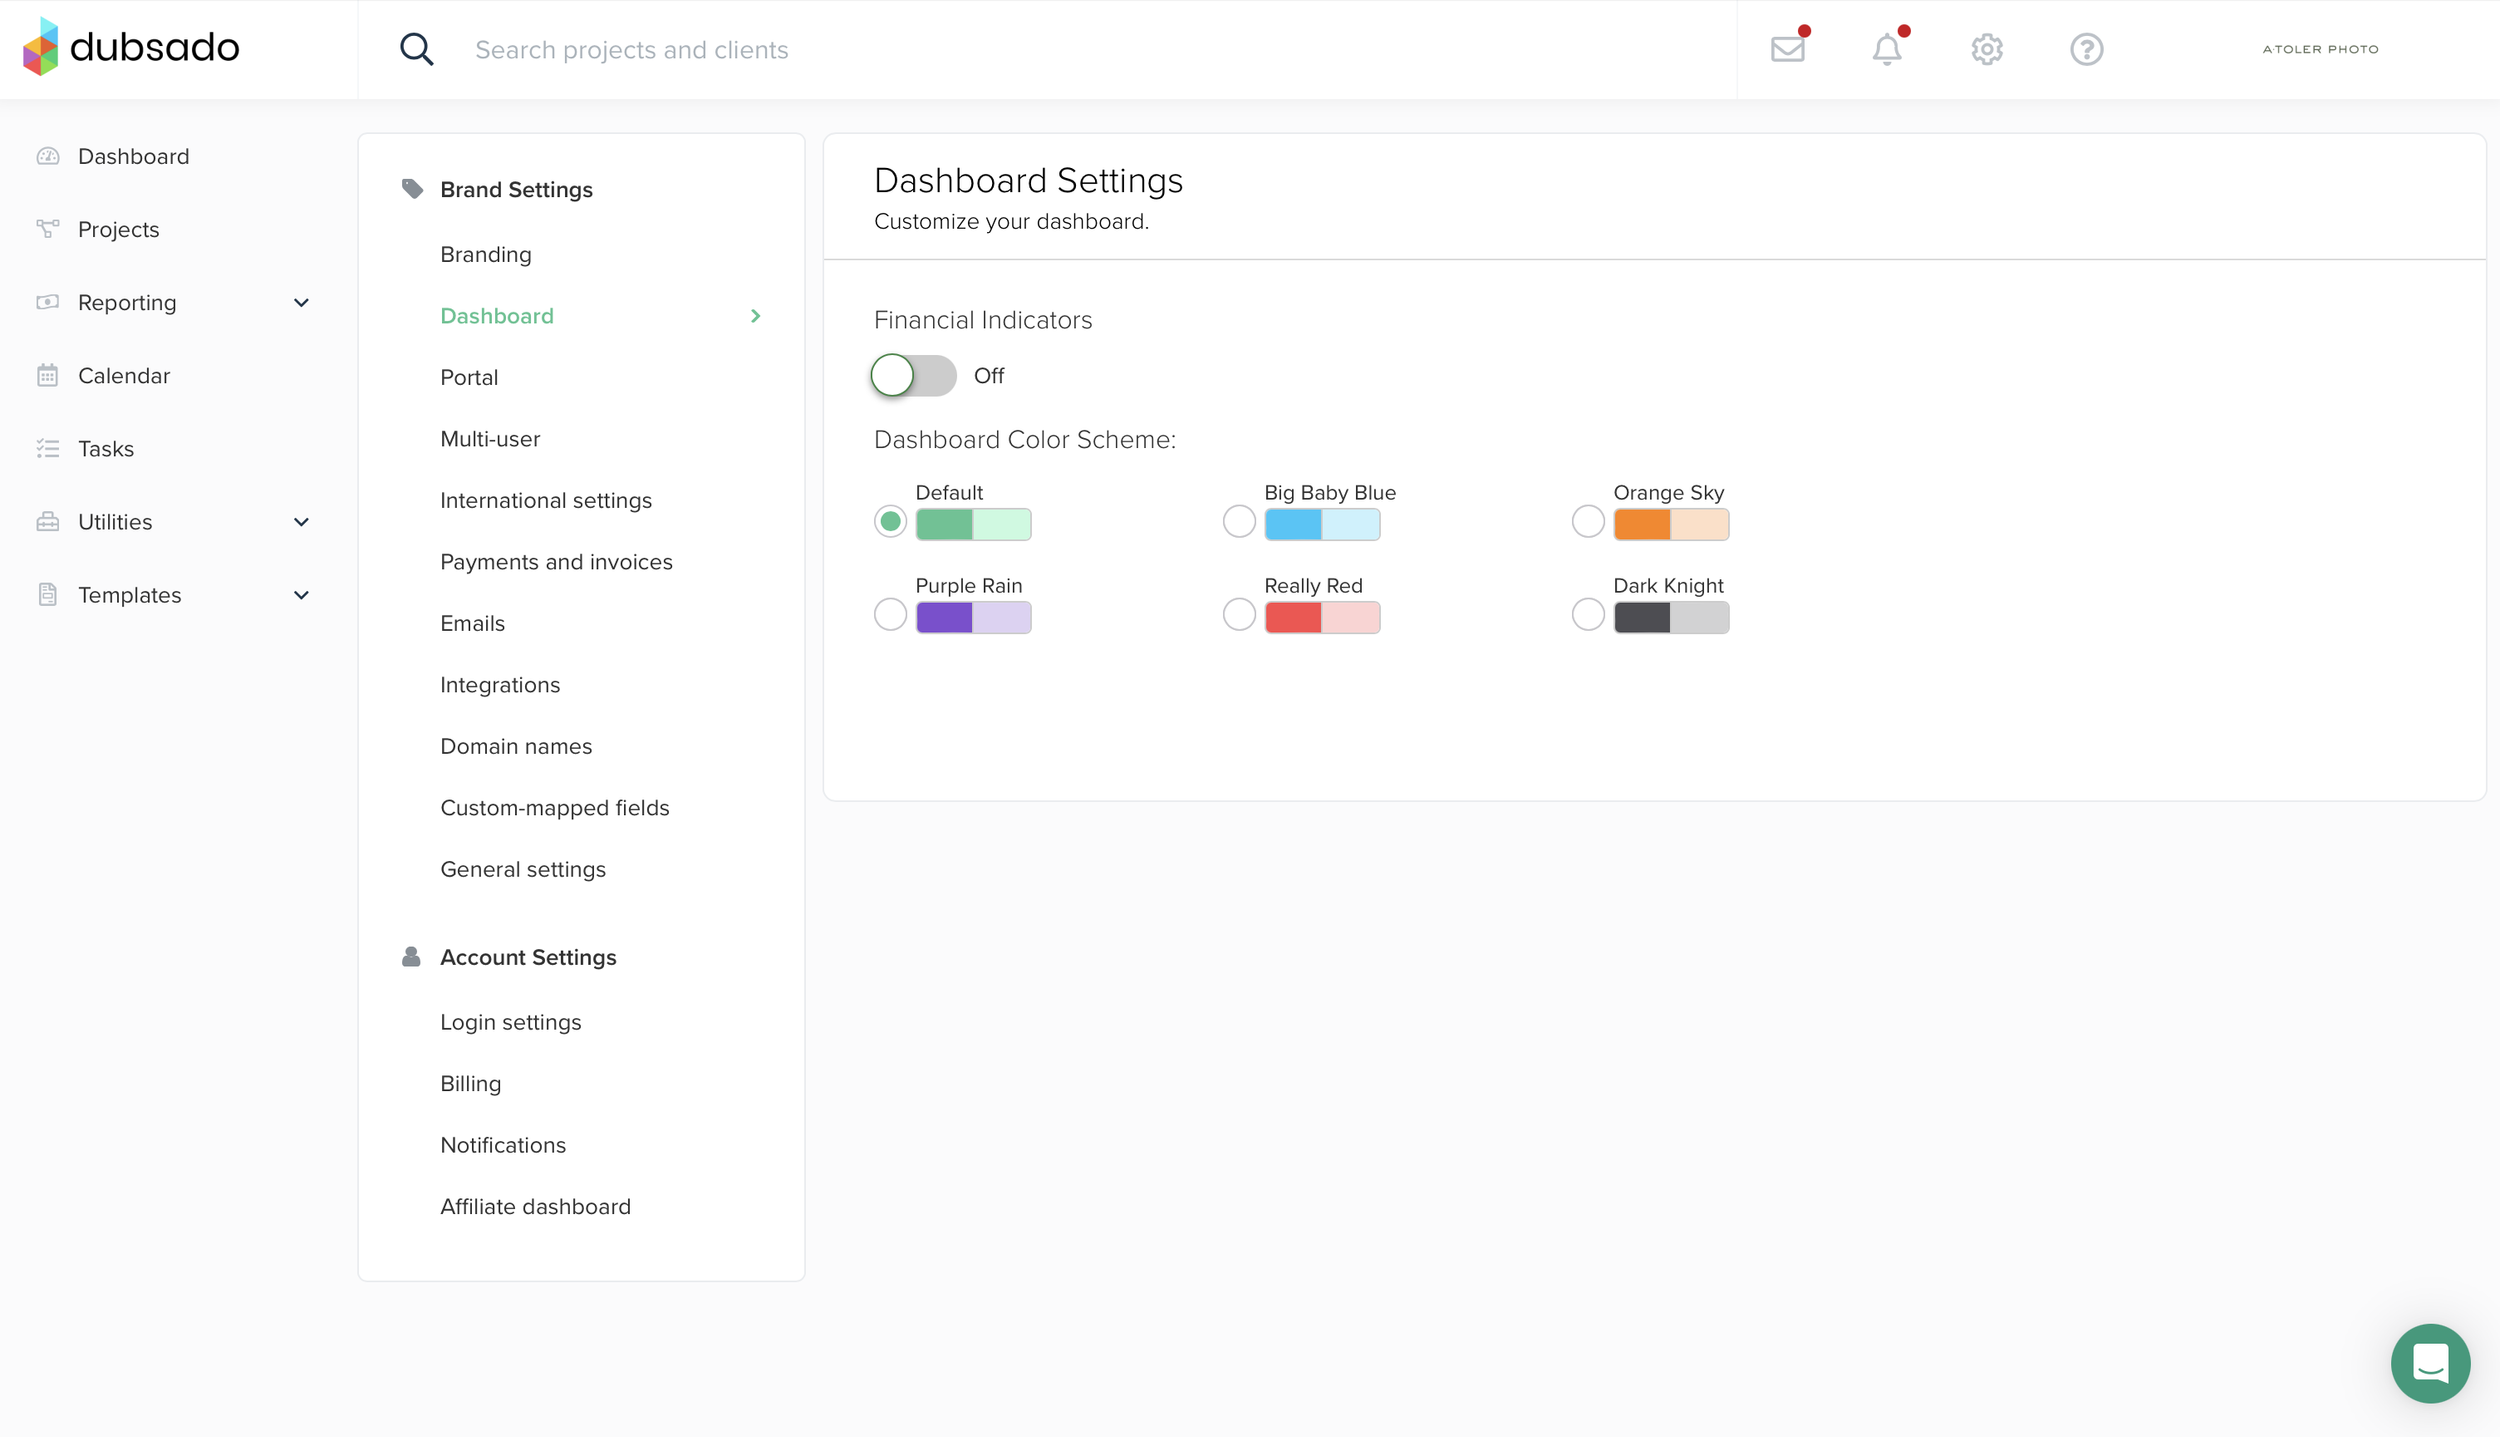
Next is the menu “Dashboard.” All this section does is allow you to pick which color you would like to see as the main color in the software. This appears only for you, and not your client. I kept mine at default because it seems easier to navigate with, and because my favorite color is green :)
If you toggle off financial indicators, it will hide the three small widgets you saw before, as shown below:
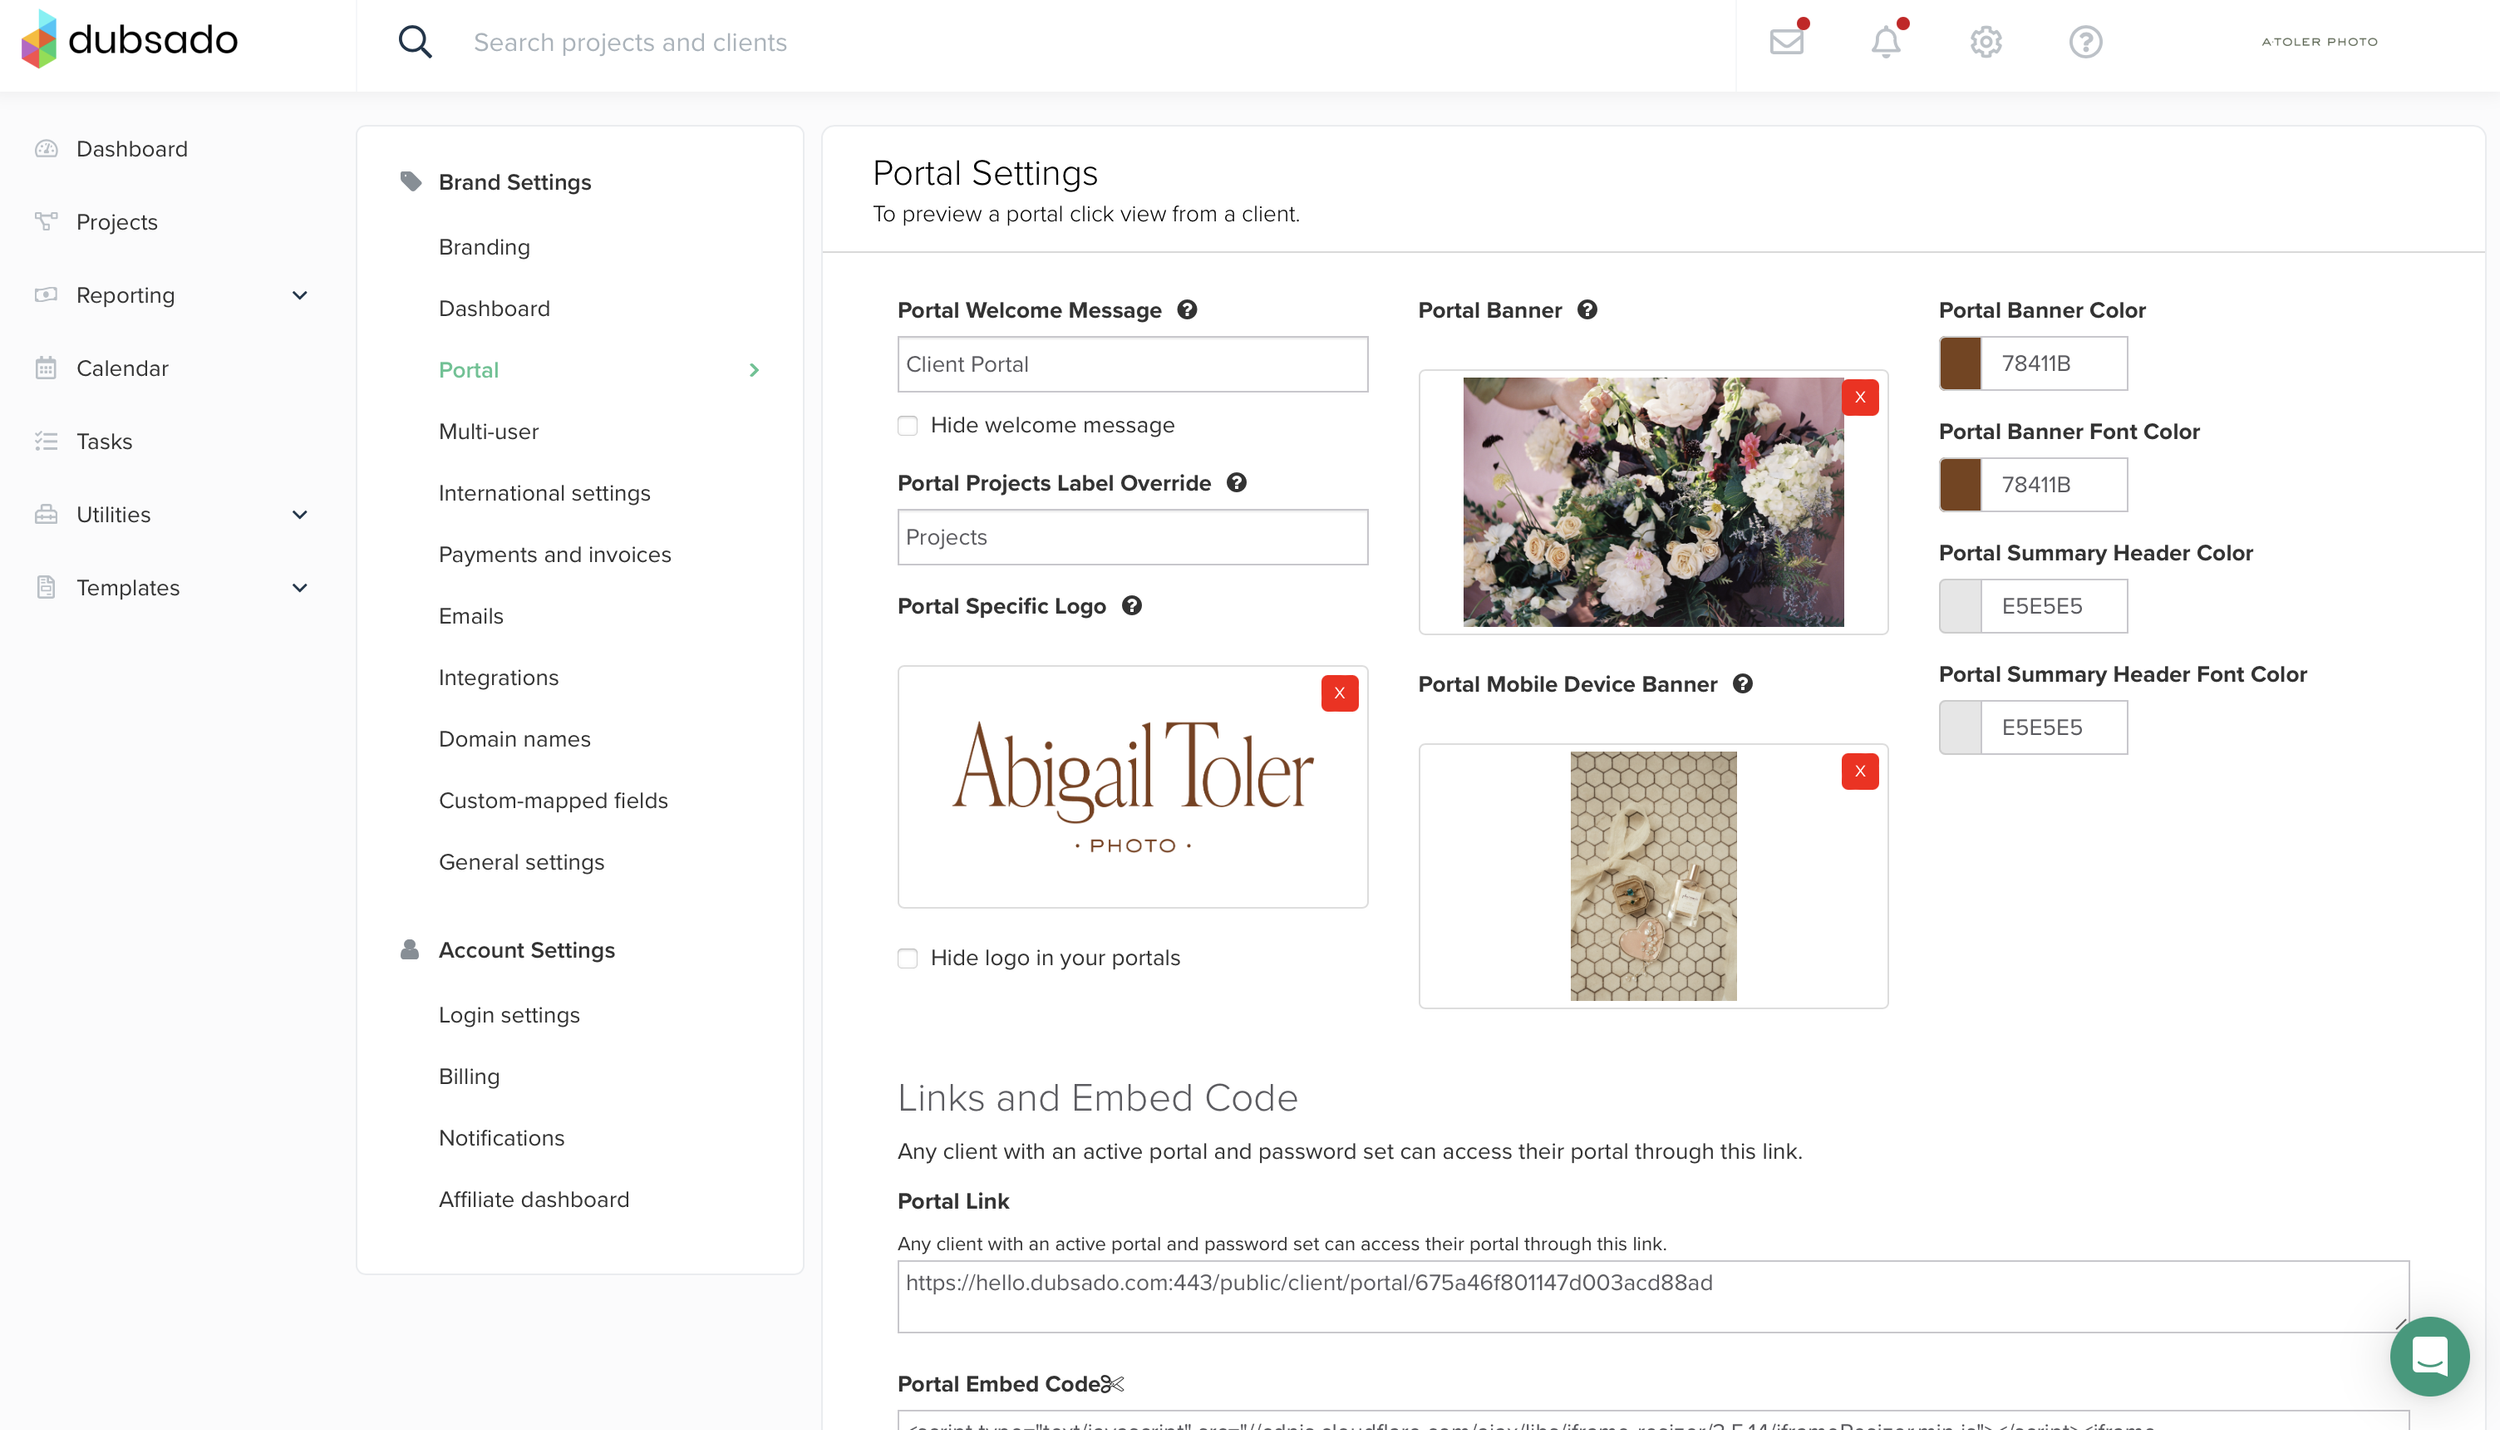
Next, we get to set up how your client’s portal will appear to them. Add a welcome message, photos for mobile and desktop, as well as your brand colors and what logo you want them to see.
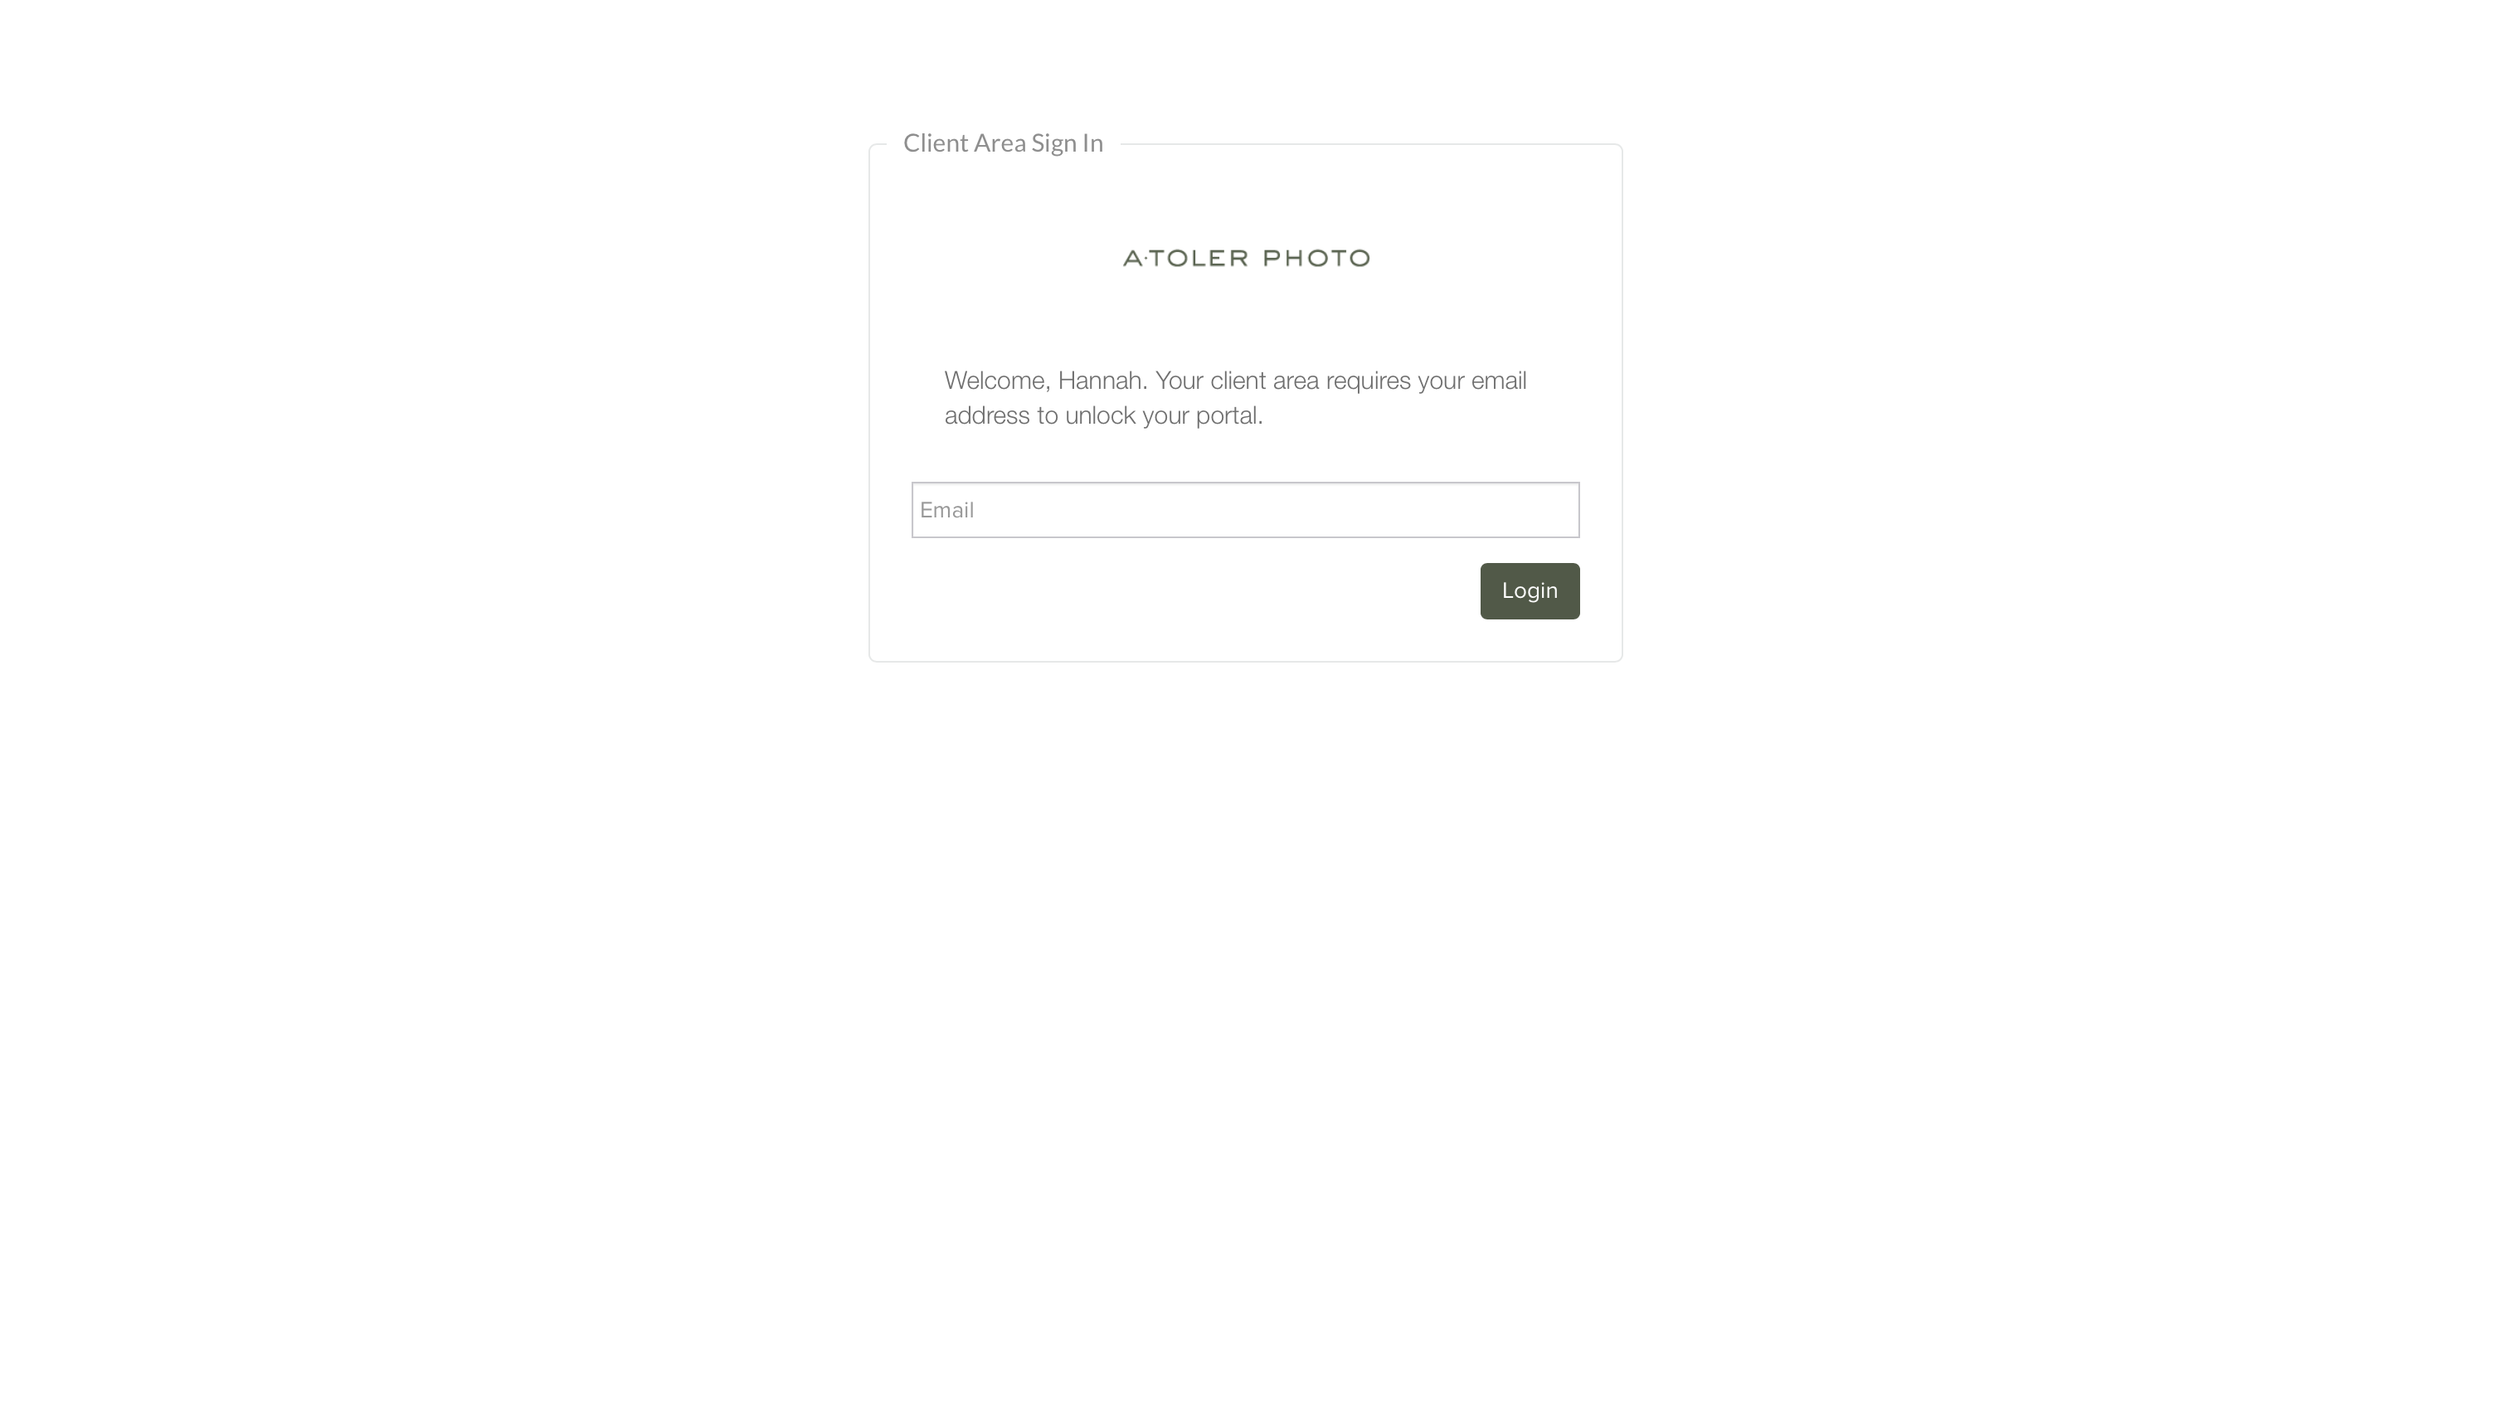
Later, we’ll look at how you can set a password in each project for each client. If you don’t want them to have to remember a password, you don’t have to set a password and they can log in by simply inputting their email. This is what it will look like to them:
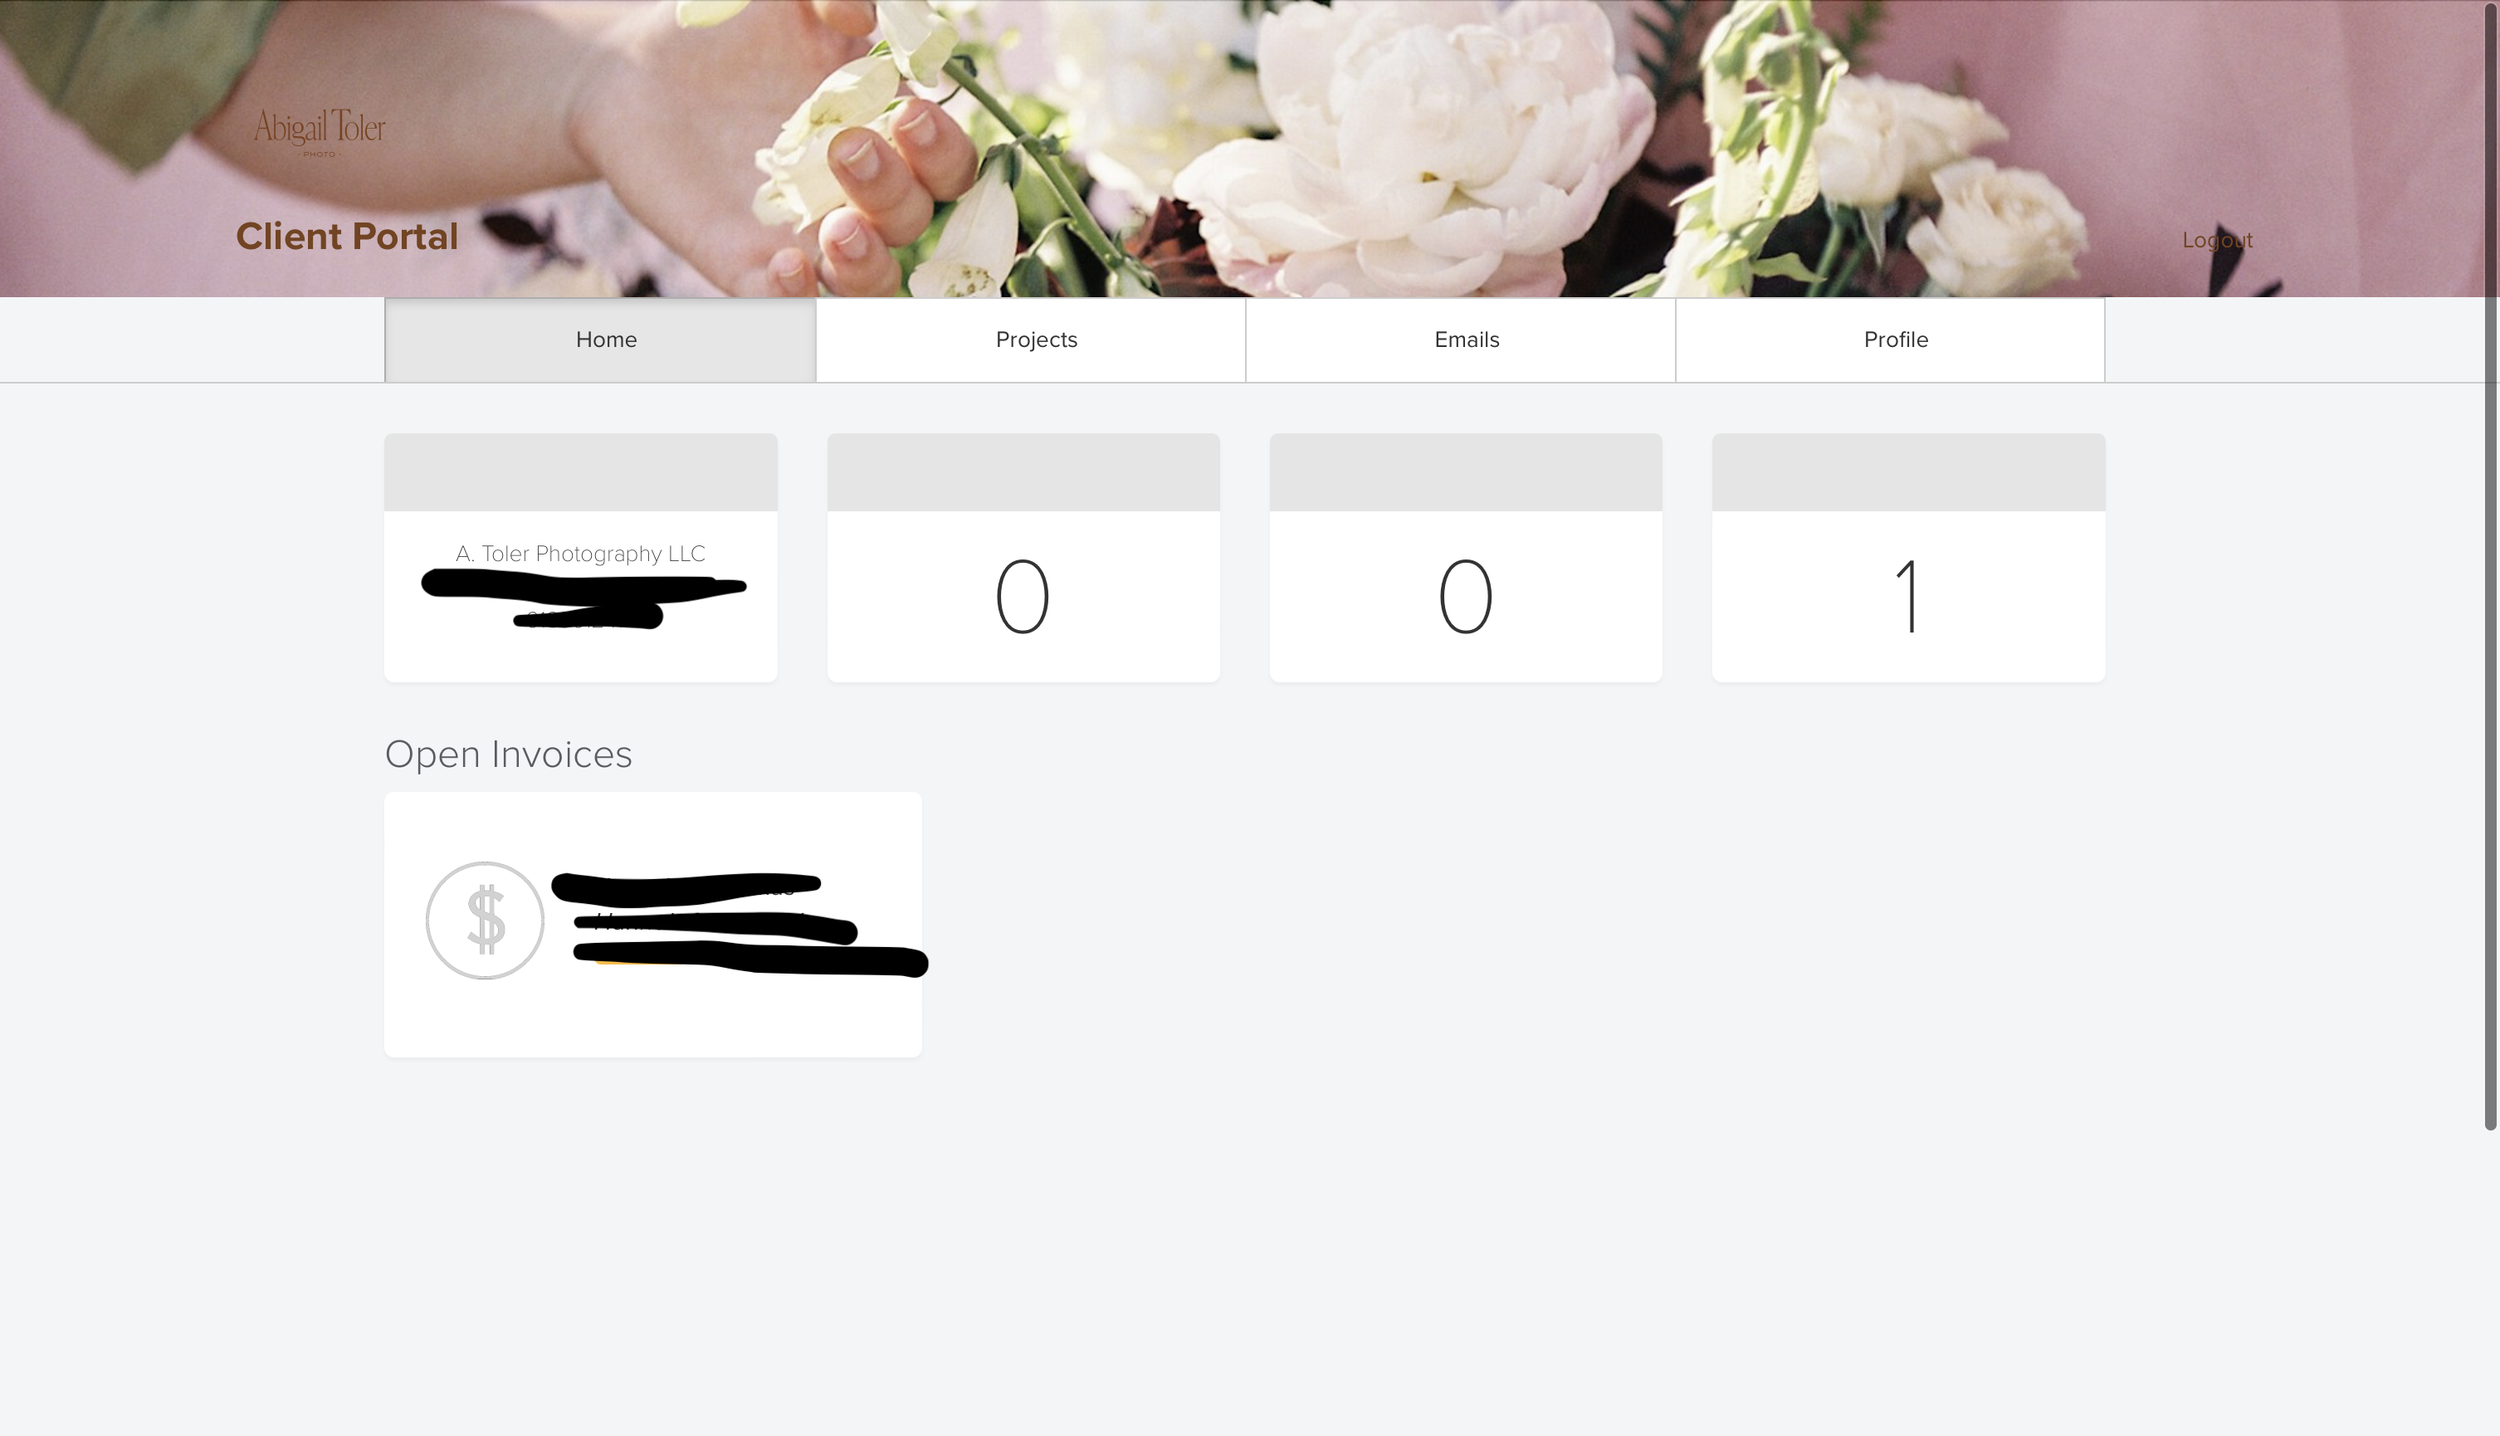
Once they enter their email, this is what they will see. You can now see the welcome message, photo, and colors you set in action.
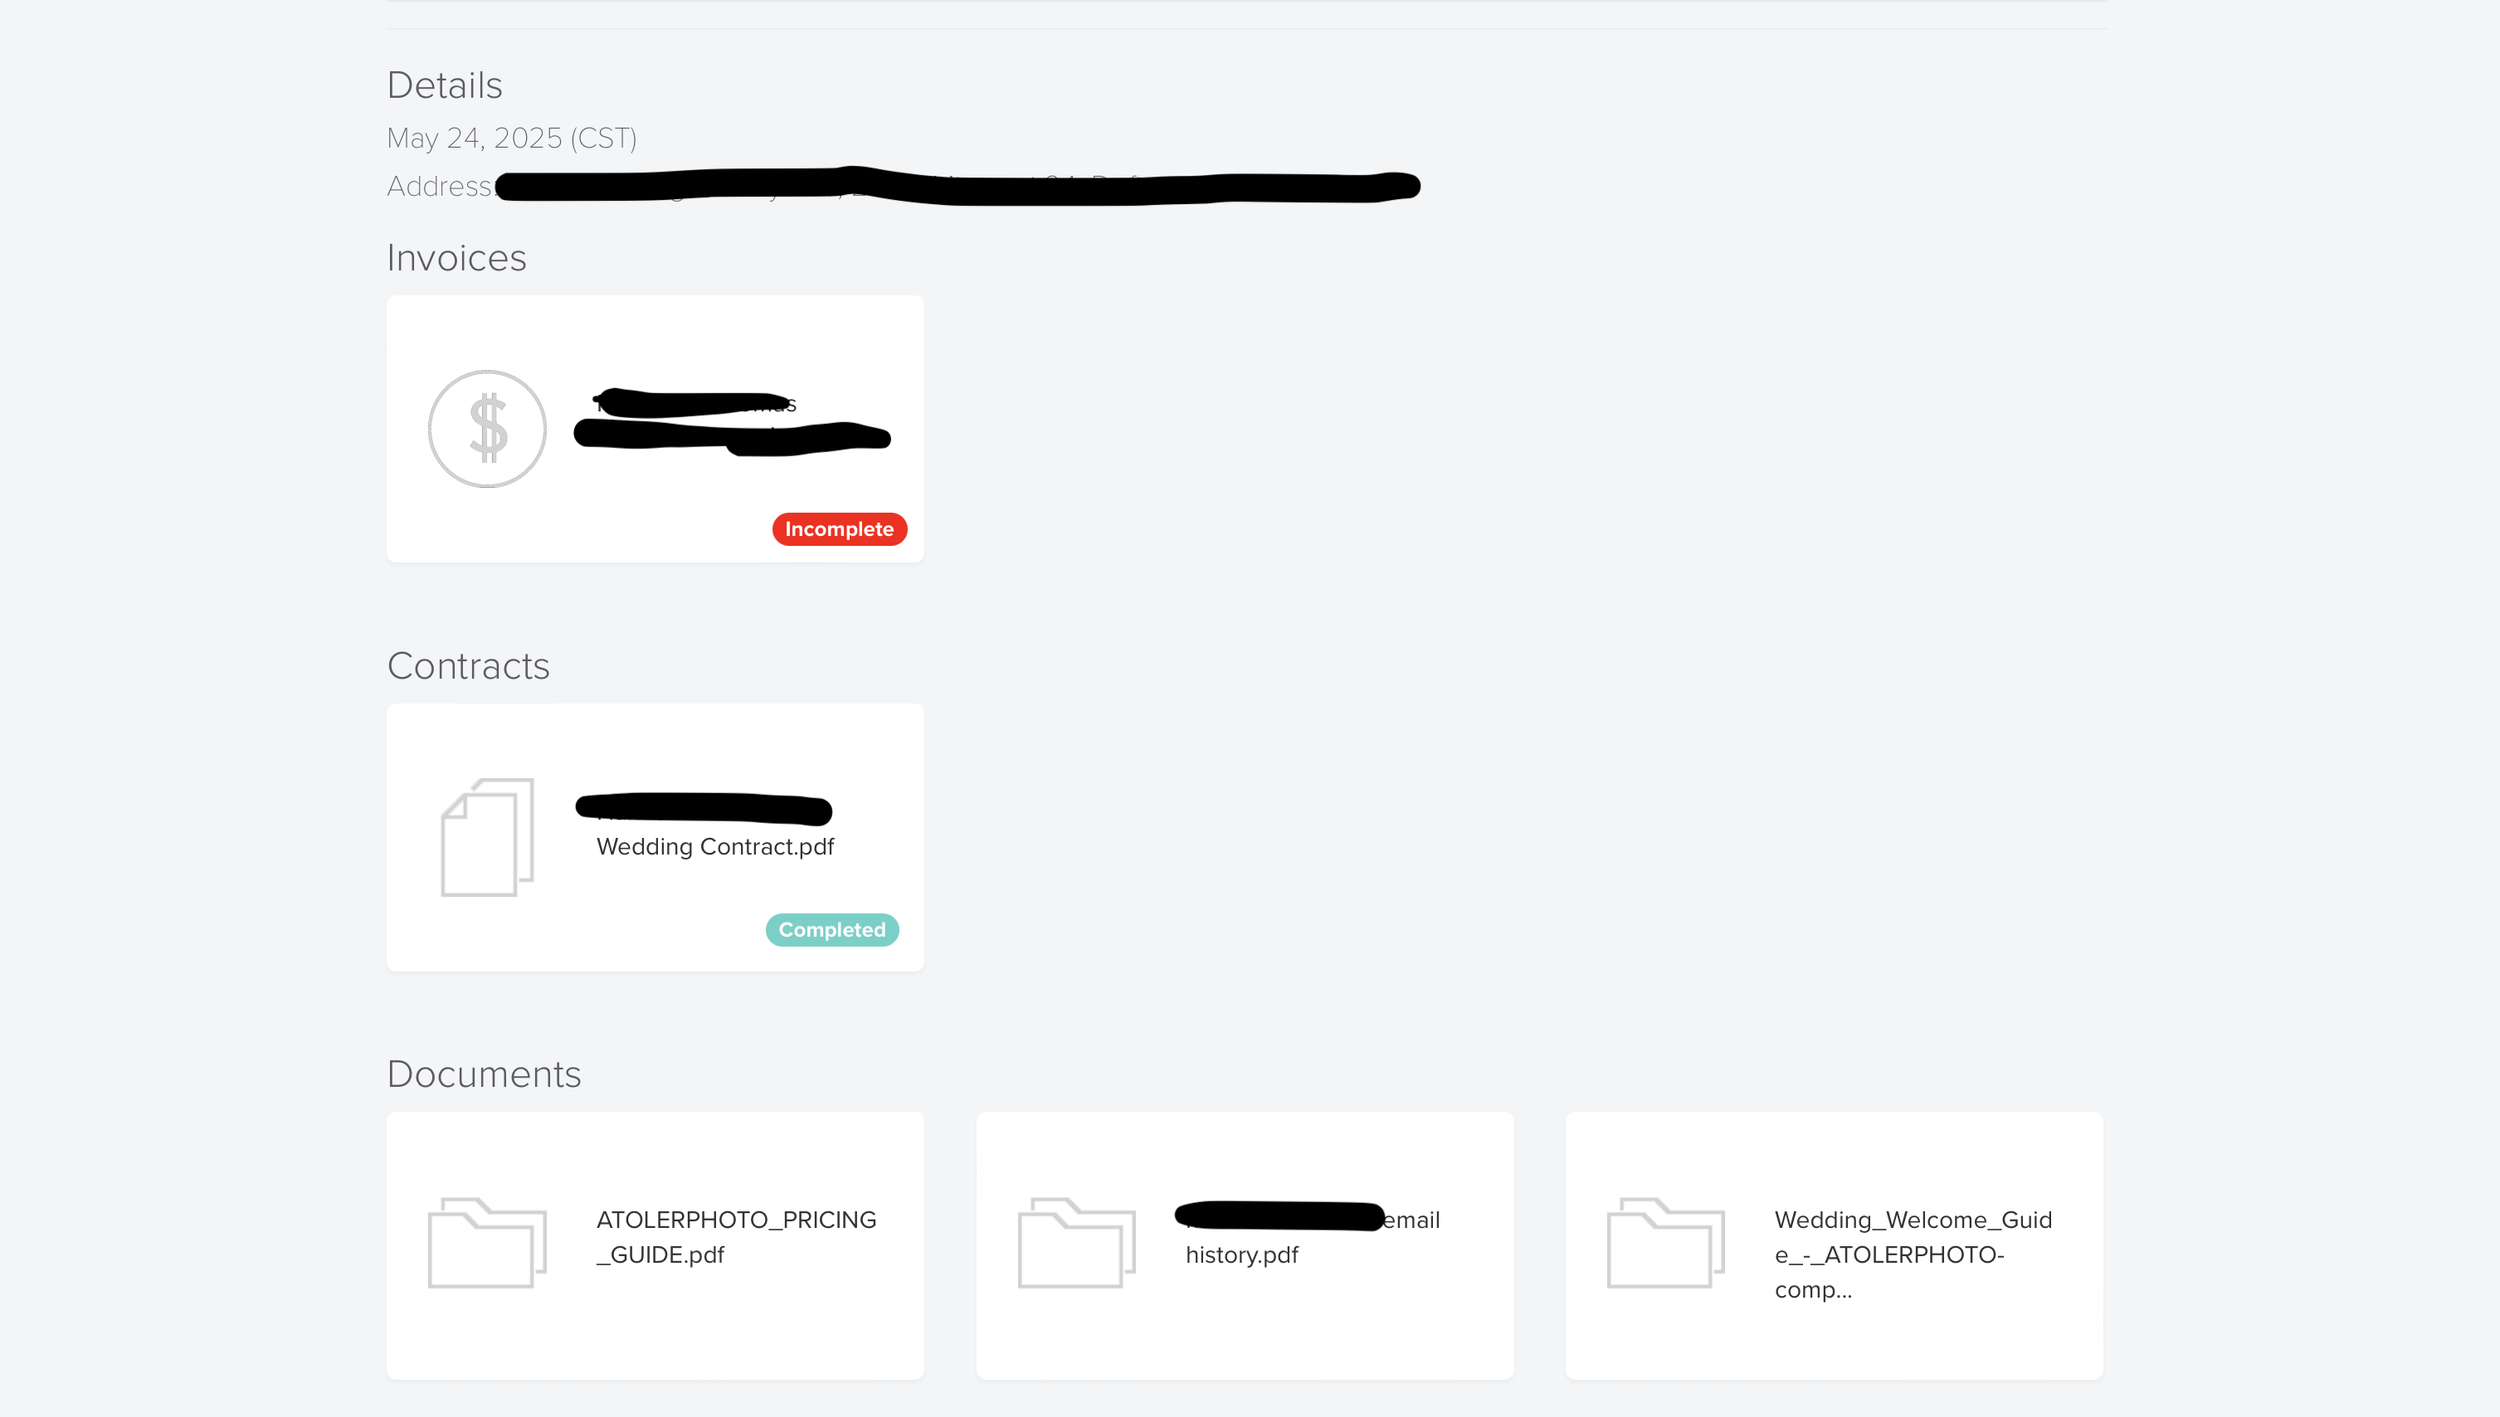
In the projects tab, they will find their contract, invoice, and any other documents you’ve uploaded or sent them, like pricing guides.
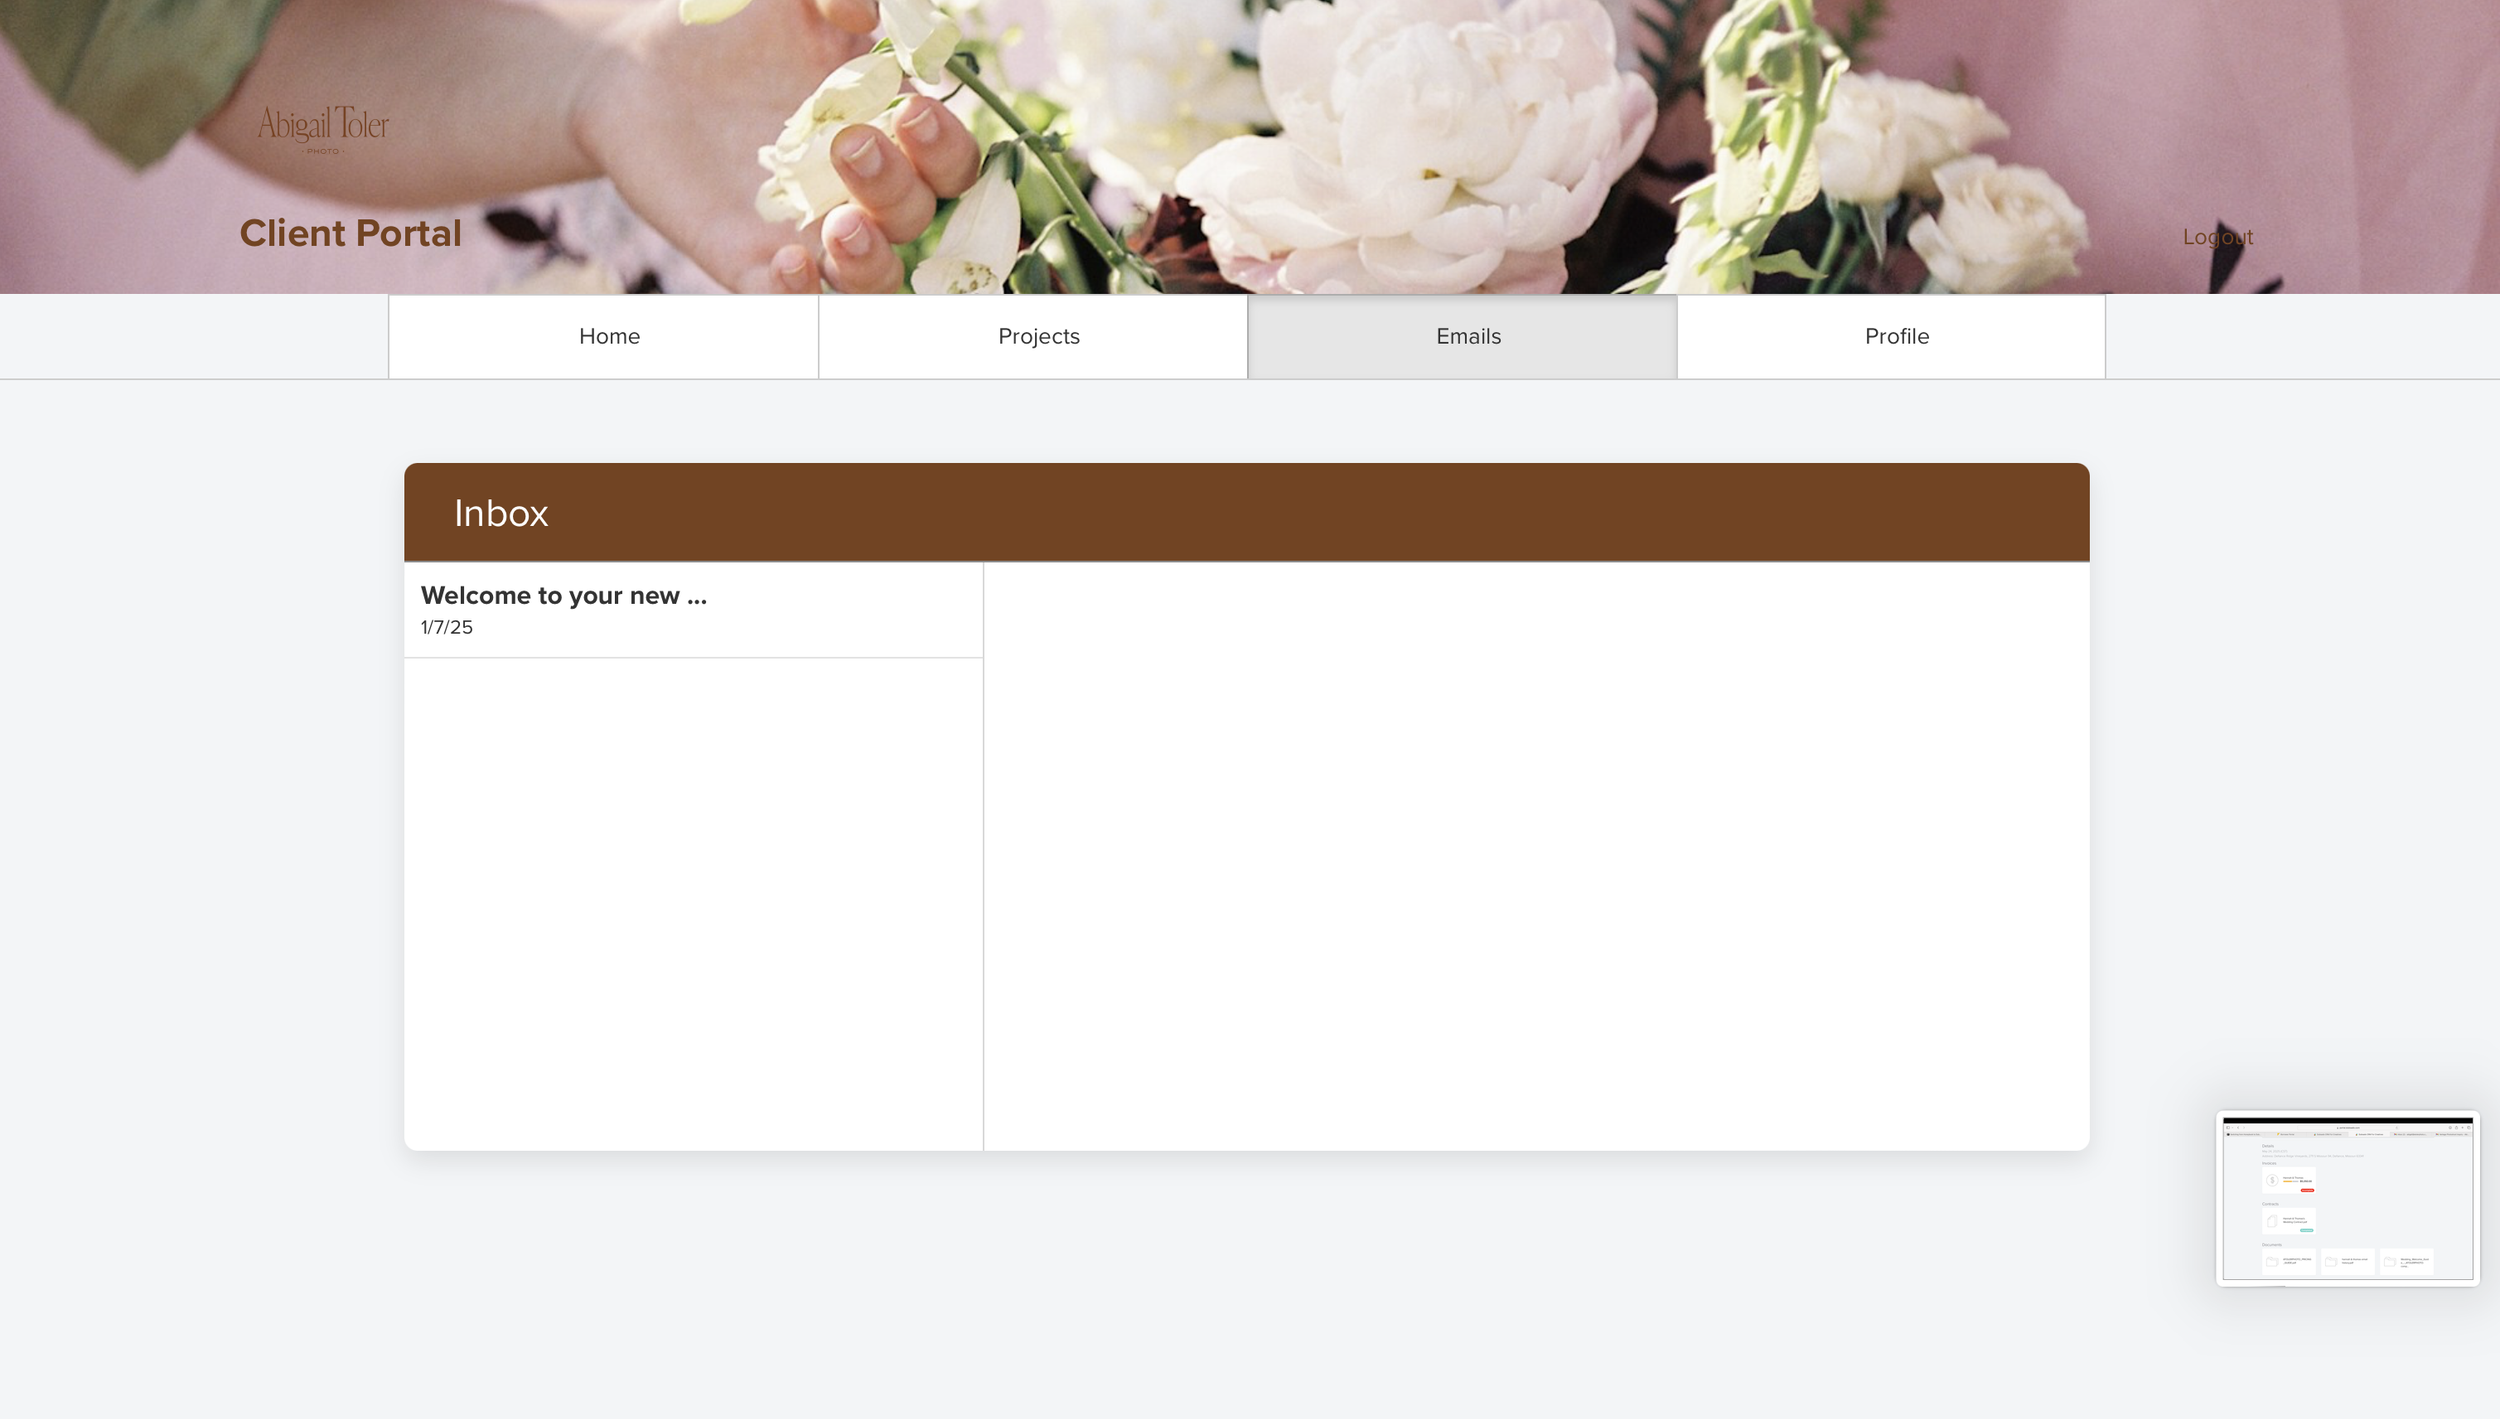
The emails button shows your email history. These email and threads also show up in your regular email inbox. If your client sends you any emails directly from their regular email inbox without using their portal, or separately sends you an email that is not in reply to an email you sent through Dubsado, it will not show up in this inbox.
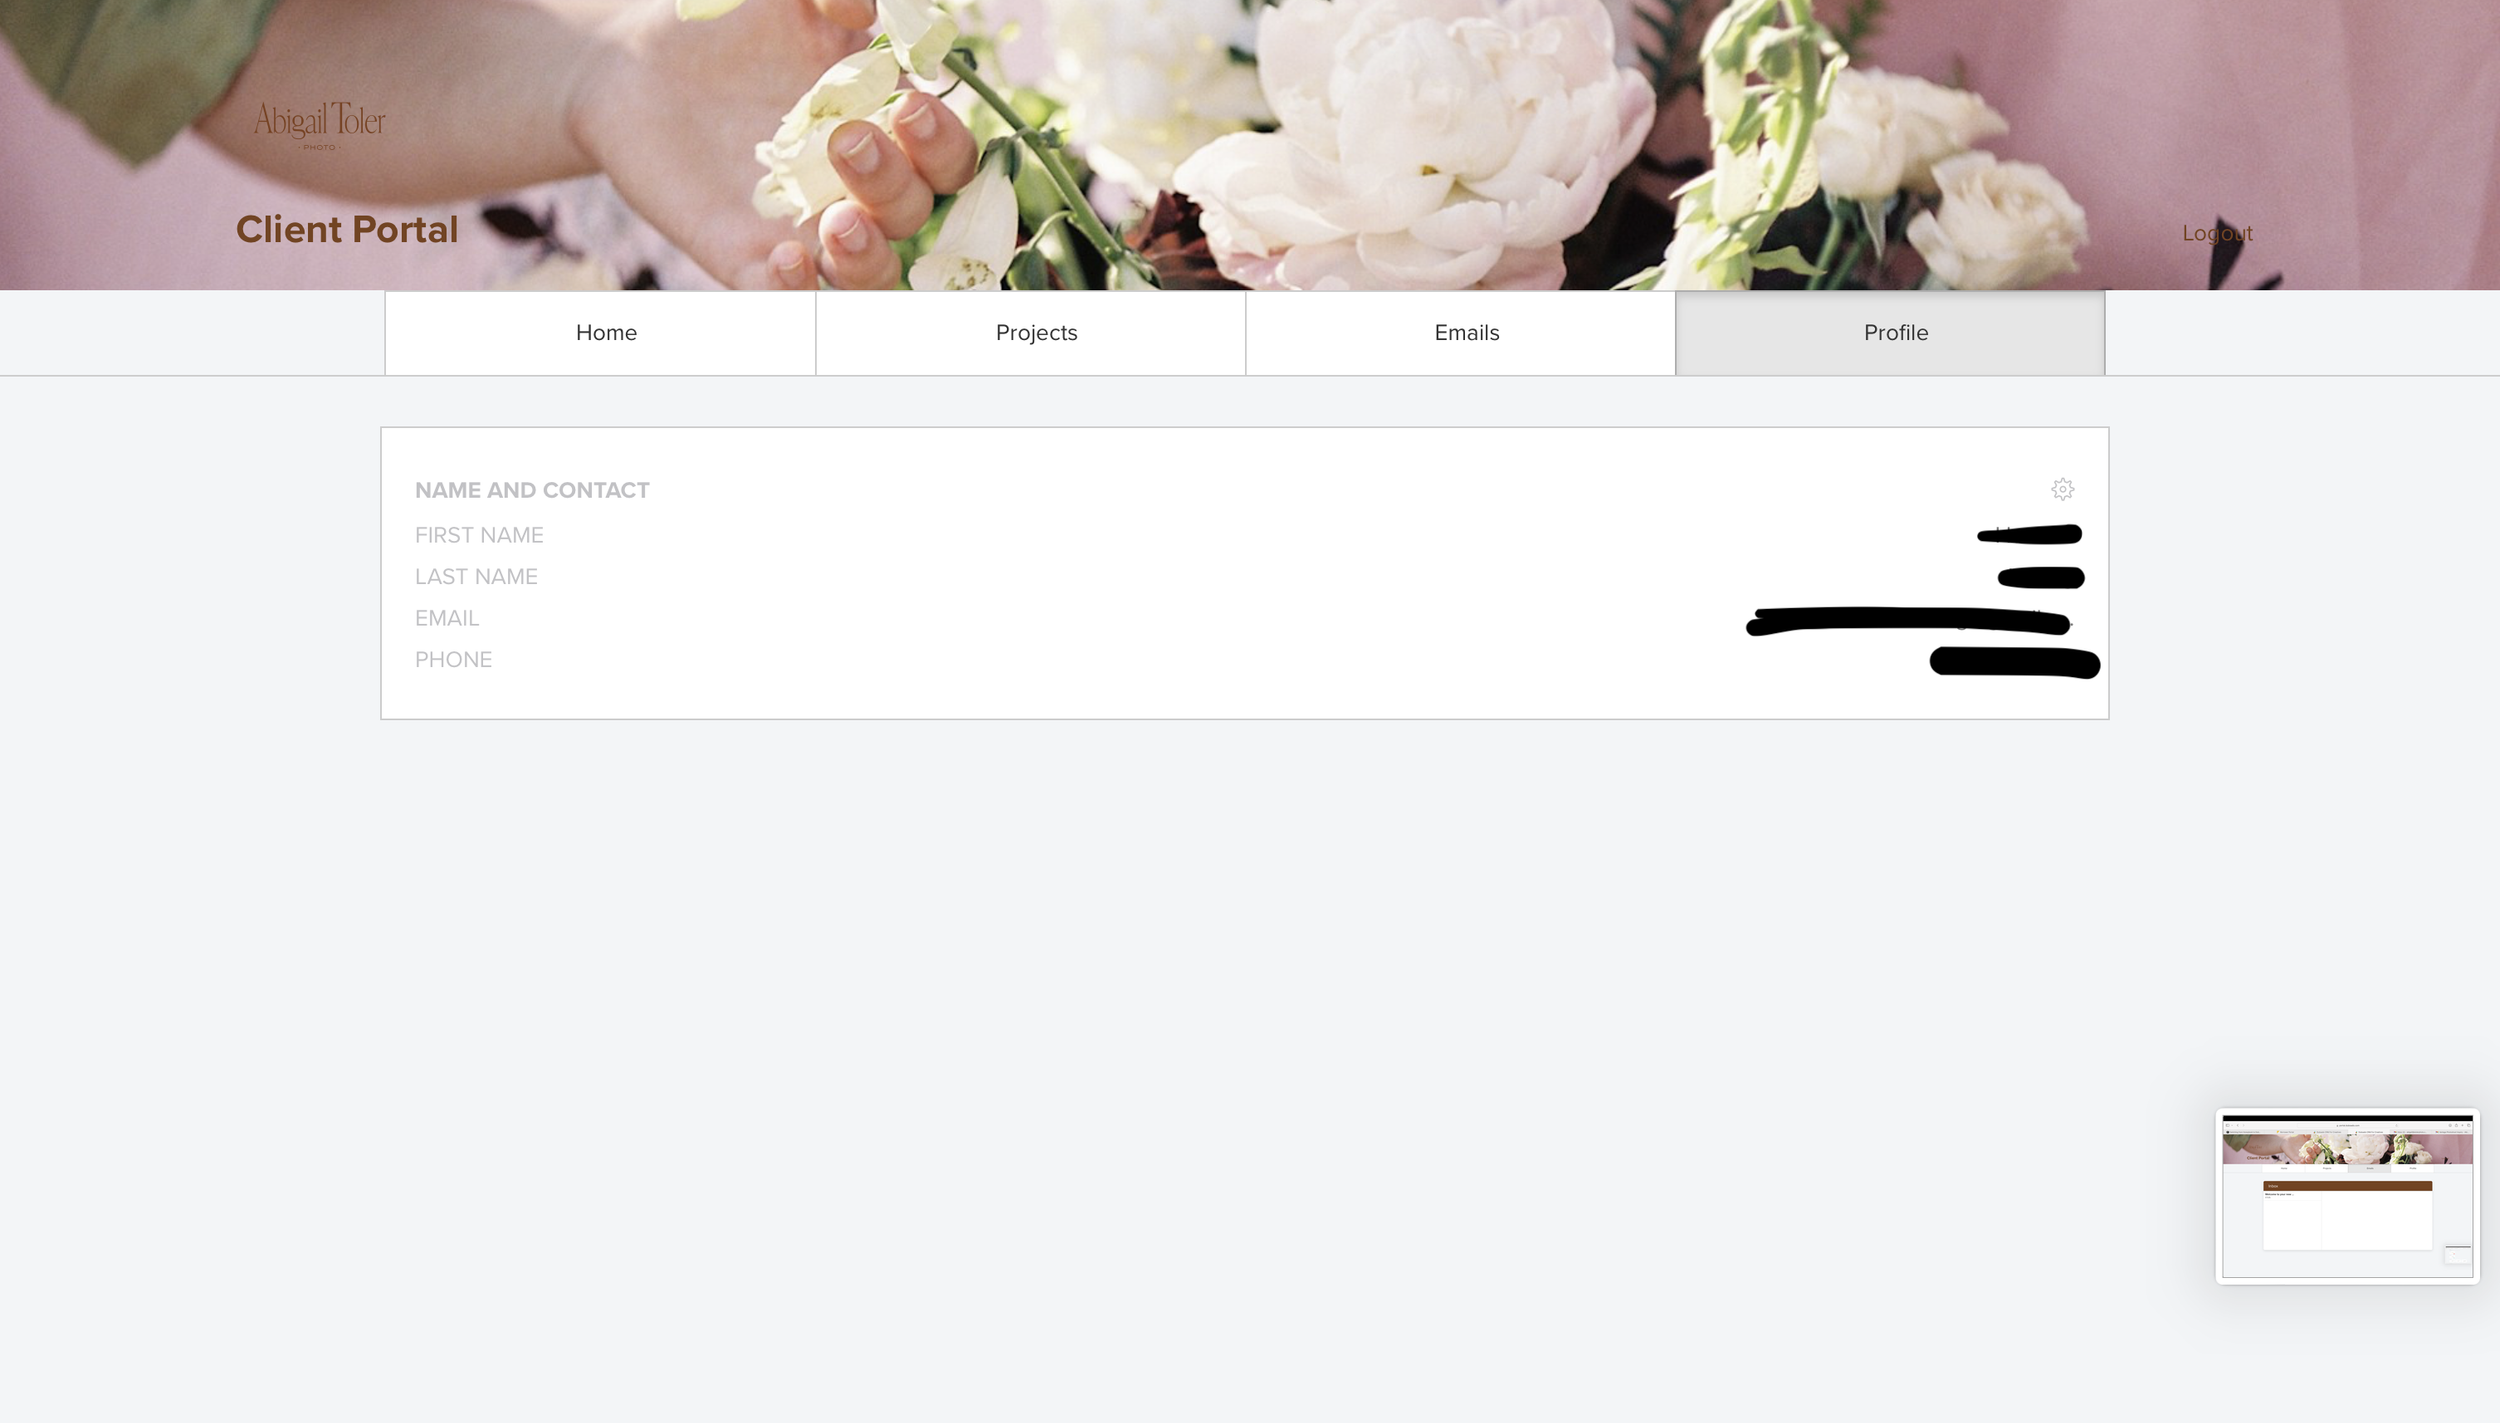
The profile tab holds their basic client contact info. As you can see, everything is easy to understand and simple to navigate for you and your client. I know it still might look very strange now, especially if you’ve been used to Honeybook. But it will start looking normal very soon.
Since my business is comprised of me and me only, I skip the multi-users section. If you have employees and need to use it, Dubsado has an article about it here: Multi-Users.
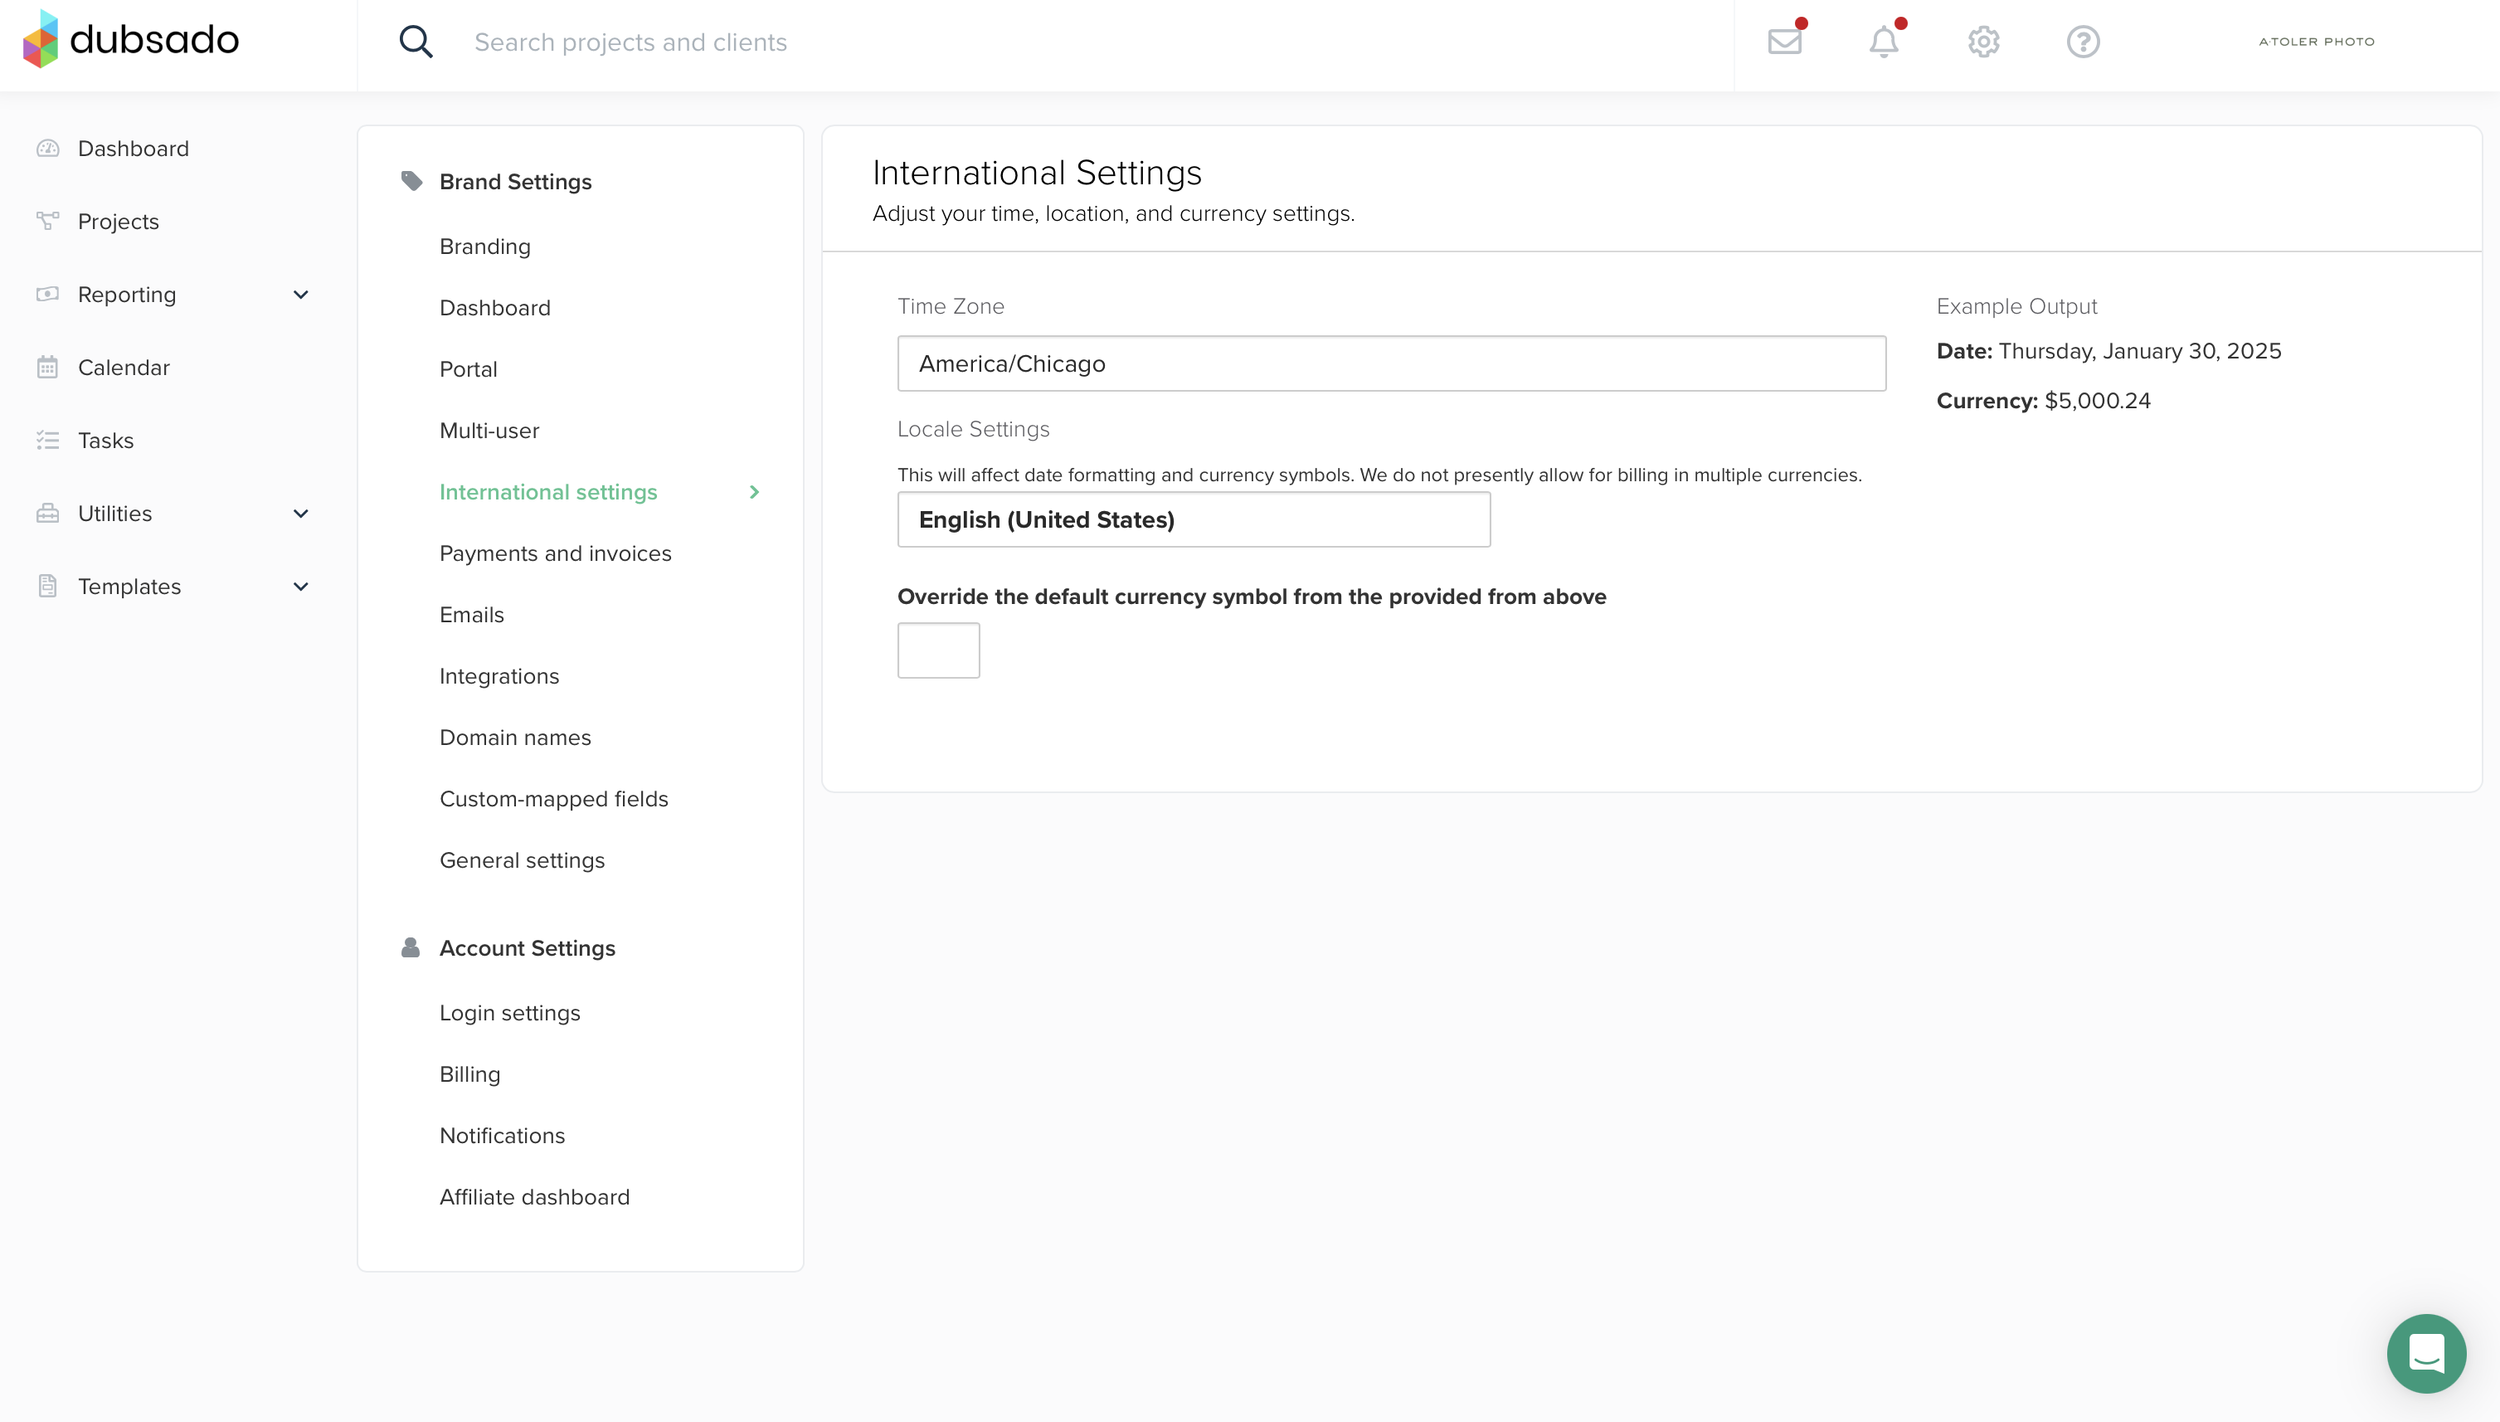
In the International Settings, set your time zone, language, and currency.
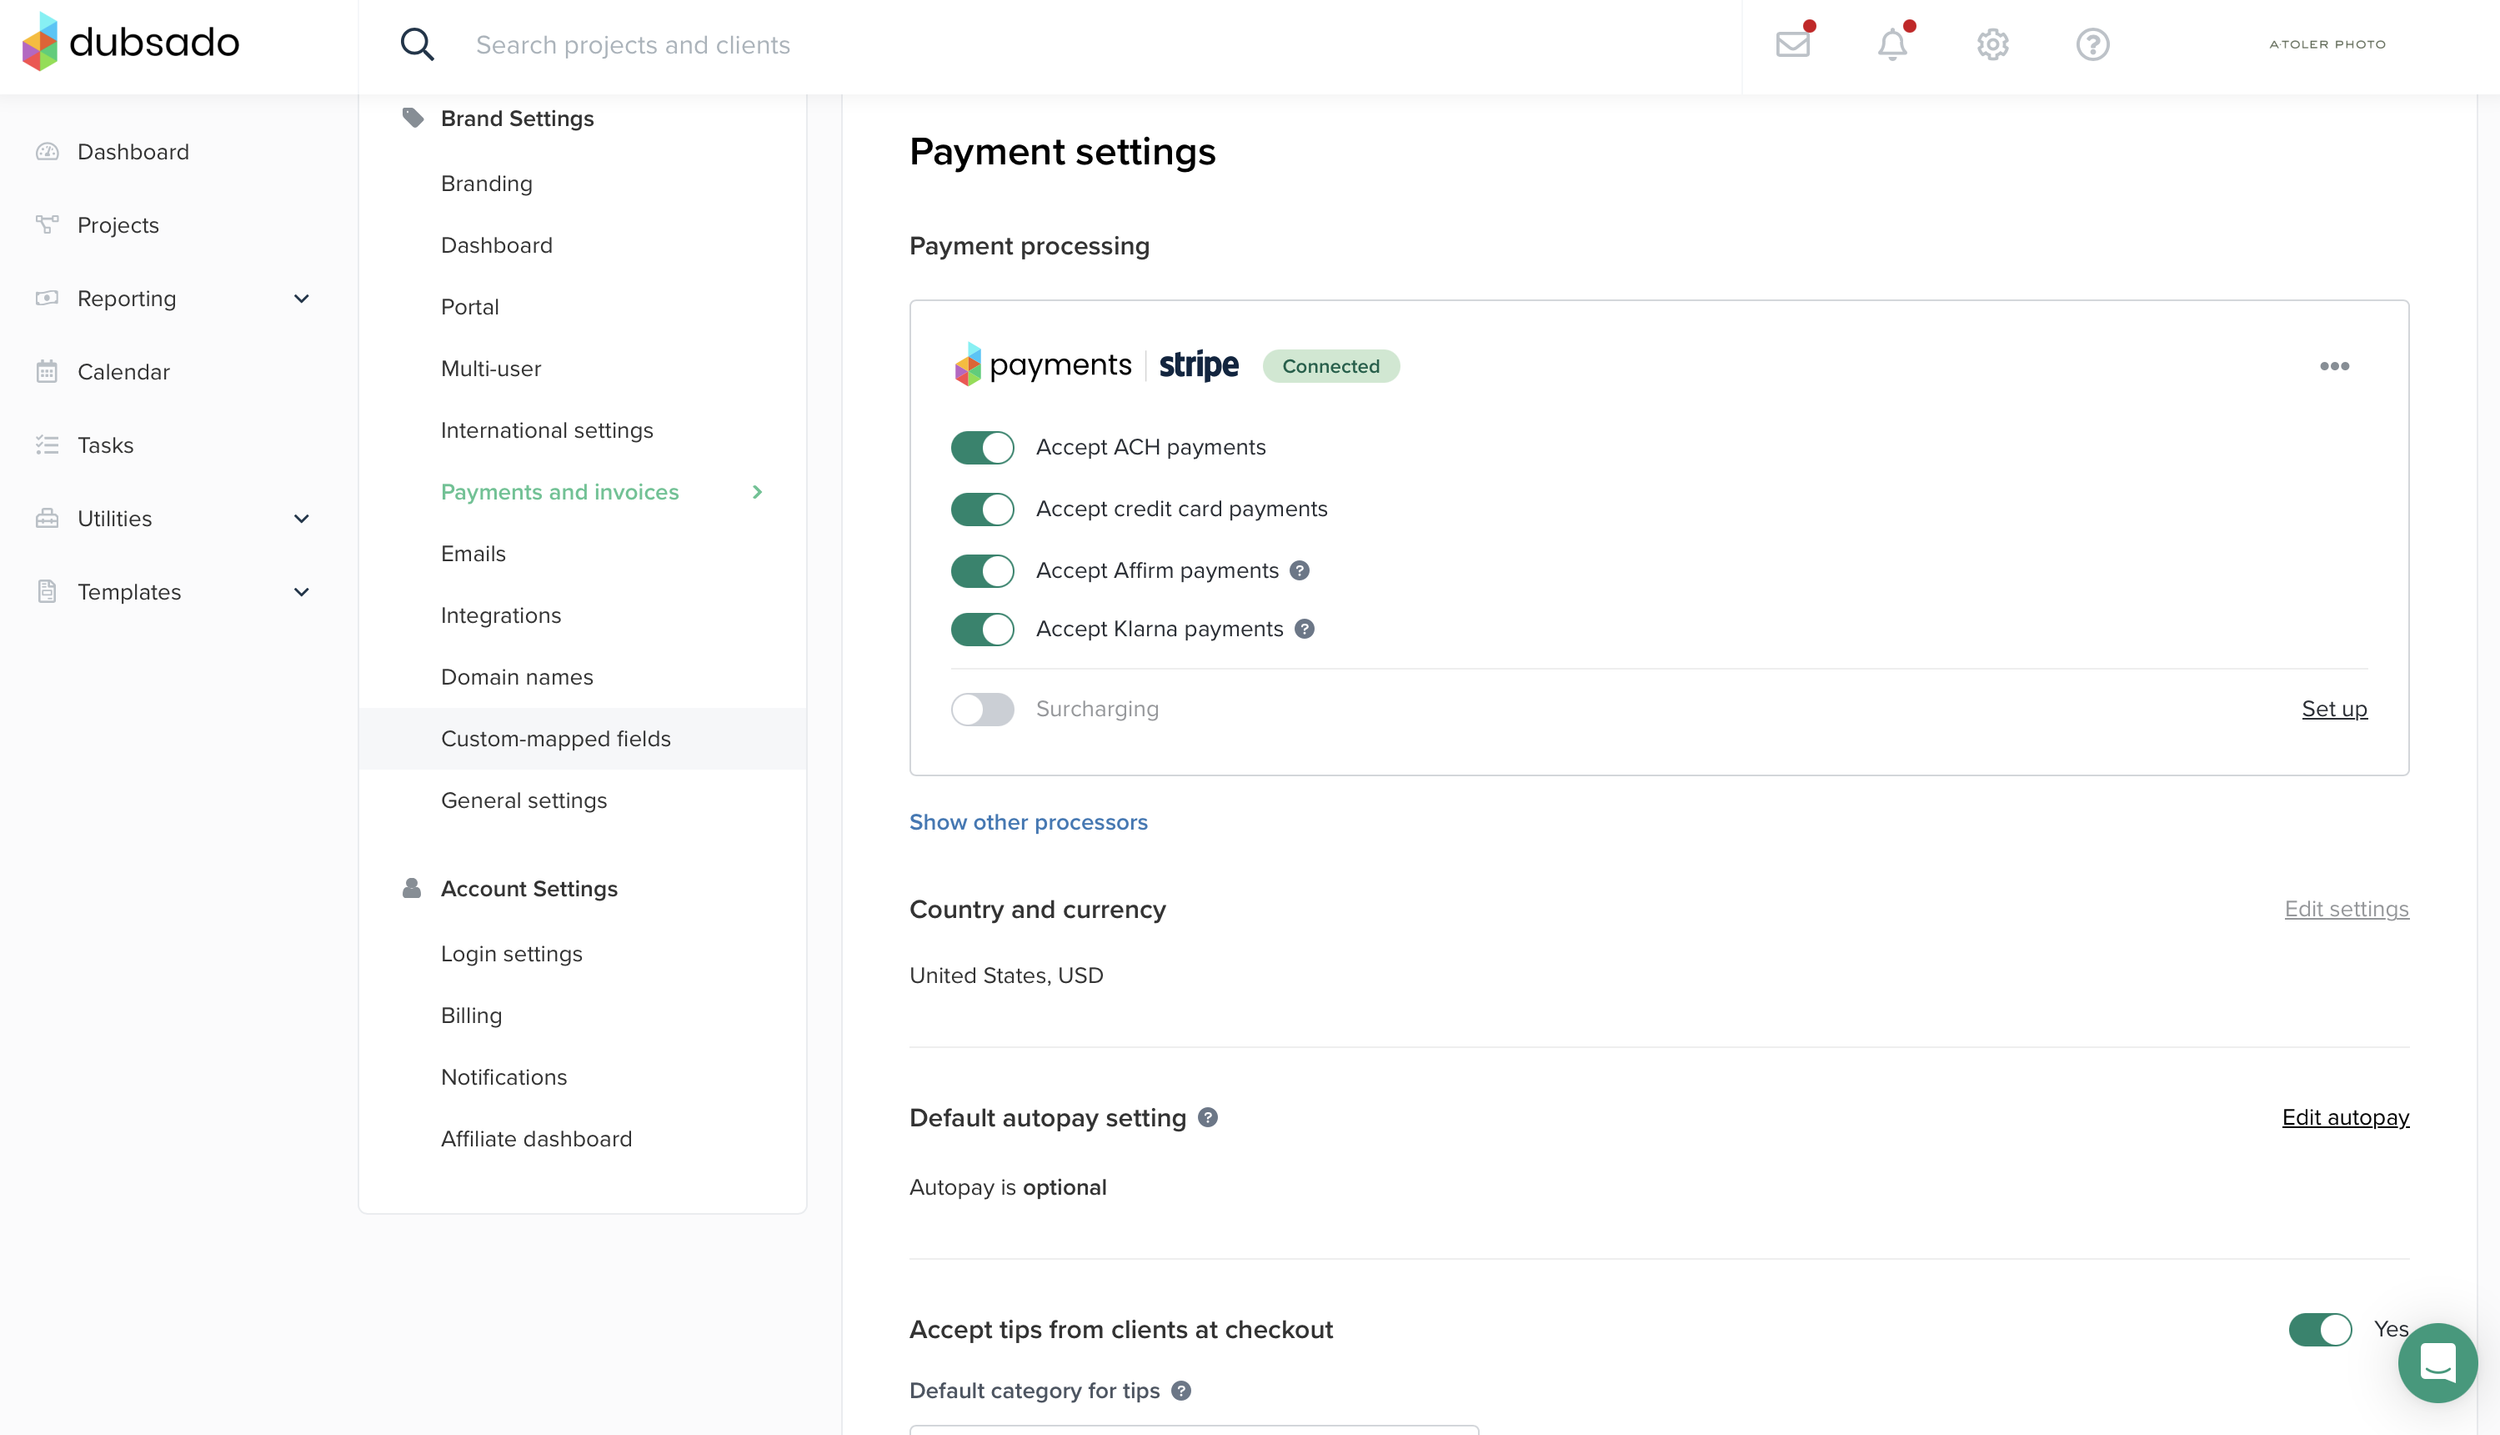
Next, add how your clients will pay you in “Payments and Invoices.” Like Honeybook, Dubsado has its own payment method. Unlike Honeybook, it uses Stripe. It’s fairly easy to set up and the website will walk you through all the steps. I was able to set it up without a hitch the first time. Also like Honeybook, it charges a 2.9% credit card process fee. You can also setup Square or PayPal if you use those instead.
If you scroll down, you can adjust simple settings related to how your invoices appear to your clients. Once that is taken care of, your payments and invoices are ready to go.
Tax is already included in my packages, so I don’t add it as a separate fee in my invoices, so I leave the taxes toggle off.
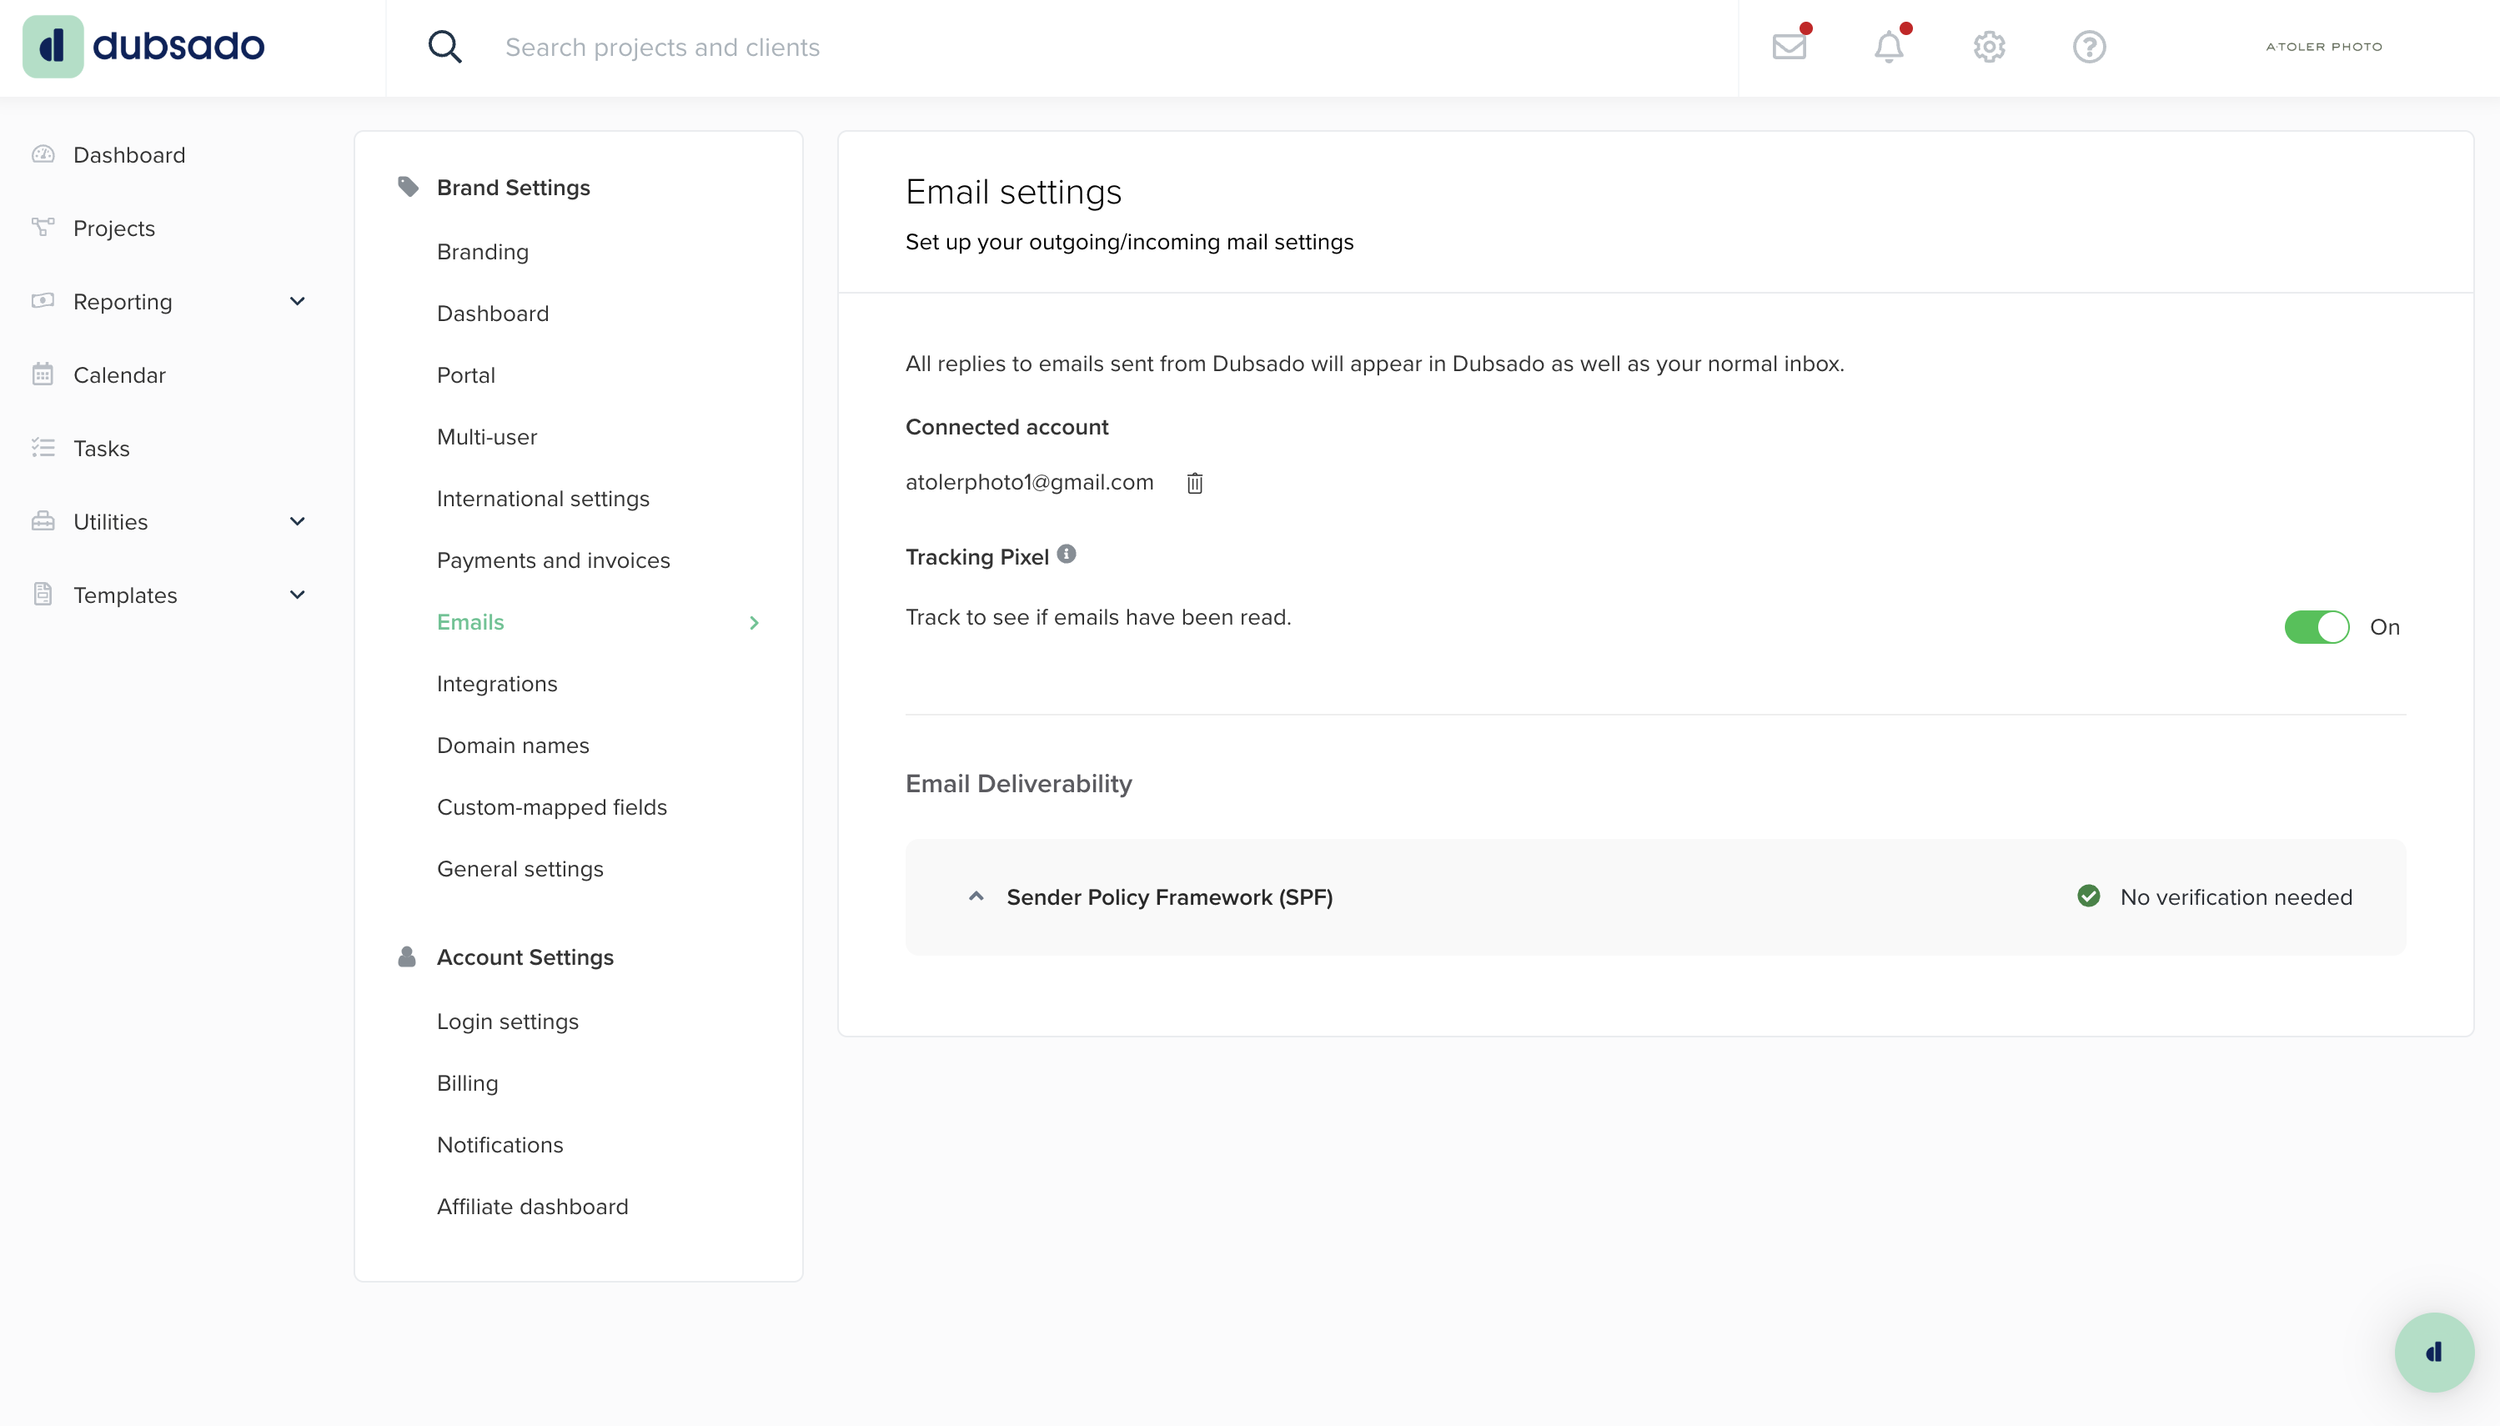
Now it’s time to connect the email you want to use to converse with your clients to your account. If you have a regular email, such as @gmail, @outlook, etc. there should not be a need for extra verification. If you have a custom domain with your business name, such as @atolerphoto, you would need to take a few extra steps for verification so that Dubsado can make sure your emails do not go to your clients’ spam folders. If you need to take this step, you can use this help article to get it done: SPF Records.
I did not change anything in Integrations, Domain Names, and Custom-Mapped Fields as they did not apply to me. But if you use other softwares like Quickbooks, Zapier, Zoom, etc. then you’ll want to connect them to your Dubsado account. If you want to make custom URLs for your Dubsado links, then you can do that under Domain Names.
Under Account Settings, you’ll see the email you used to sign into Dubsado. This email can be different than the one you use to email your clients, it is up to your preference. Your Billing plans and history are on the next tab. Before you purchase a plan, make sure you use my referral code ATOLERPHOTO2025 for 20% off your first subscription! You can also use the link: here.
Under Notifications, set up how you want to be notified when things like someone inquires or a client makes a payment occur. You can also pick which email you want these notifications to go to. If you do not enter a different email, it will automatically send them to your login email.
Your basic set up is complete! Now it’s time for the fun things.
projects page
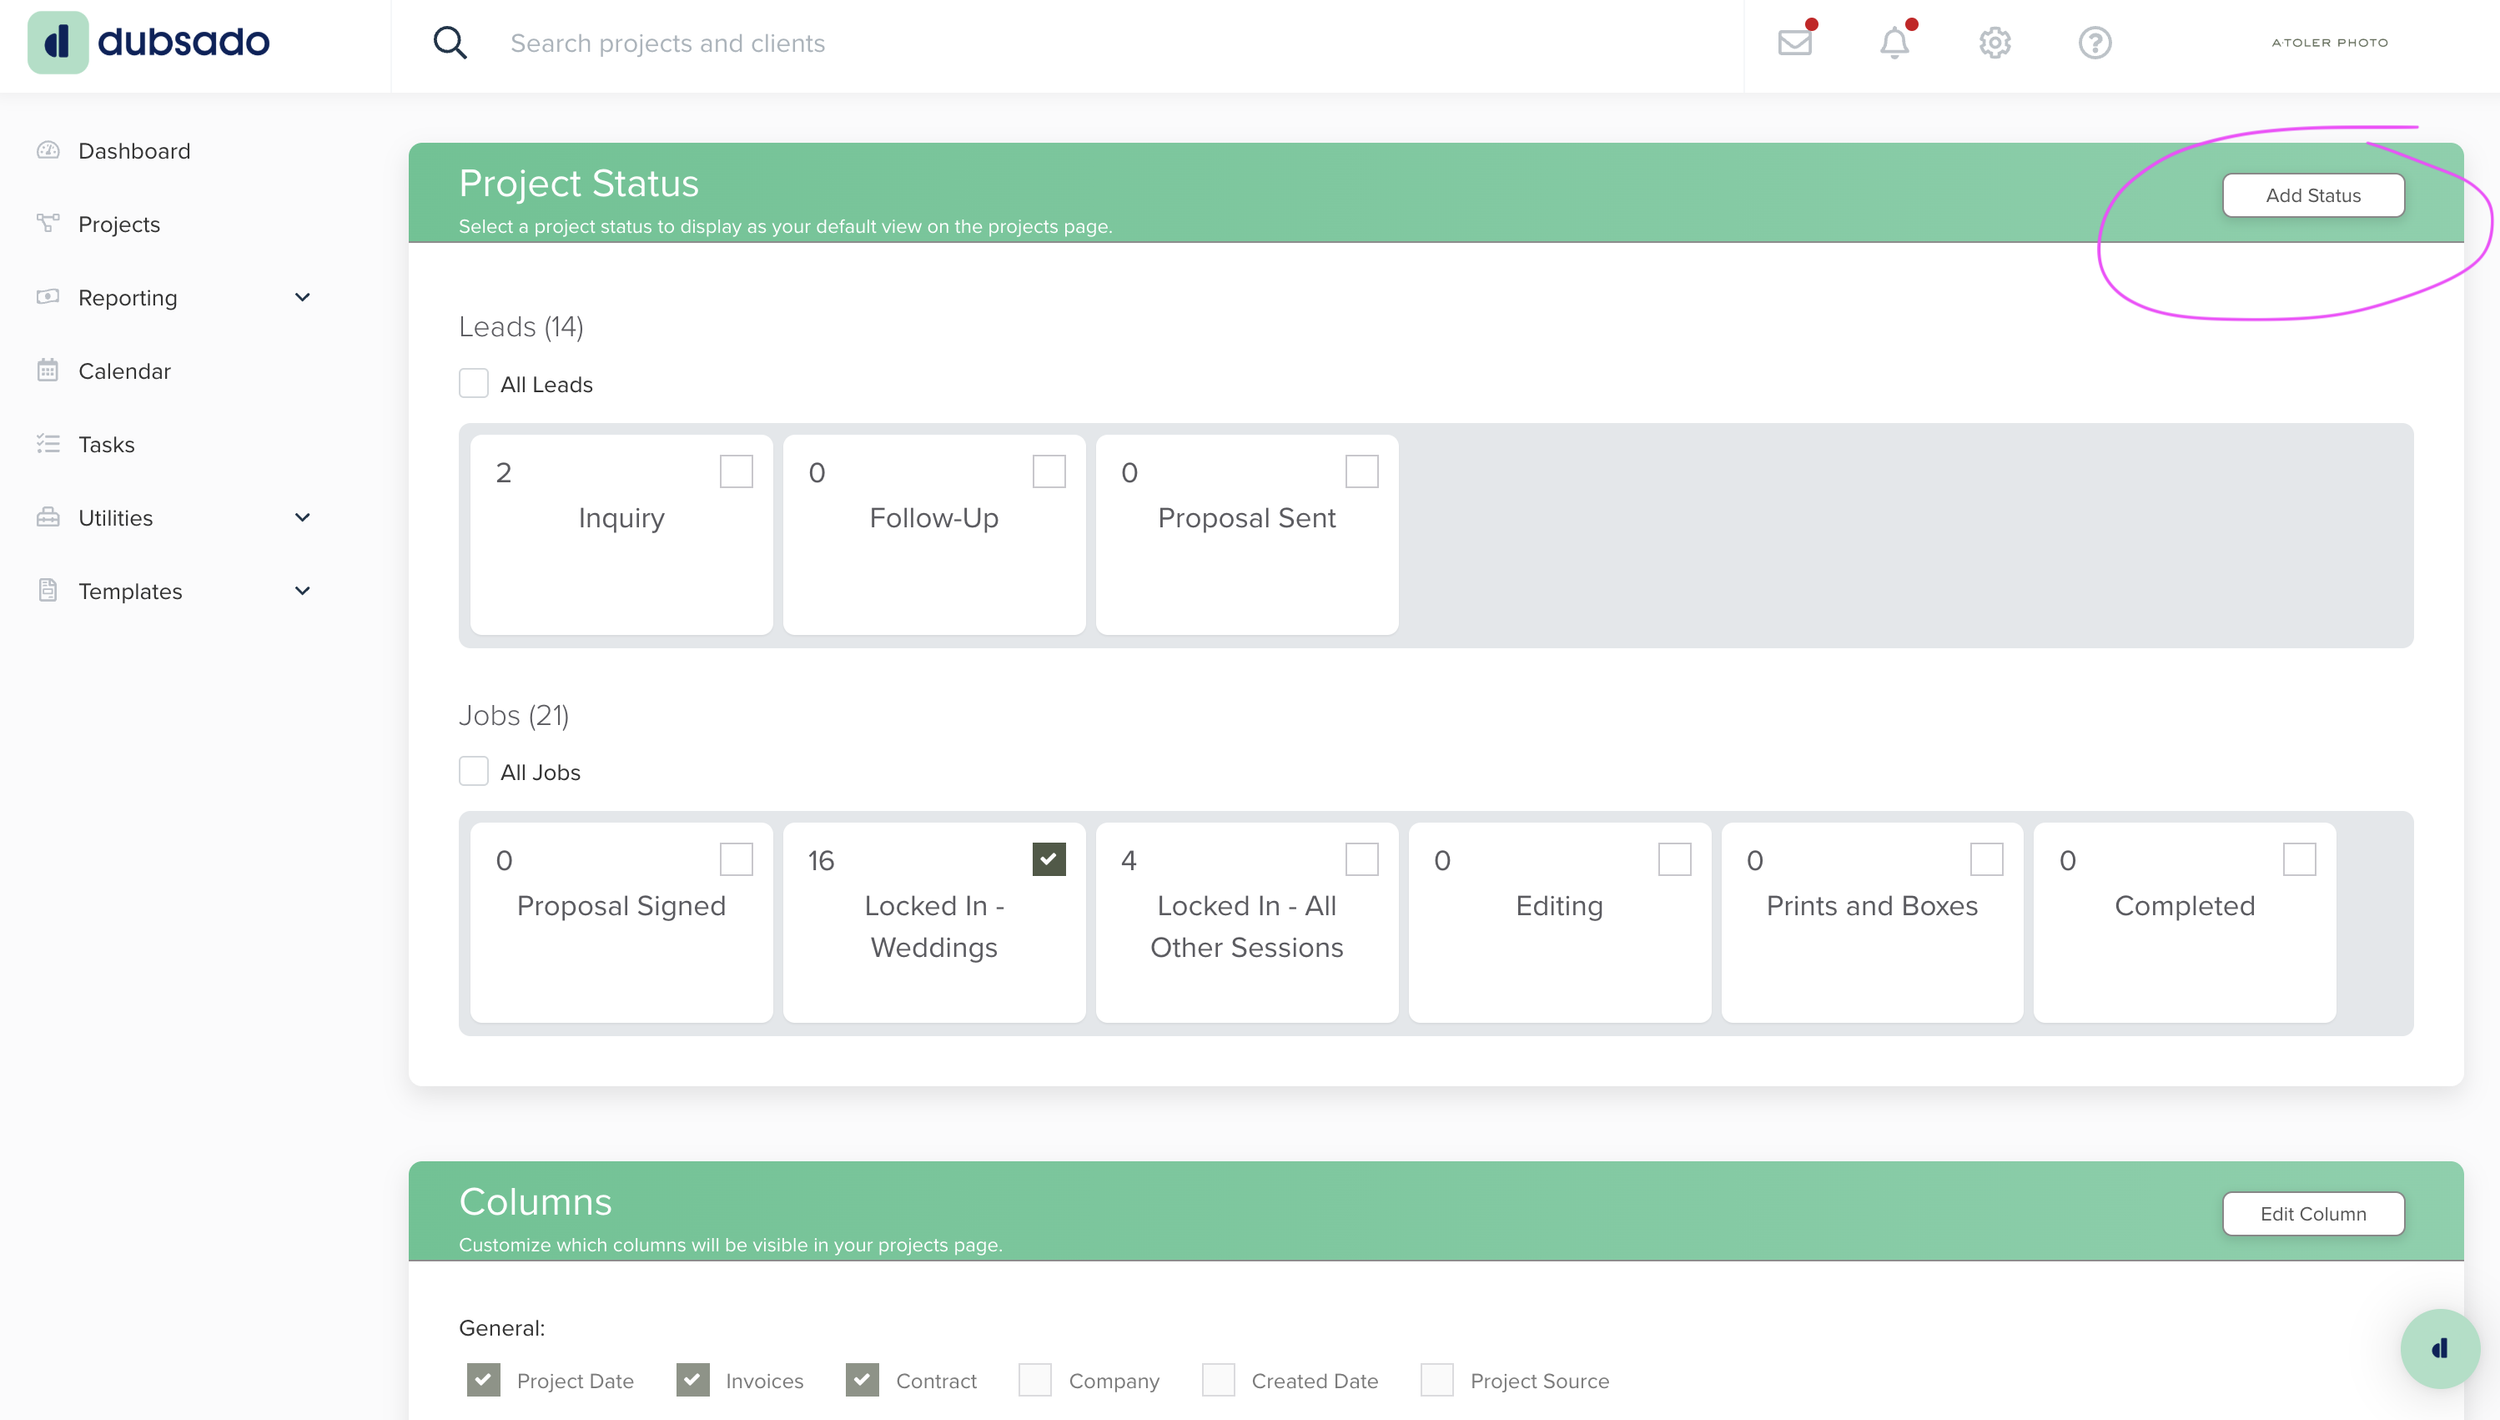
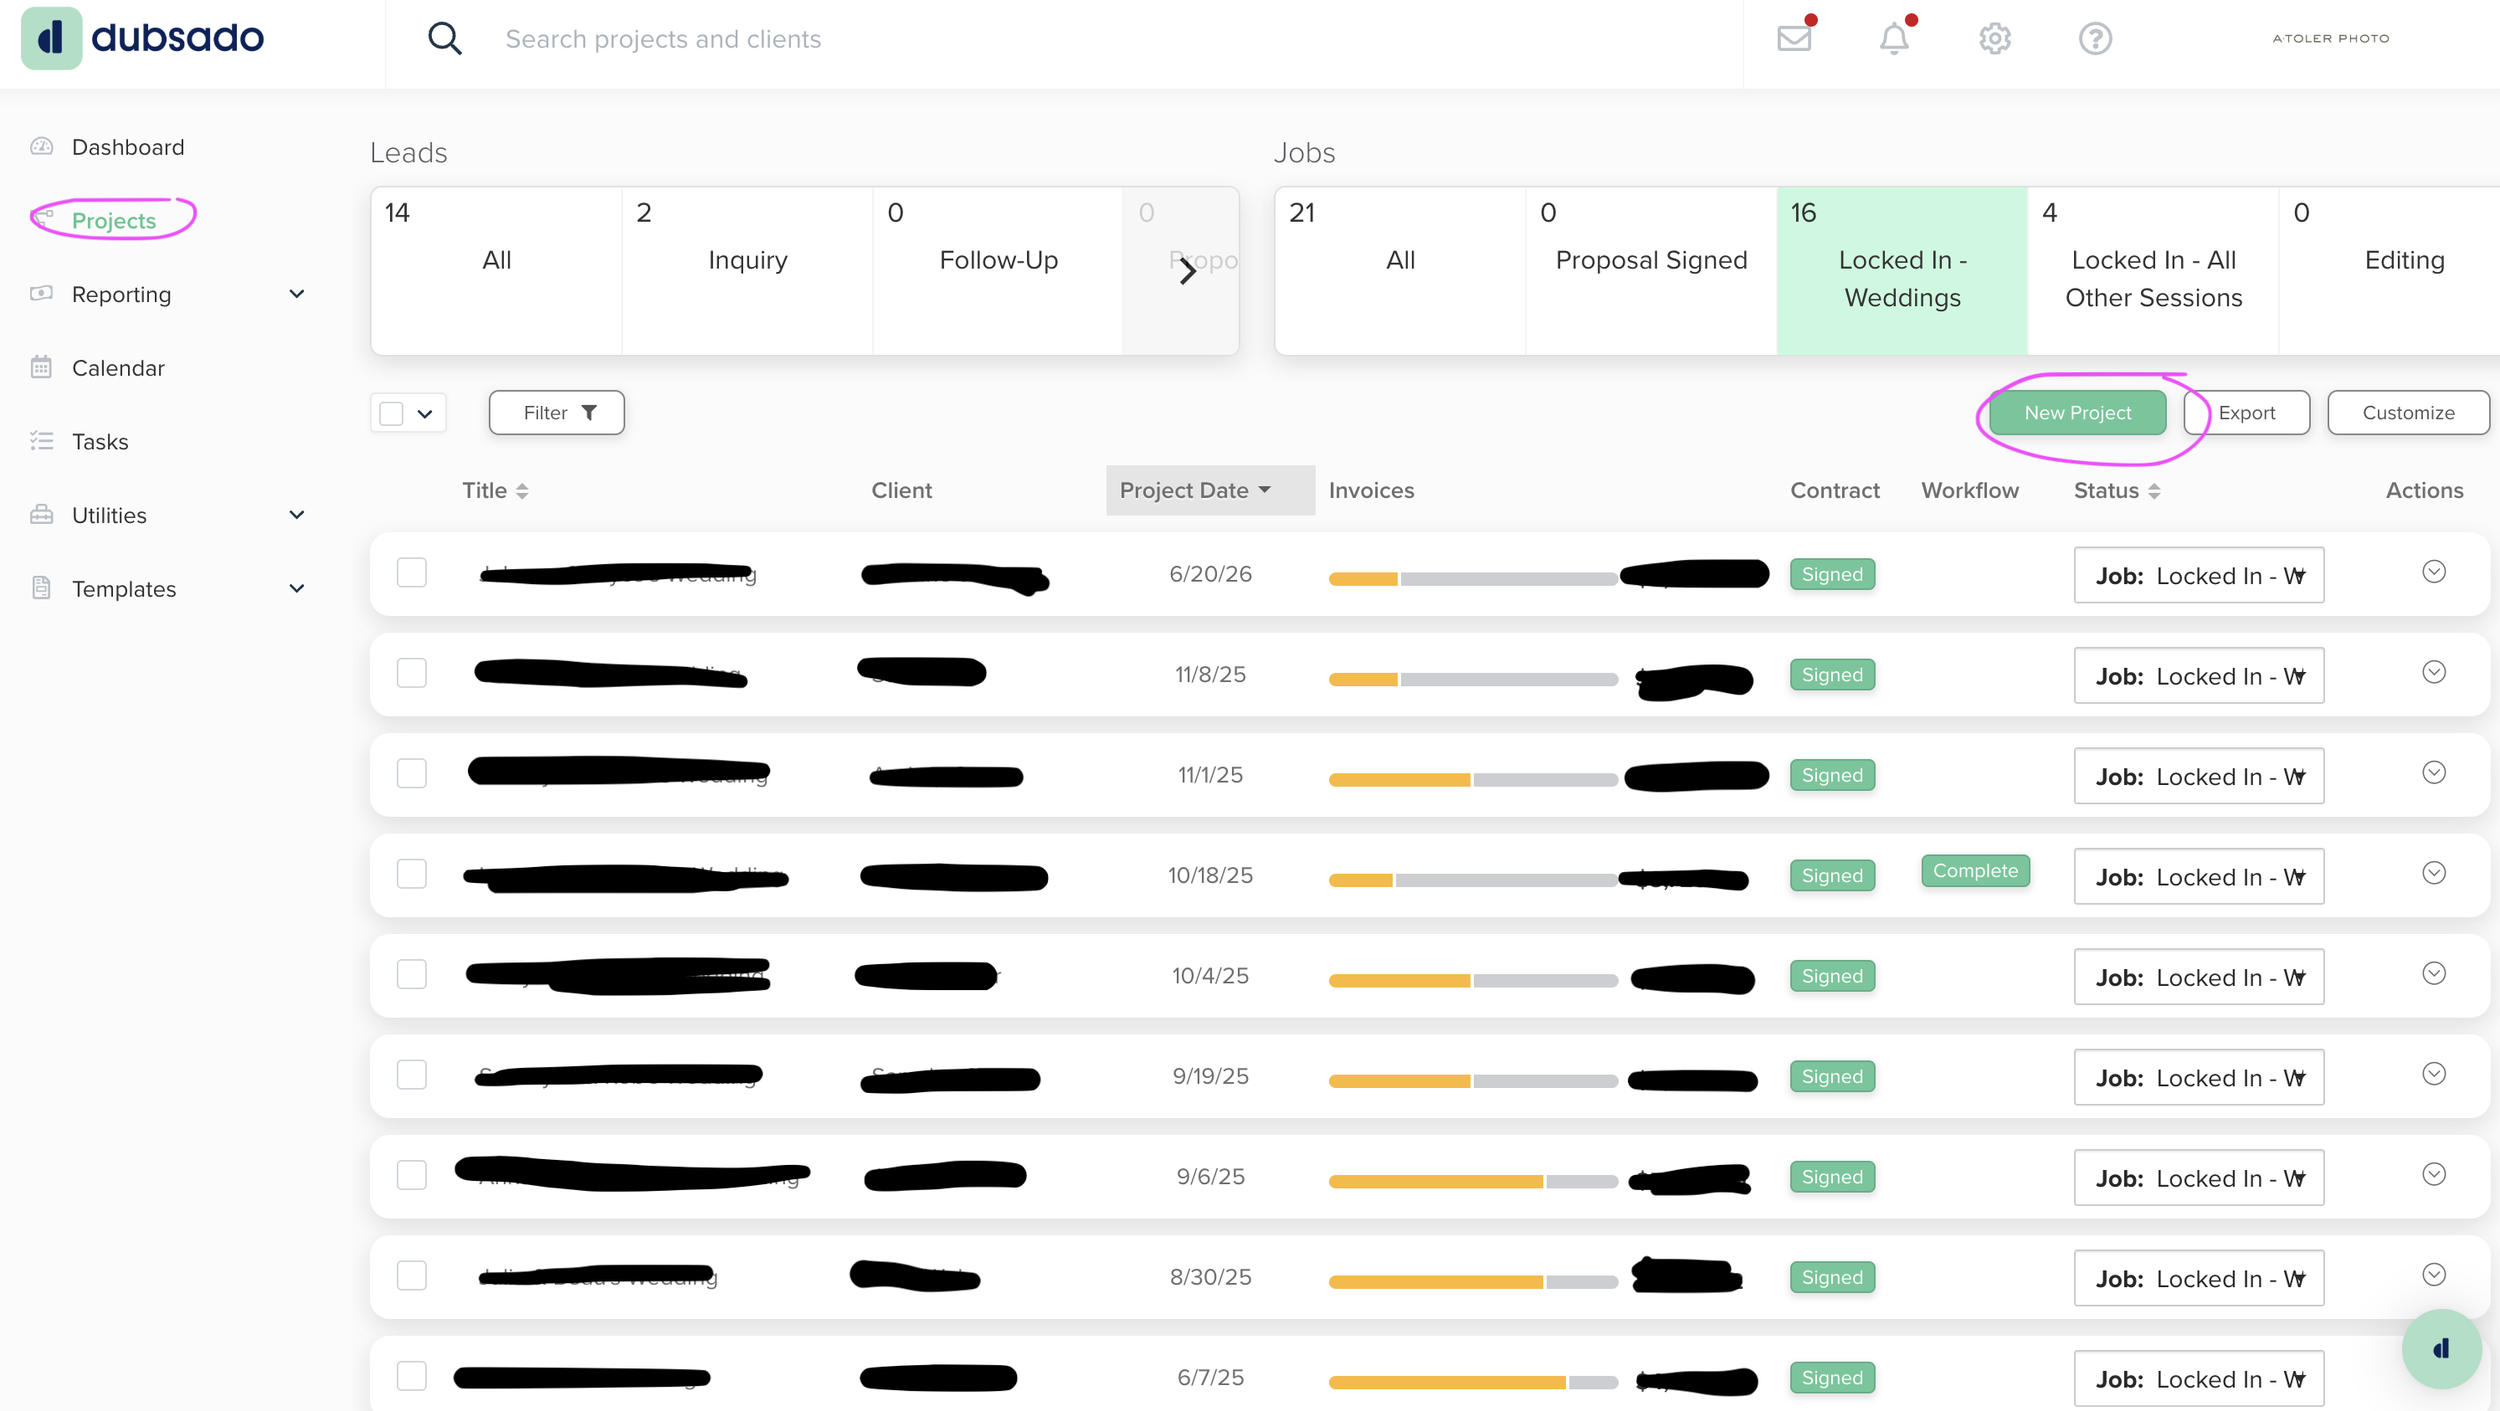
Let’s organize your projects based on stages. Dubsado is different from Honeybook in that all of your projects are divided between “Leads” and “Jobs” to help distinctly separate what projects are booked and which ones you are still working on booking.
To add a new category, click “customize” in the upper right corner, then “add status” as shown below.
Checkmark whichever box you want displayed as the default page when you click on the “projects” page.
TEMPLATES
Templates are where most all of the custom contents of our business will be. Unlike Honeybook, who has all of these features spread out and divided across multiple page menus and categories, Dubsado keeps all of your files, tools, and forms in one place. Once these are all set up, you’ll have everything you need to give your clients a streamlined experience.
CANNED EMAILS
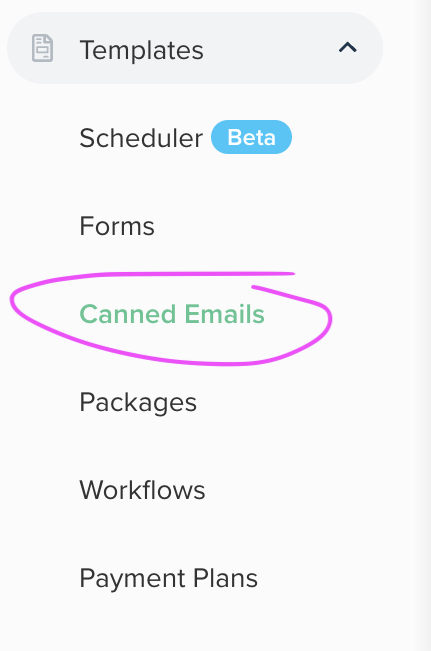
We’re going to open the template drop-down menu and go straight to “canned emails.” A canned email is the Honeybook equivalent of an email template. Almost every other feature in Dubsado uses these, so it’s helpful to set these up first.
First, click “signature.” This is your email signature, and it will probably go on the bottom of the rest of your canned emails, so it’s helpful to make it first. You can add your logo, images, and whatever else you think is helpful for your clients.
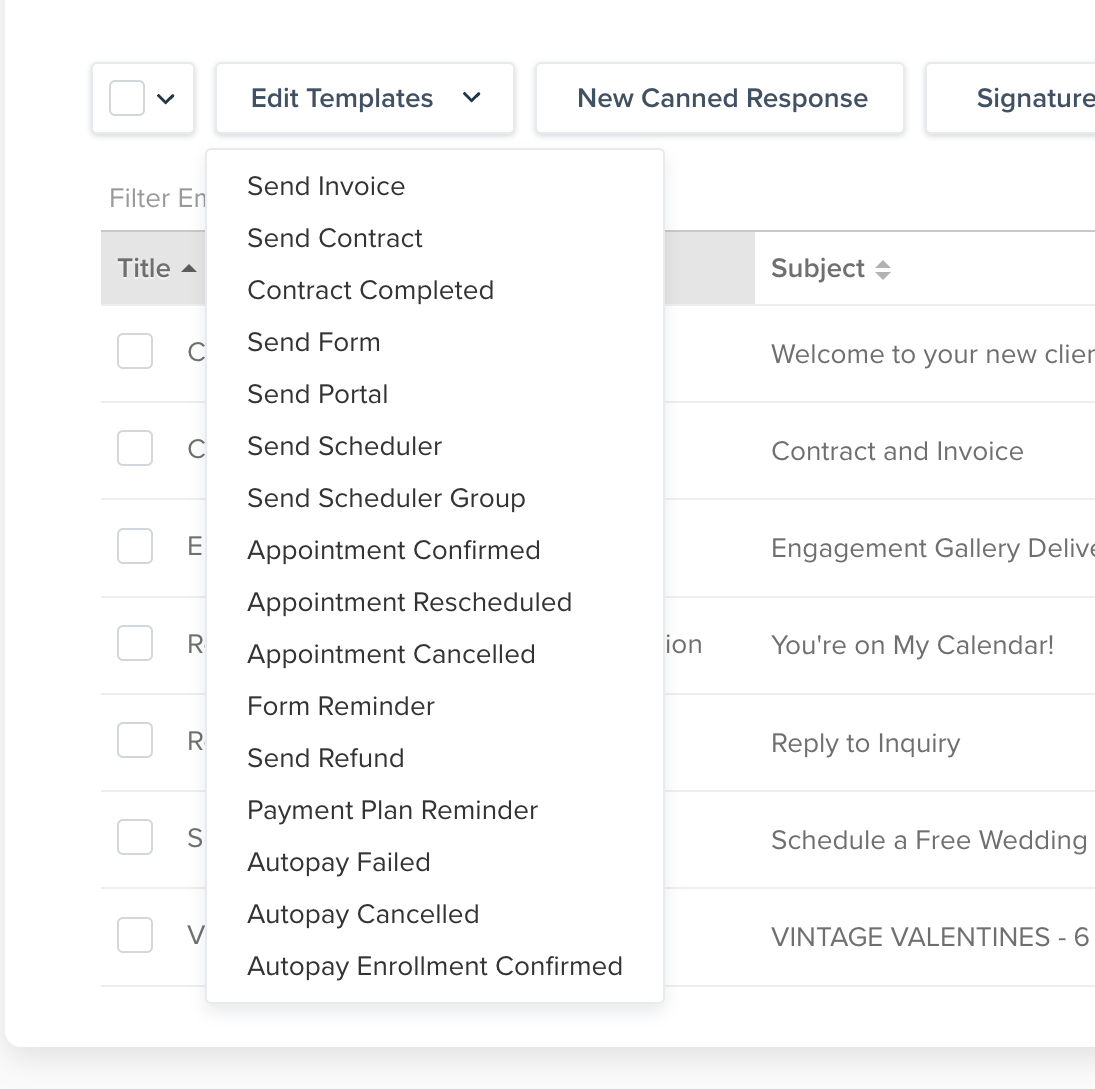
You can begin by editing the default email templates first. These are the default emails that pop up when you do something basic like send a form to a client directly from the form, or the emails a client gets when they schedule or change an appointment with you. This might seem a bit tedious, so I tend to update them as I come across using them and sending them to a client. Unlike Honeybook, where changing these default emails was located in all different places, I love how easy to is to see and be able to edit all of my default emails in one section.
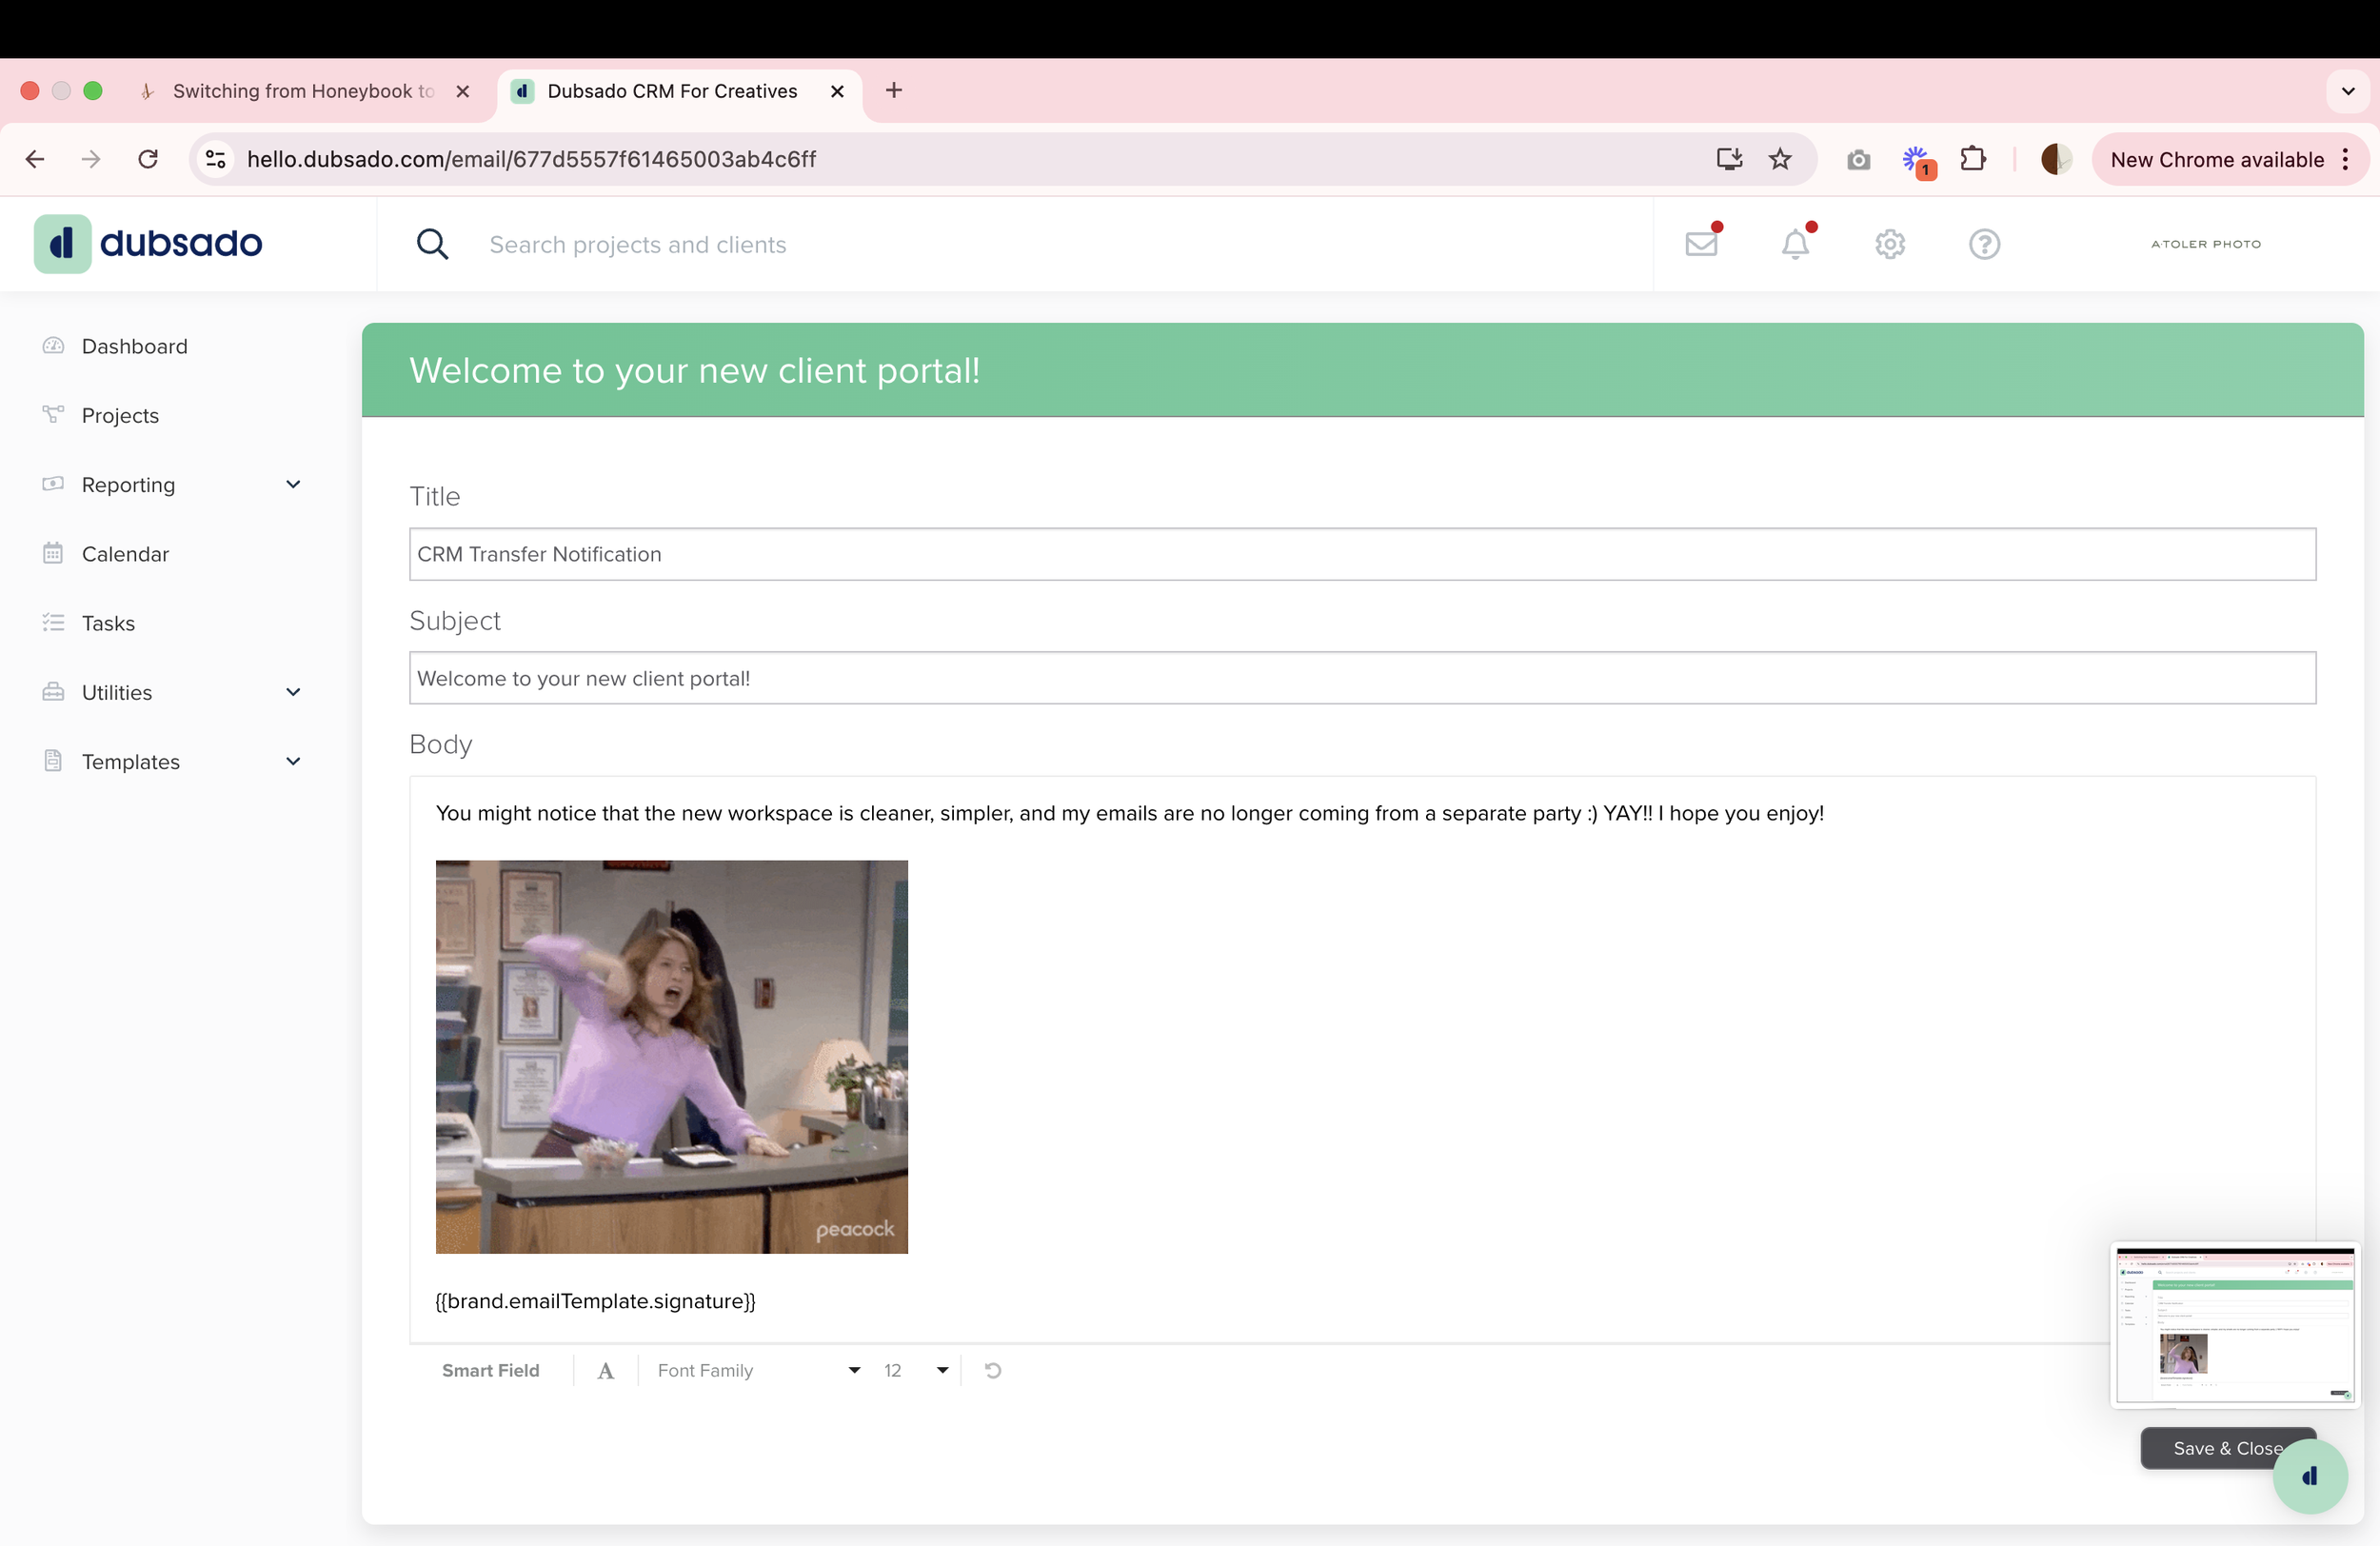
Next, you’ll want to click “New Canned Response” to make your first email template. This is when you’ll transfer all of your email templates from Honeybook by copying and pasting into new canned emails. Like Honeybook, you can use smart fields, even though I find the options Dubsado offers to be more extensive, easy to connect, and helpful to me and my client. Unlike Honeybook, Dubsado’s smart fields are marked by brackets instead of boxes. This took me a minute to get used to, but now it feels very natural. There’s an example of one of my canned emails below. Use the “smart fields'“ button in the bottom left corner of the email to choose a smart field. Something that’s super fun is you can also enter GIFs !!
Once you’re copied and pasted, added smart fields, and even updated, all of your email templates from Honeybook, your canned emails are complete. Next, let’s look at Forms.
forms
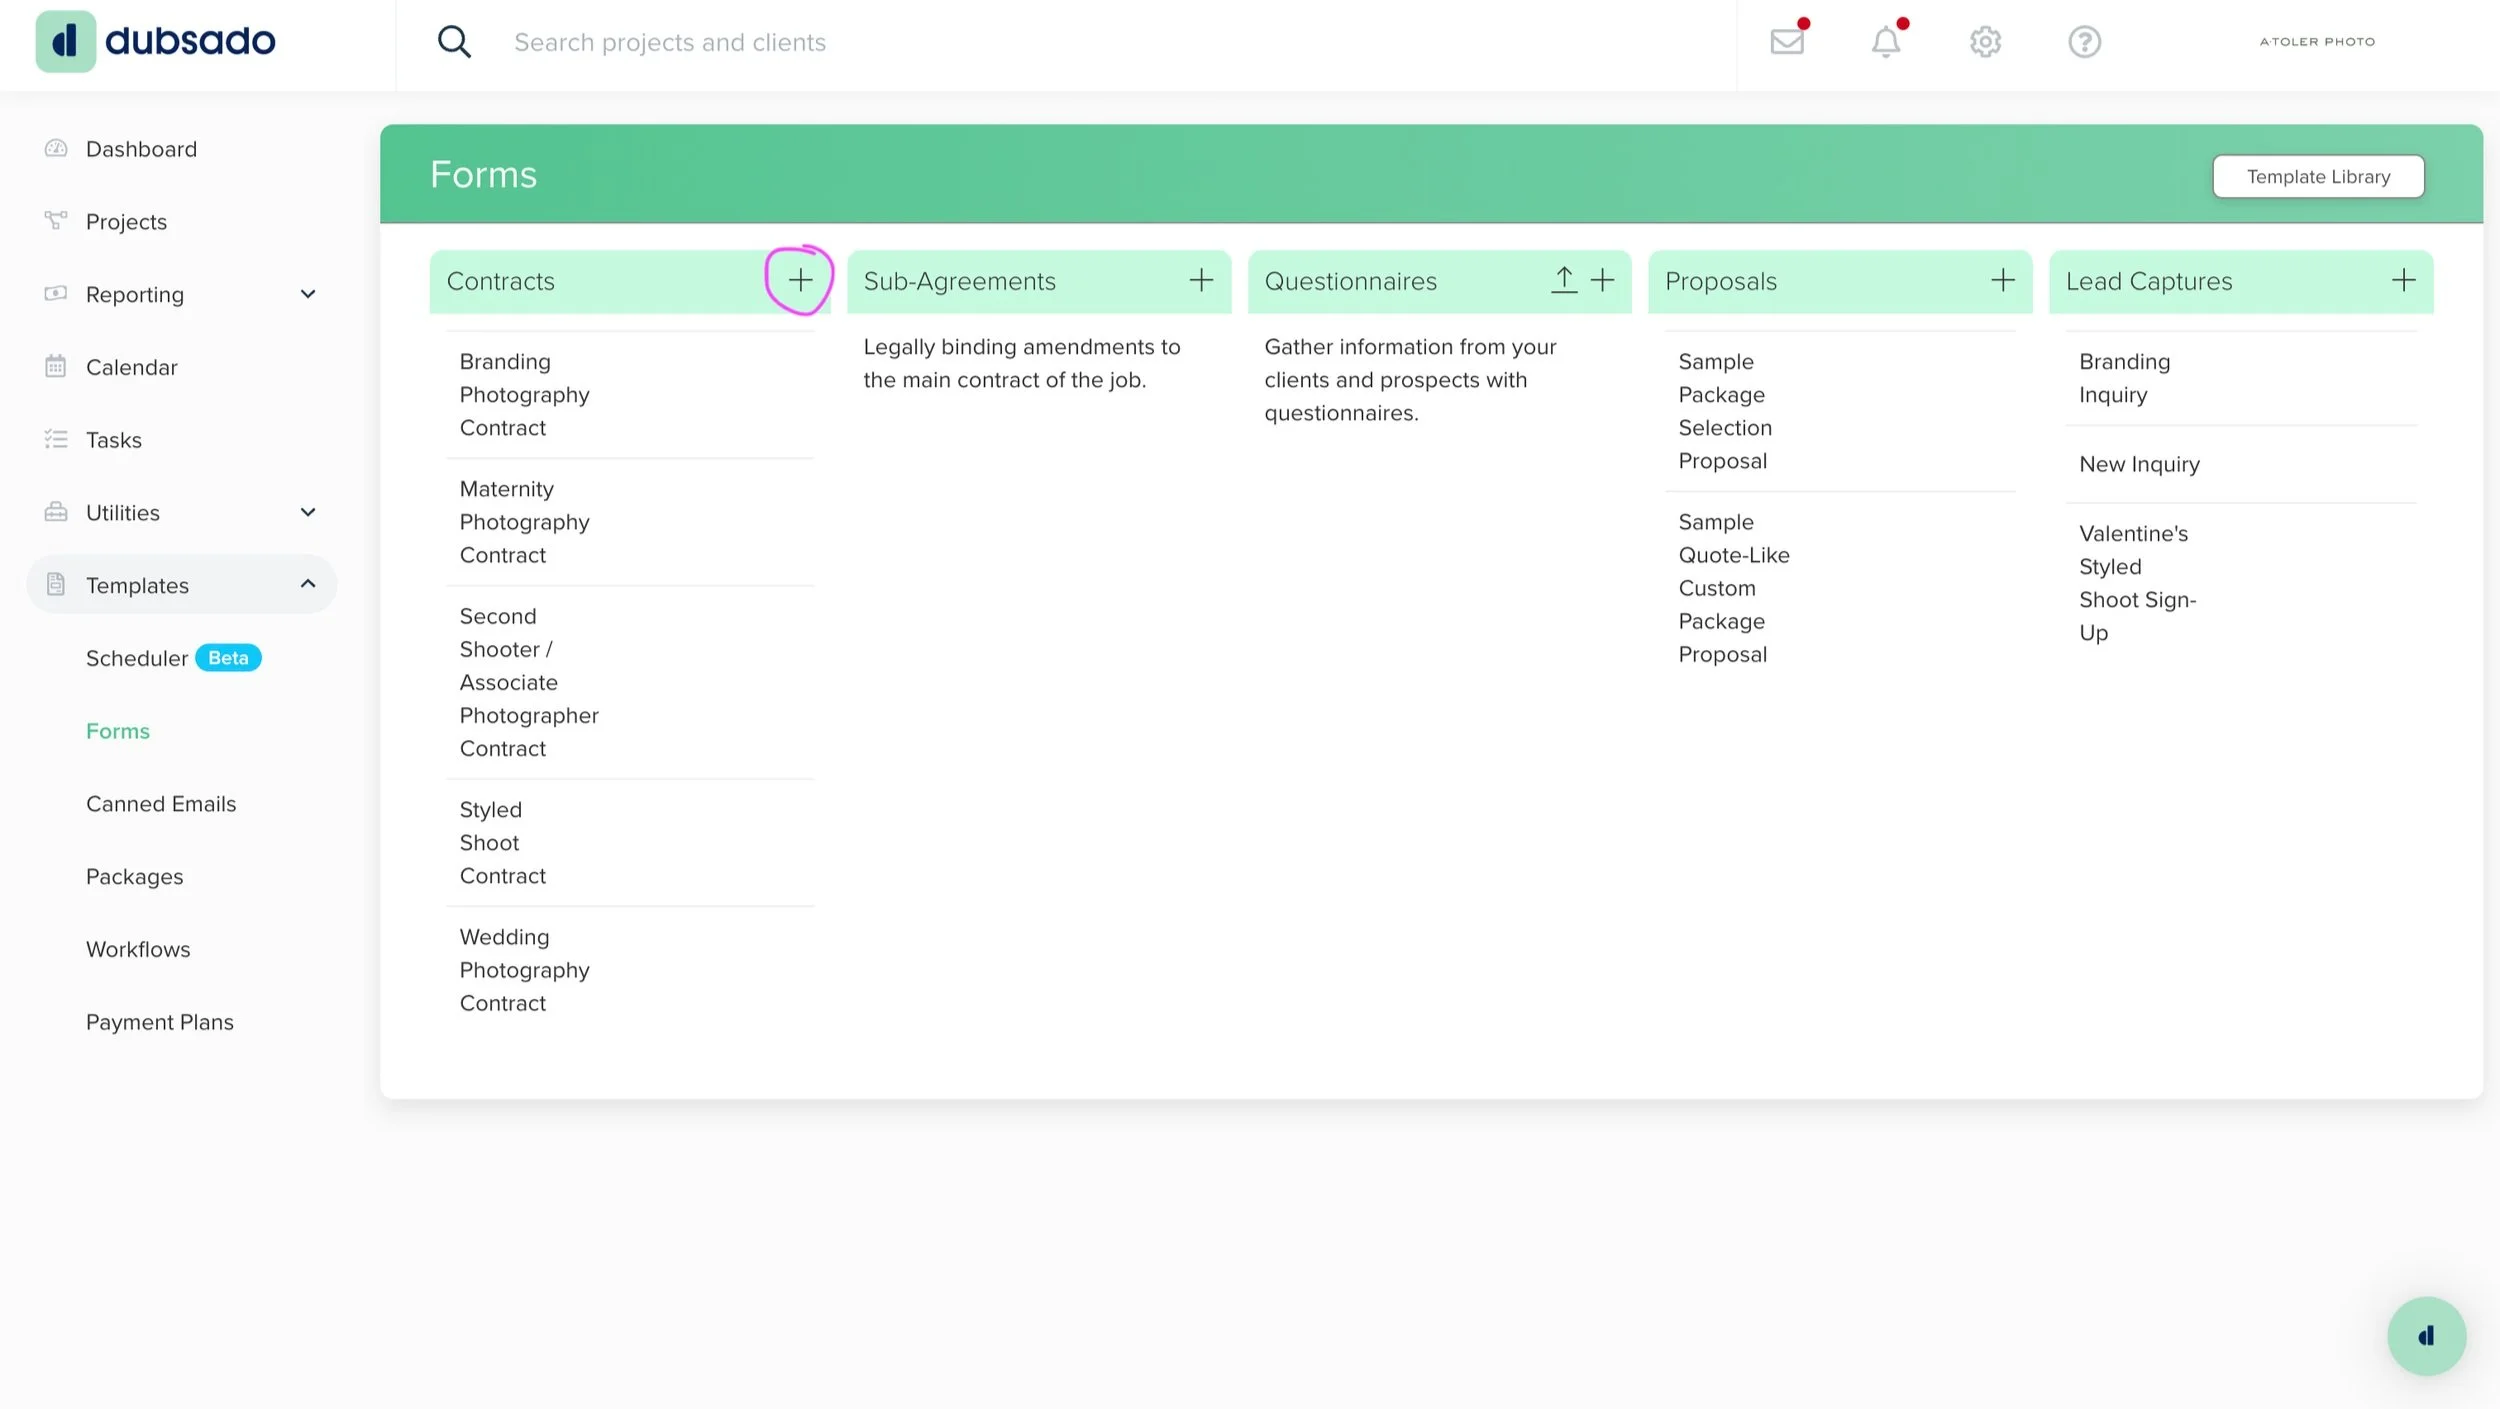
This is where you’ll transfer all of your contracts, questionnaires, lead capture forms, and proposals. You can copy and paste info from your old contracts, but questionnaires and lead capture forms will need to be remade. This takes some time, but it also gives you a chance to refresh your content. My documents feel much more clean and up-to-date after taking the time to refresh them during the transfer.
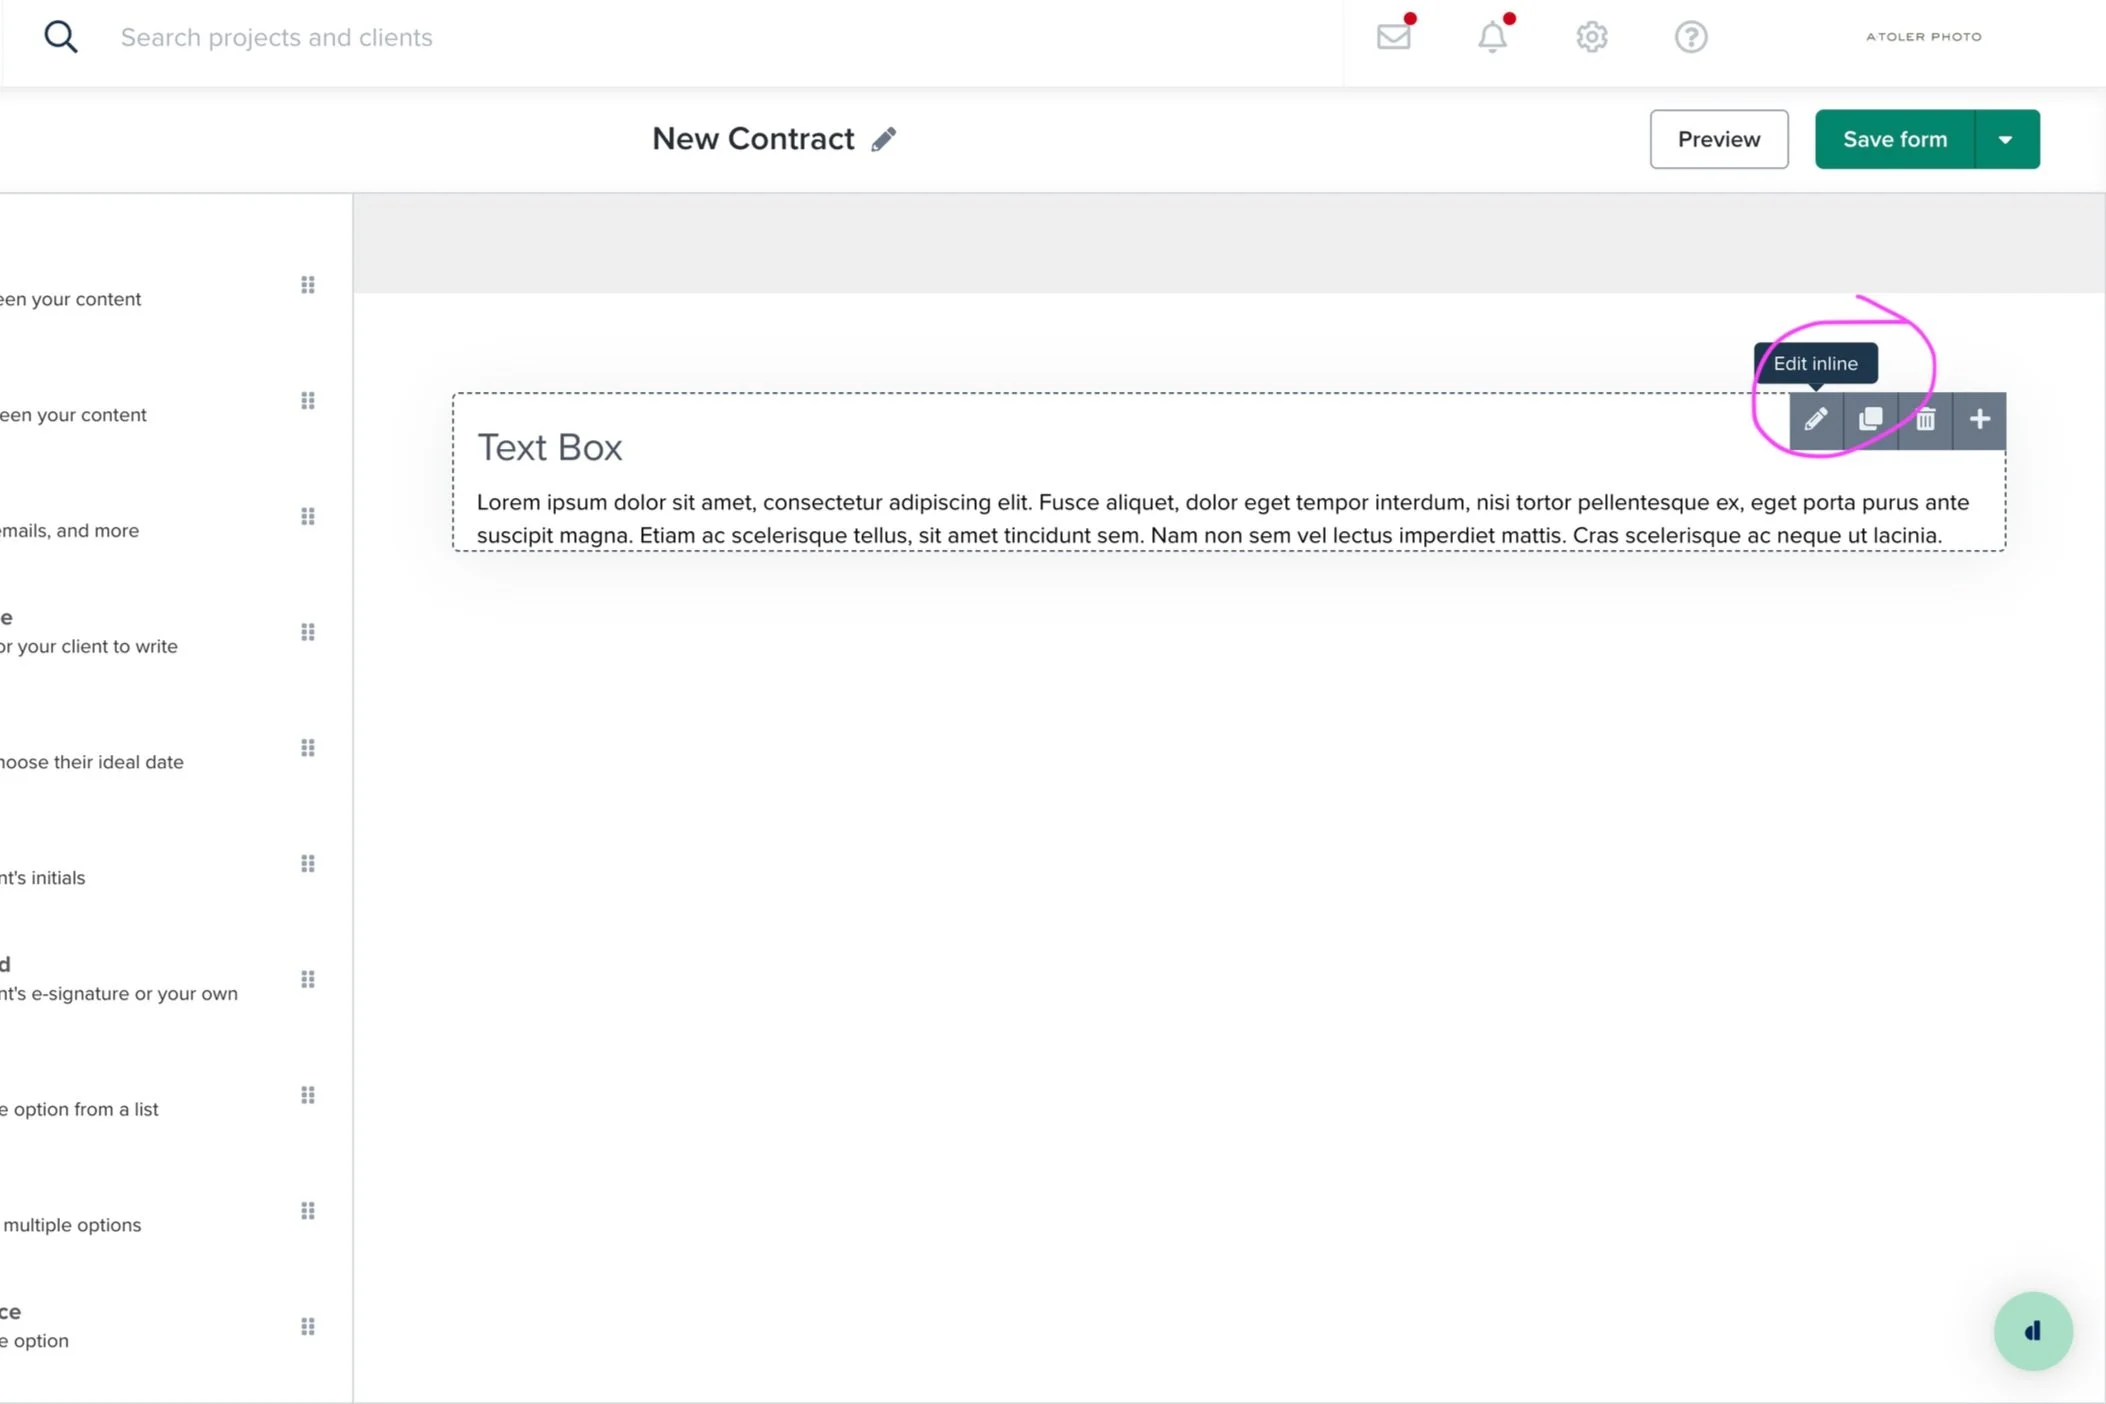
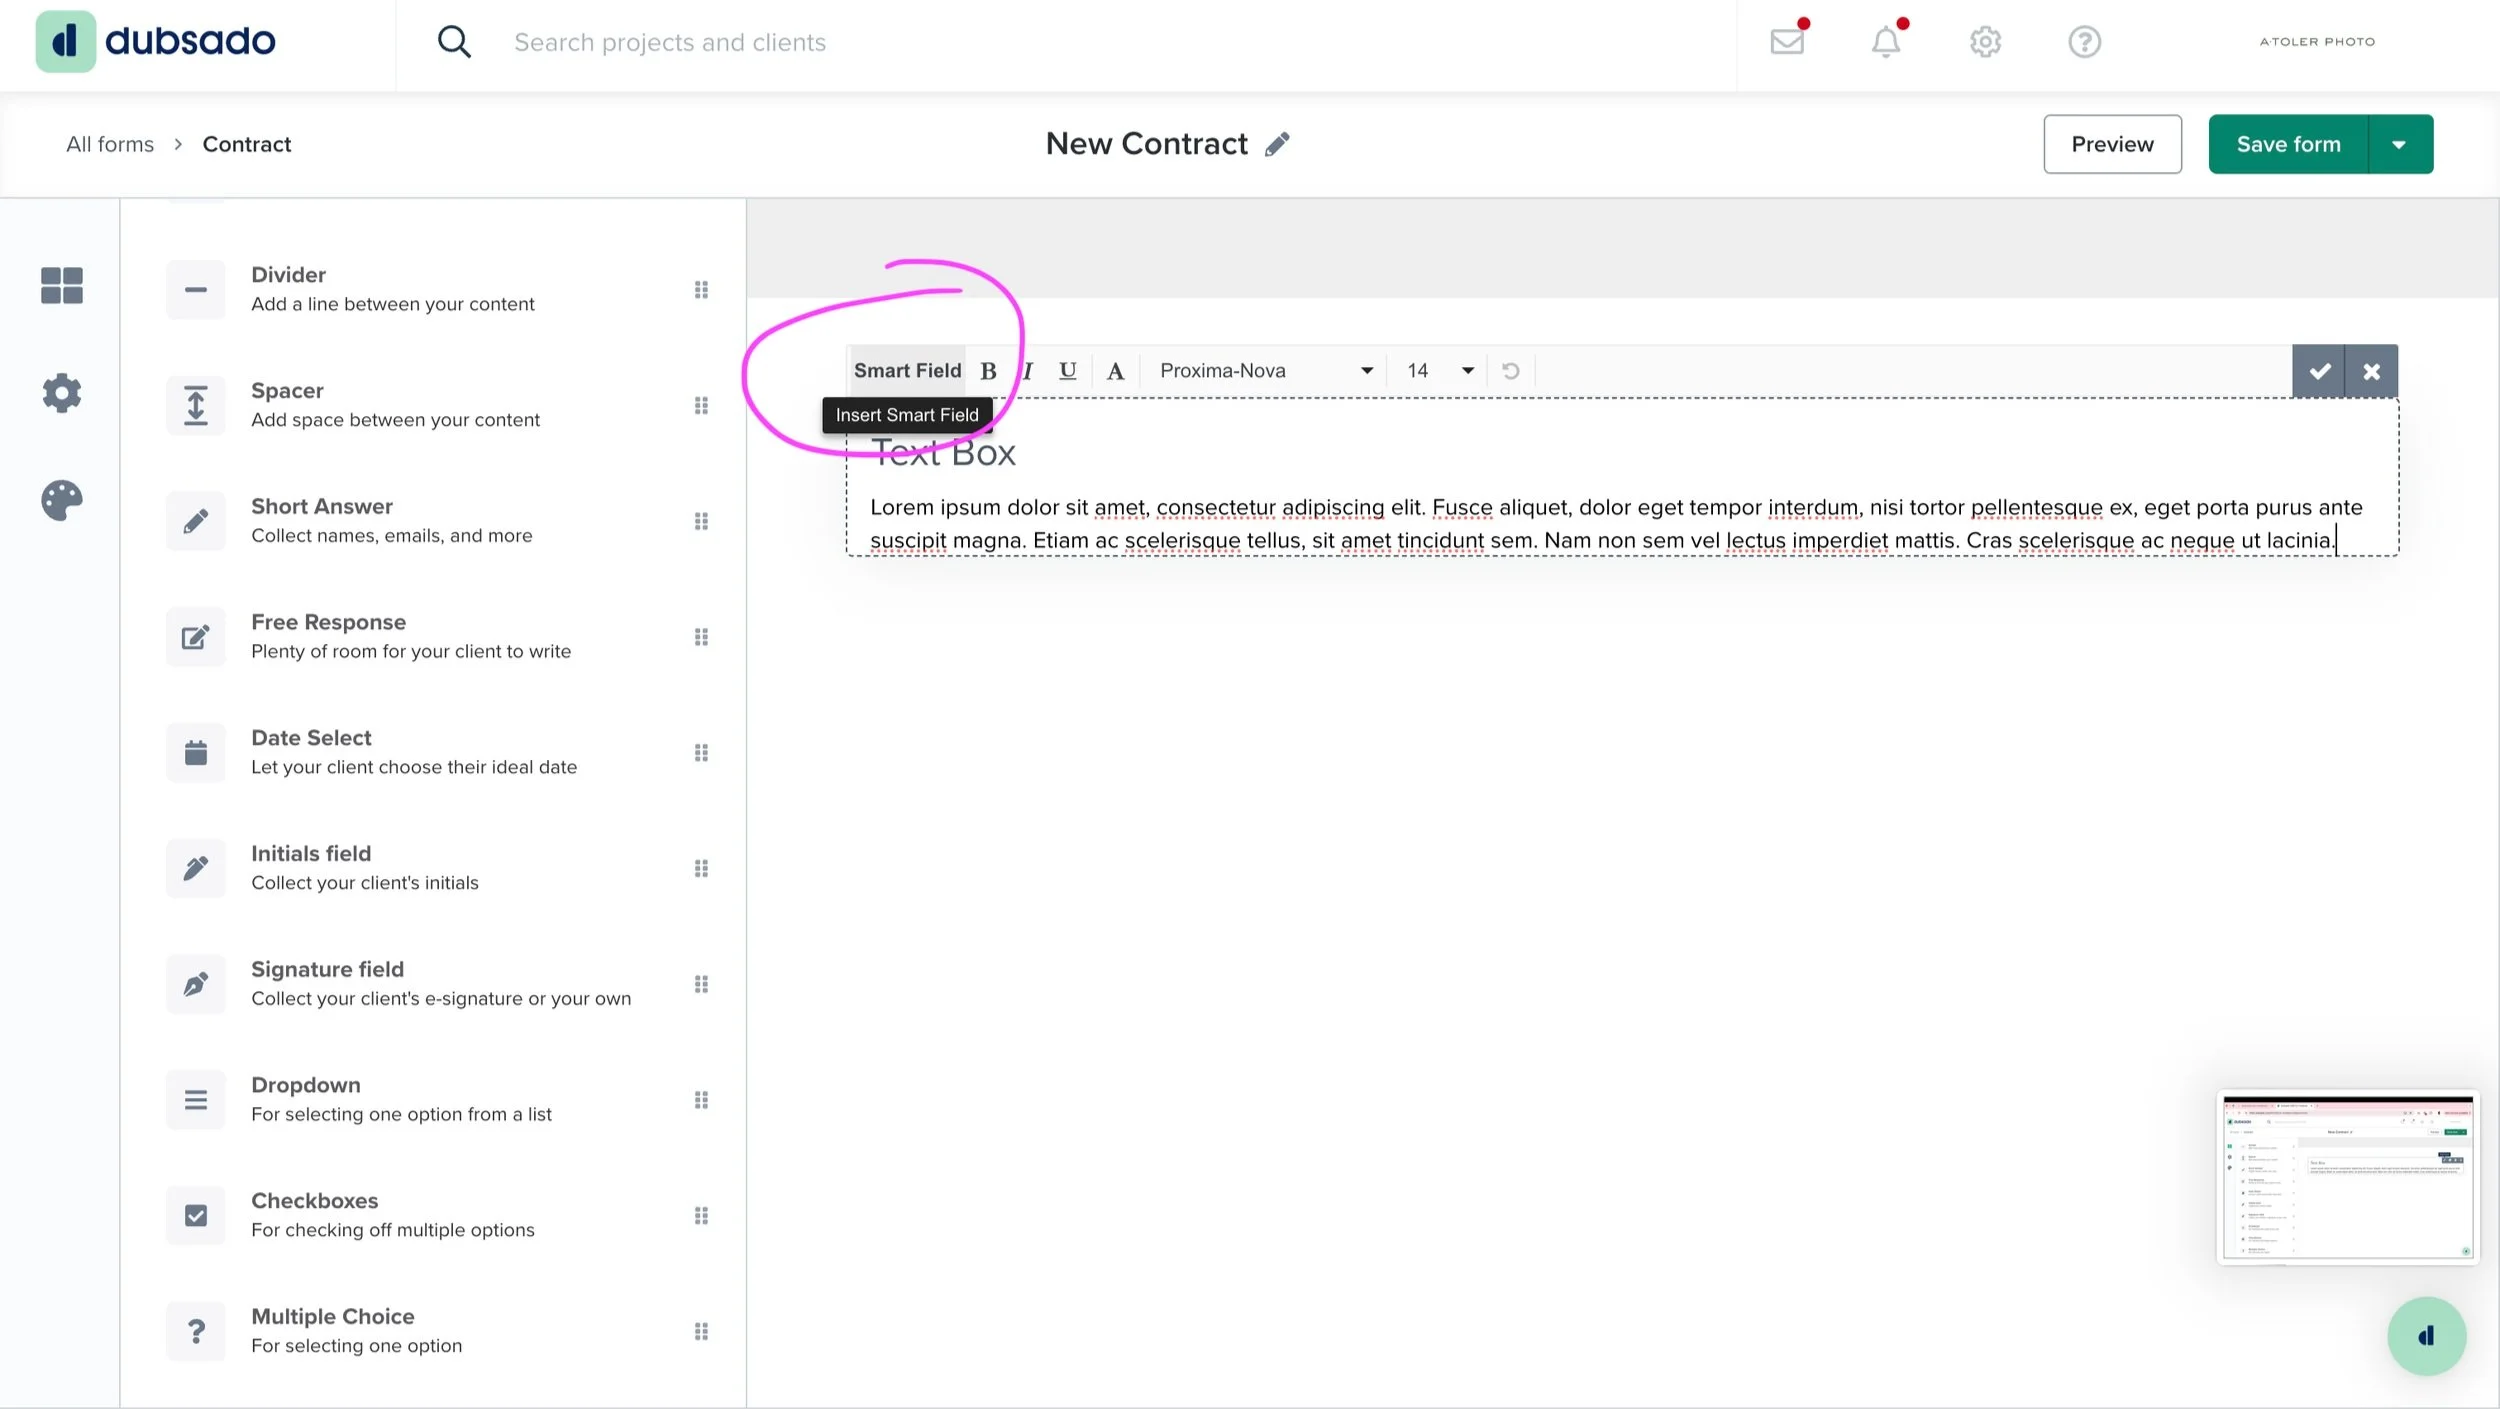
Click the “+” sign by each category to create a new file. For the contracts, you build them by adding elements together. I used different text boxes for every section of my contracts, but if you are low on time, you can just copy and paste your entire contracts into one text box. To edit the text in a text box, click the pencil in the upper right corner of the text box. If you want to enter a smart field, it shows up in the upper left corner of the text box. You can stack as many elements as you wish. For contracts, I mainly used the text boxes, spacers, and client signature and initial sections.
One of my FAVORITE FEATURES in the contracts is the ability to add a smart field that corresponds directly with the invoice in the project. Adding smart fields such as the total price in the invoice, the payment schedule, and the invoice items and amounts makes my life so much easier when sending contracts and invoices. No more going back and forth between each file - if I change one thing in one document, it automatically updates in the other!
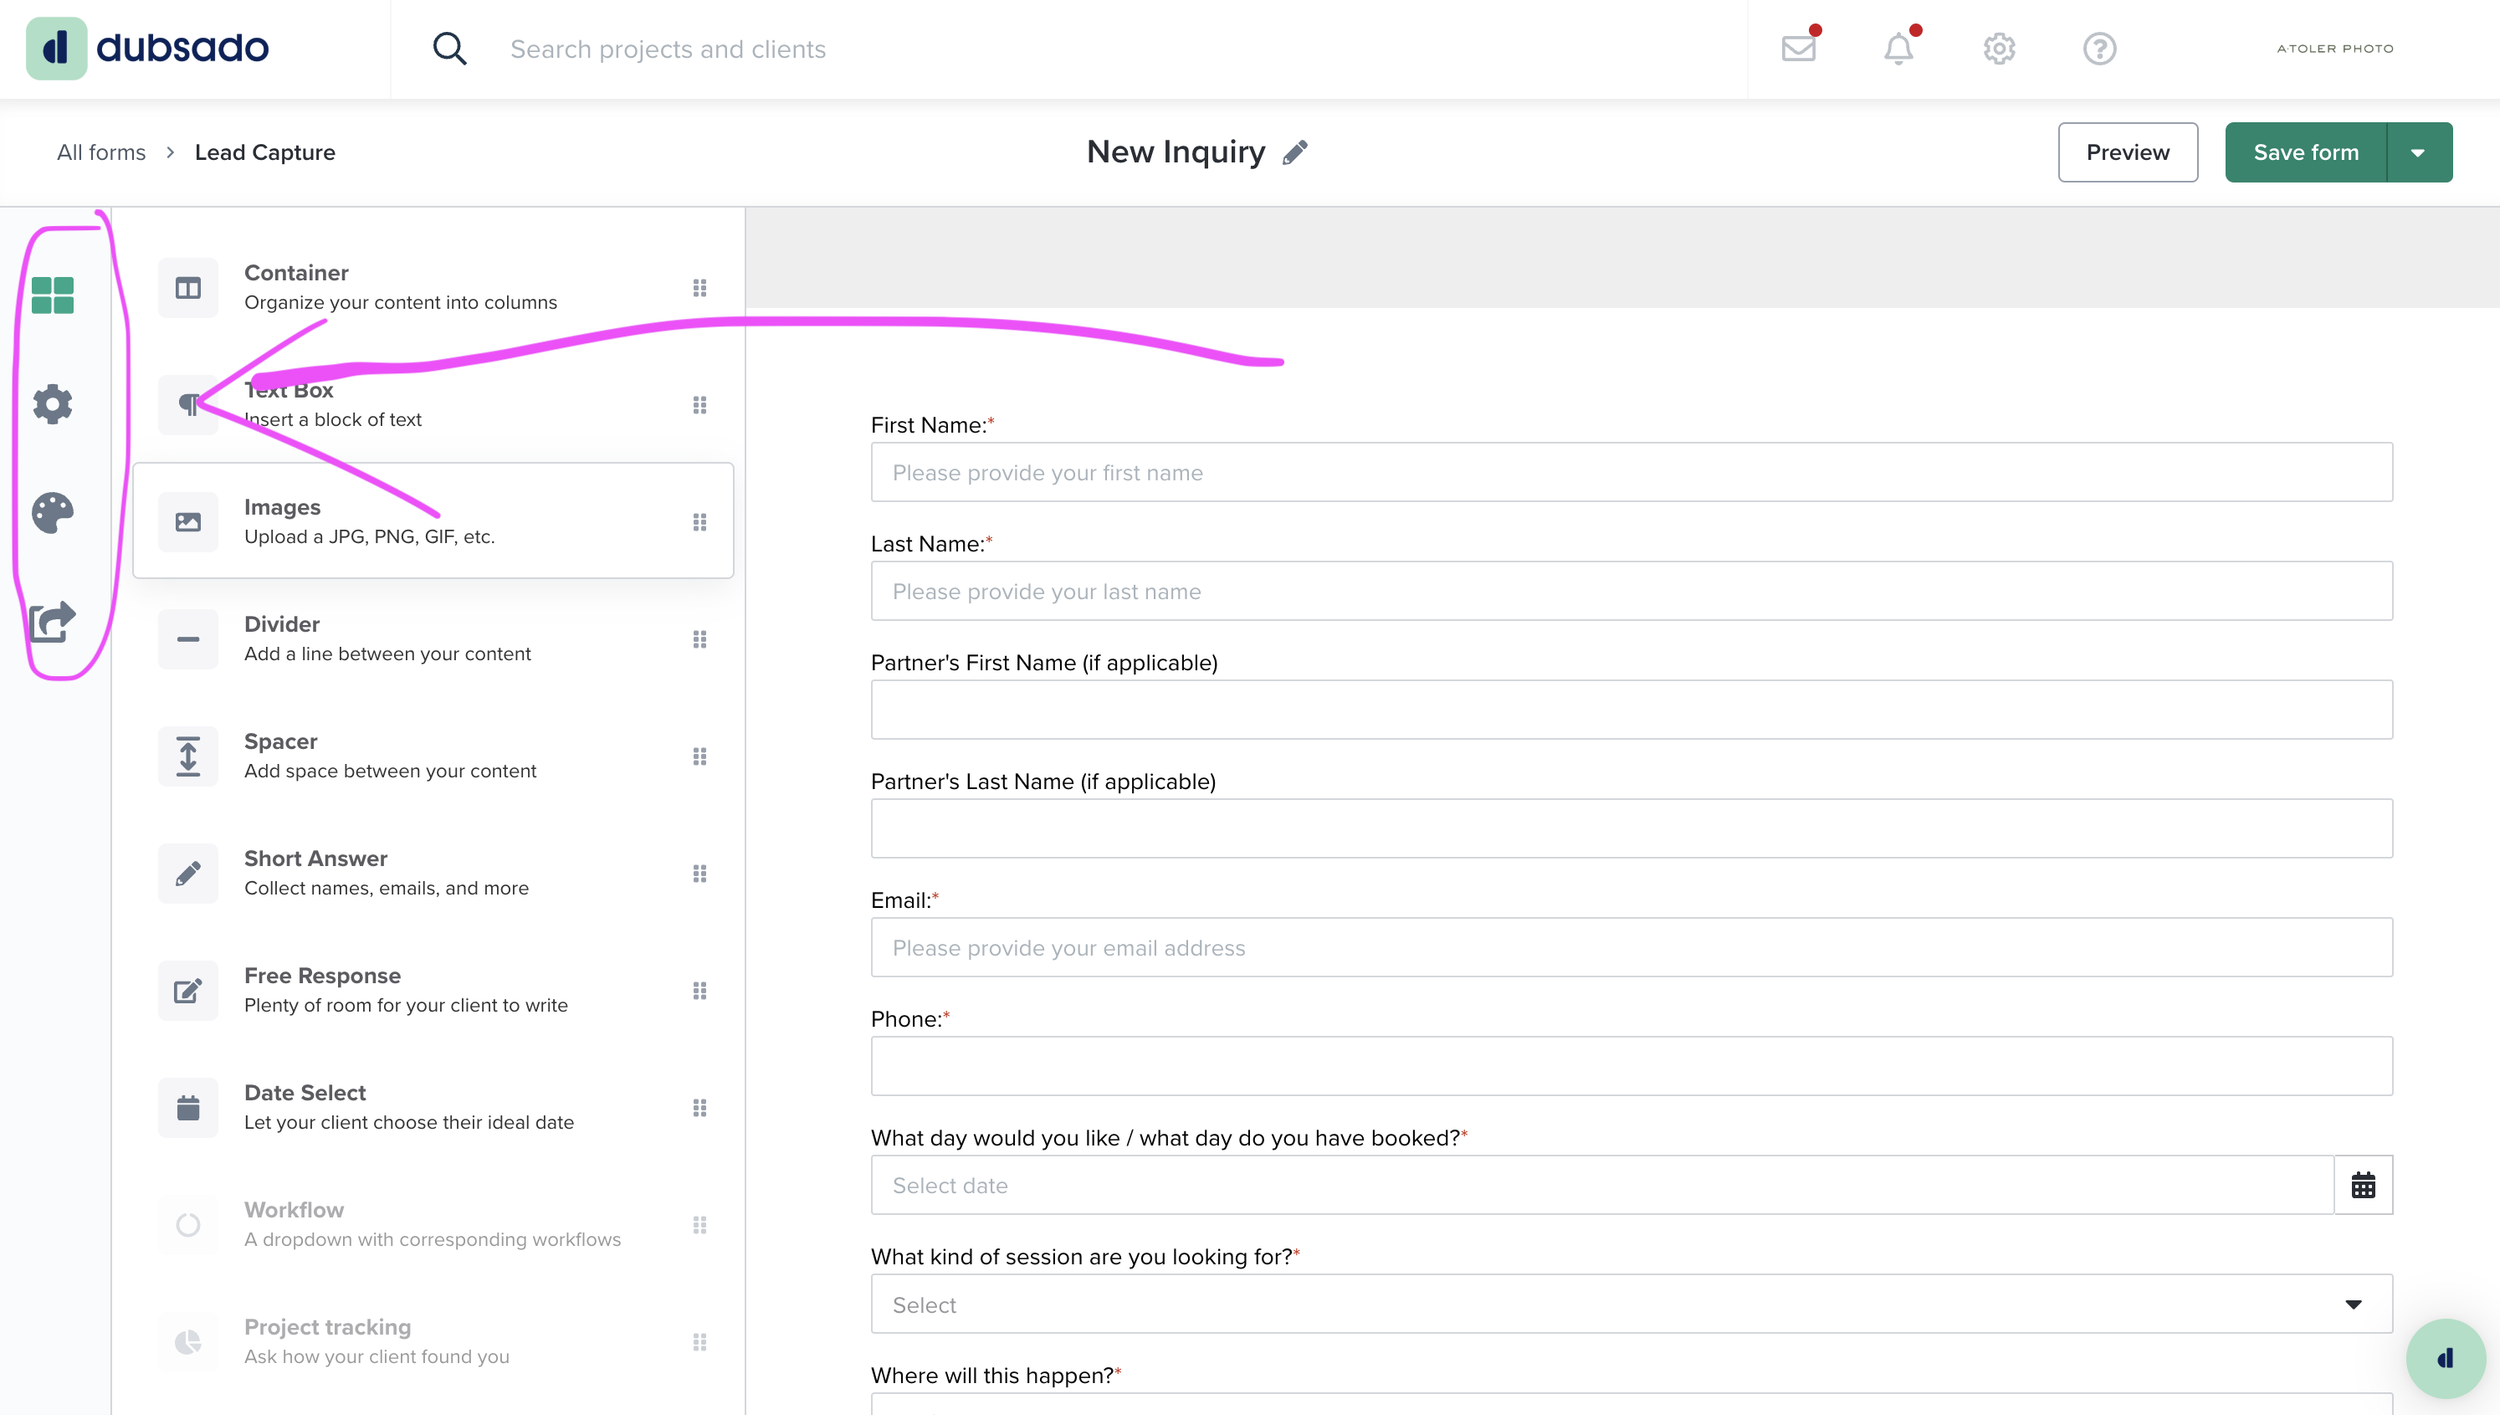
For questionnaires and lead capture forms, you’ll want to stack different elements like short answer, check boxes, date select, dropdown menus, etc. The simple user interface makes it easy to understand and therefore faster to put together.
Use the short panel on the far left of the screen to edit design, sharing, and settings of the form.
To embed a lead capture form into your website, like a “New Inquiry” form, simply copy and paste the first code into your website’s HTML or “embed link” section. You can also share it directly with the link at the bottom - this is the link you would put in your instagram bio.
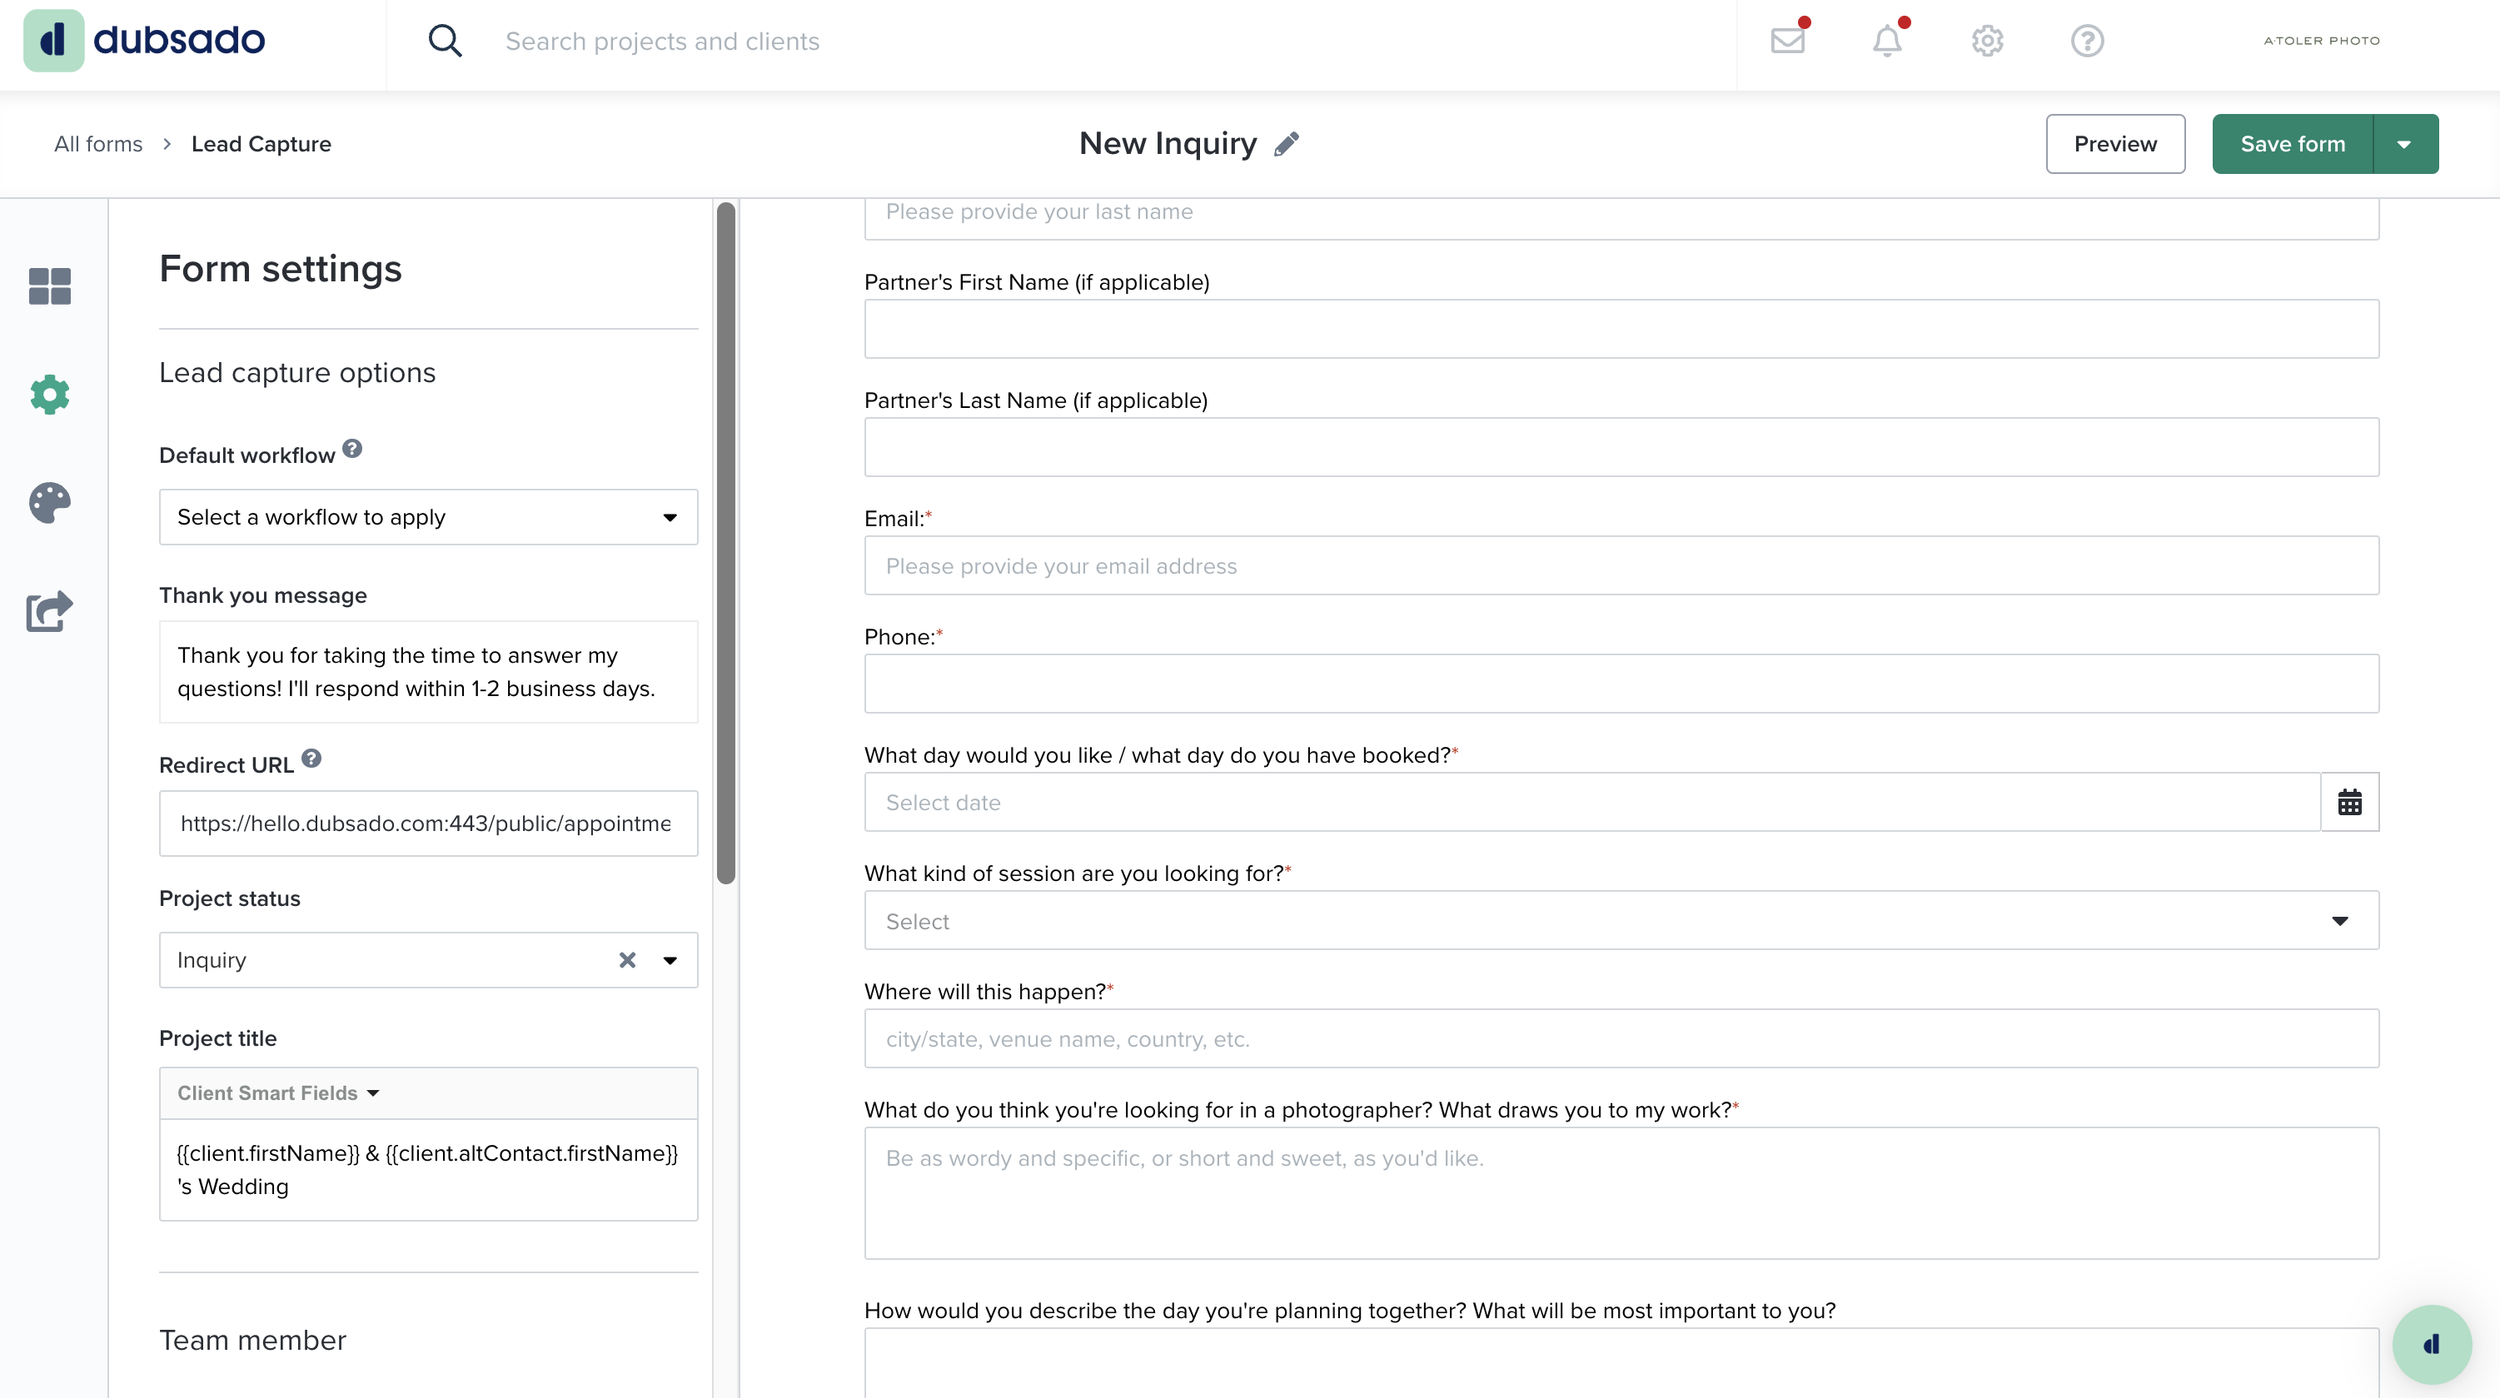
In the settings section, you can add a workflow for the project after the person inquires, you can attach what message will display after the person submits the form, you can add a URL that redirects the person once the form is submitted (mine personally redirects directly to a scheduler link, also made in Dubsado, to let them schedule a call with me), assign smart fields, and assign a project stage to the form once it’s submitted. You can see how I have mine set up below.
scheduler
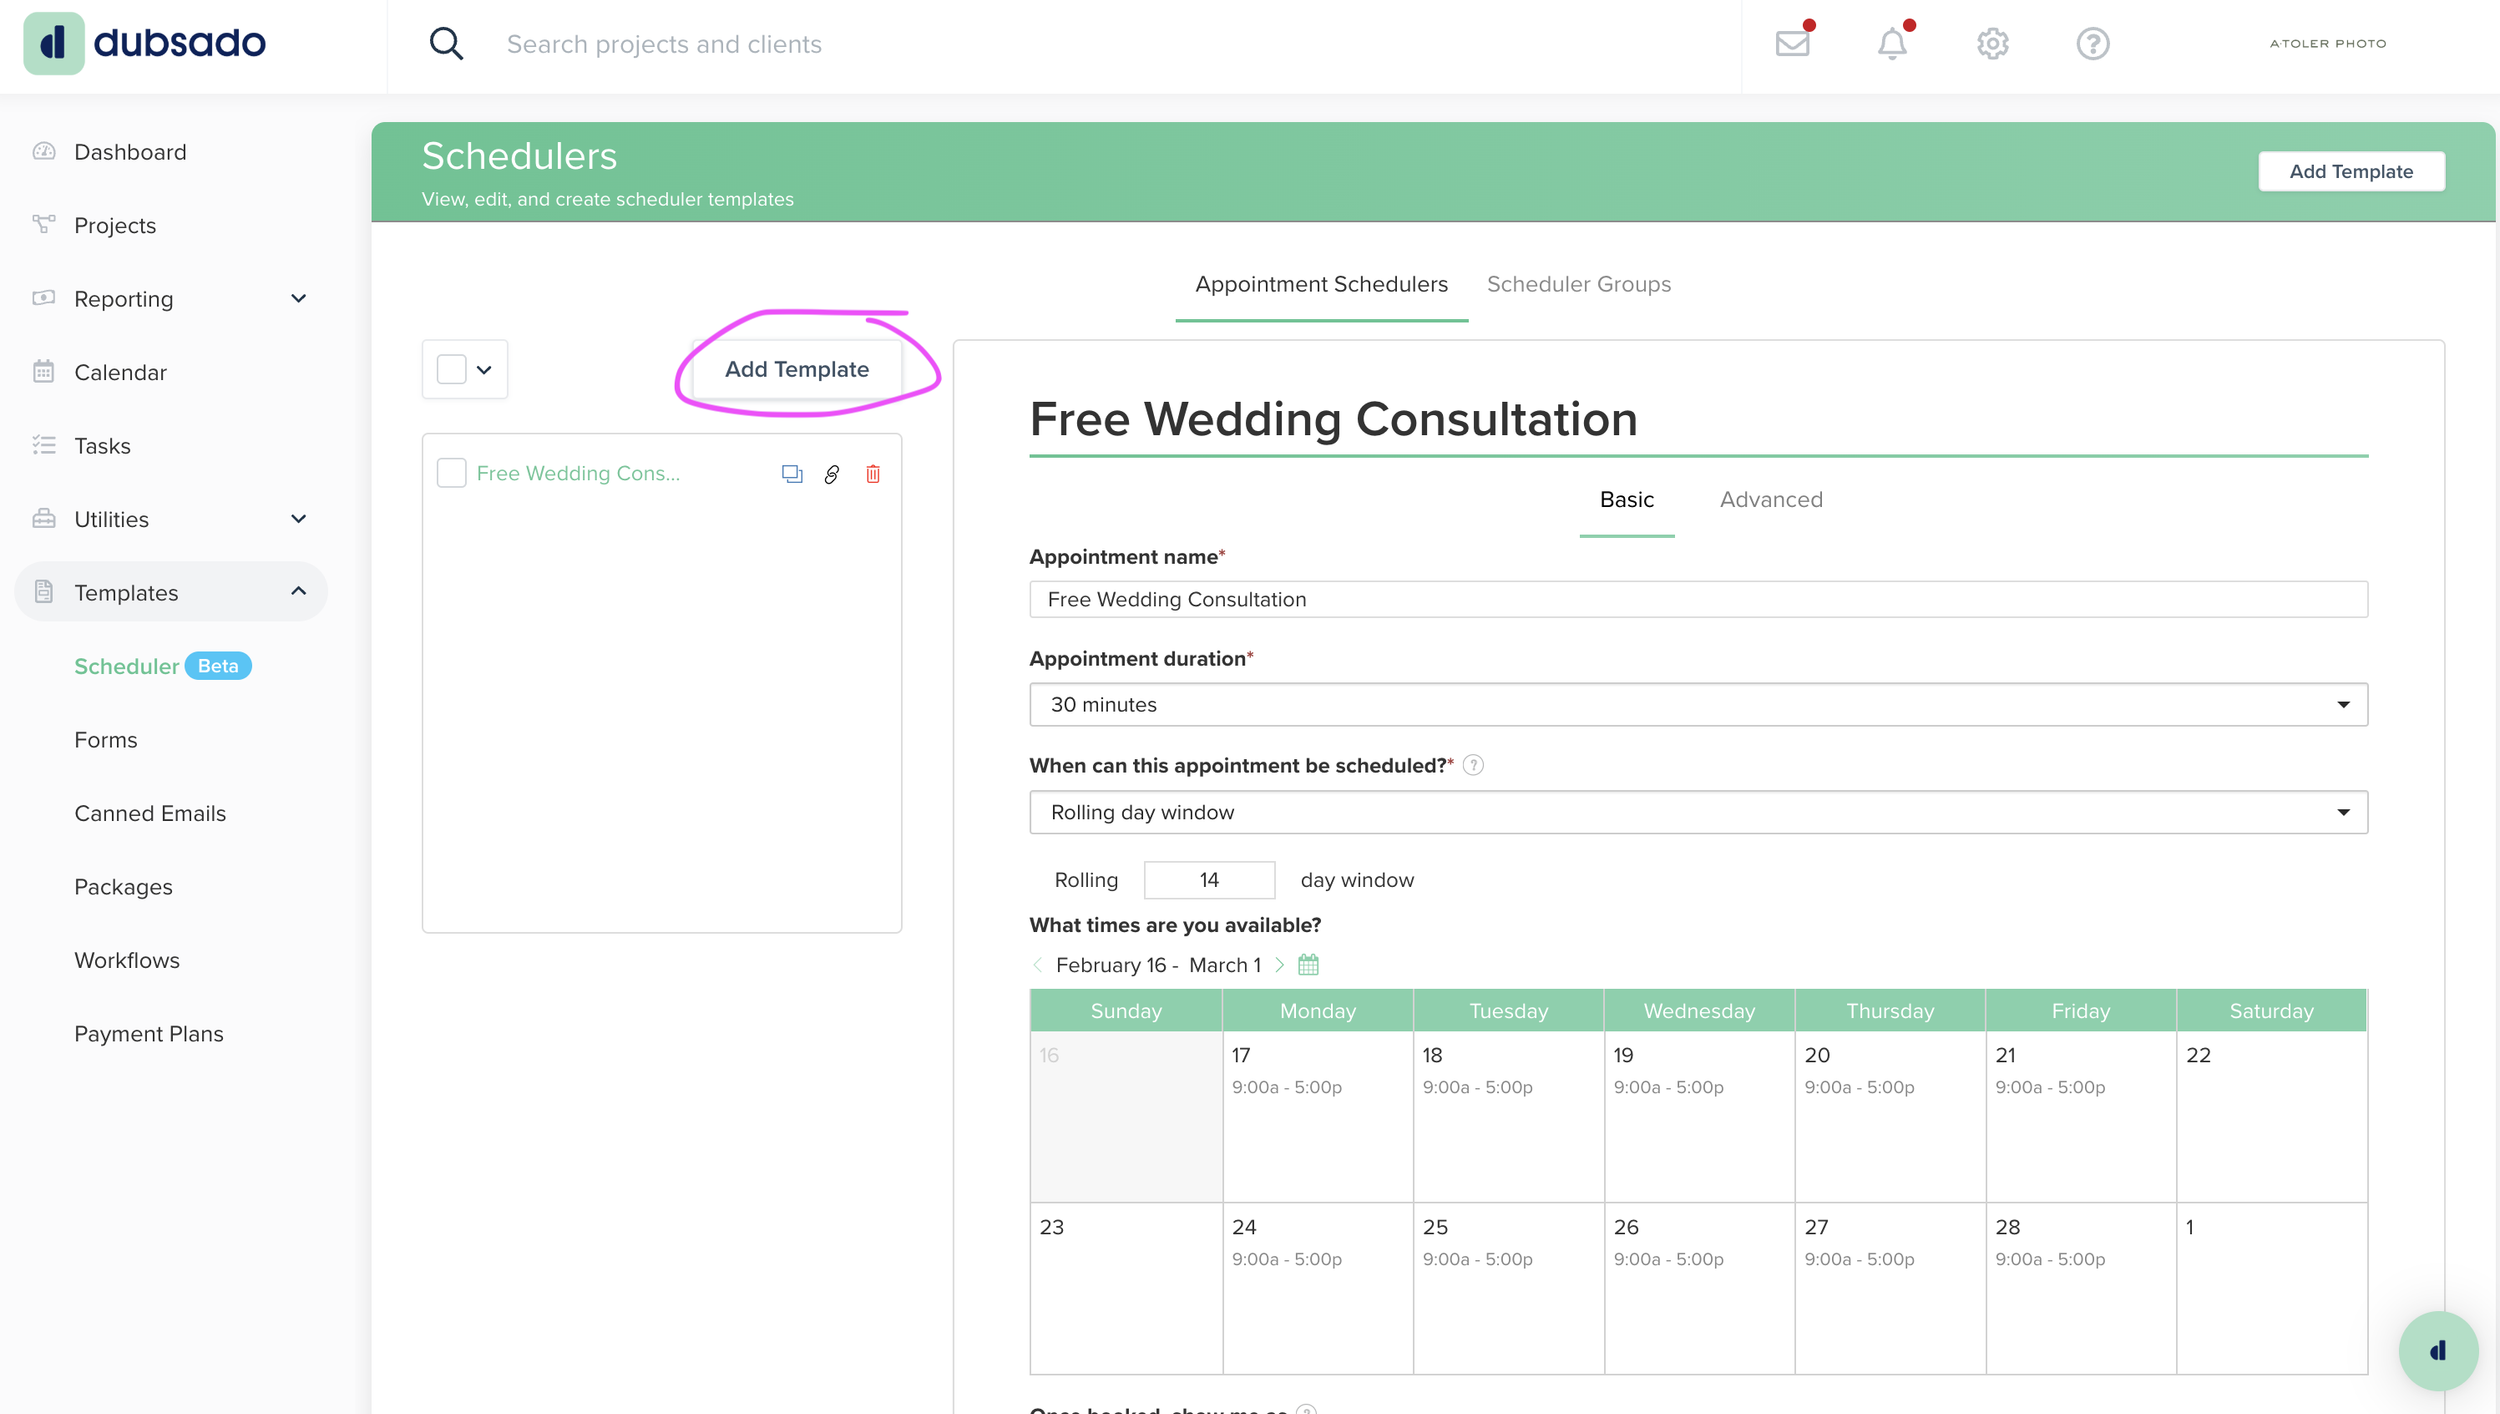
The Scheduler feature in Dubsado is much easier for me to navigate than the one in Honeybook, and it appears less intimidating to my clients as well. When you make a Scheduler link, people are able to use it to pick an open time on your calendar that works for you both, enter their information, and schedule a meeting. Using this feature eliminates extraneous back-and-forth messaging trying to find a time and date where both of you are available, therefore making it more likely a potential client will want to talk to you. To create a new scheduler, click “add template.”
Adjust the settings to your needs. The “Email” section at the bottom is for the email that will be used when you directly share the scheduler link with someone. You can enter a canned email, or you can type it up at the bottom.
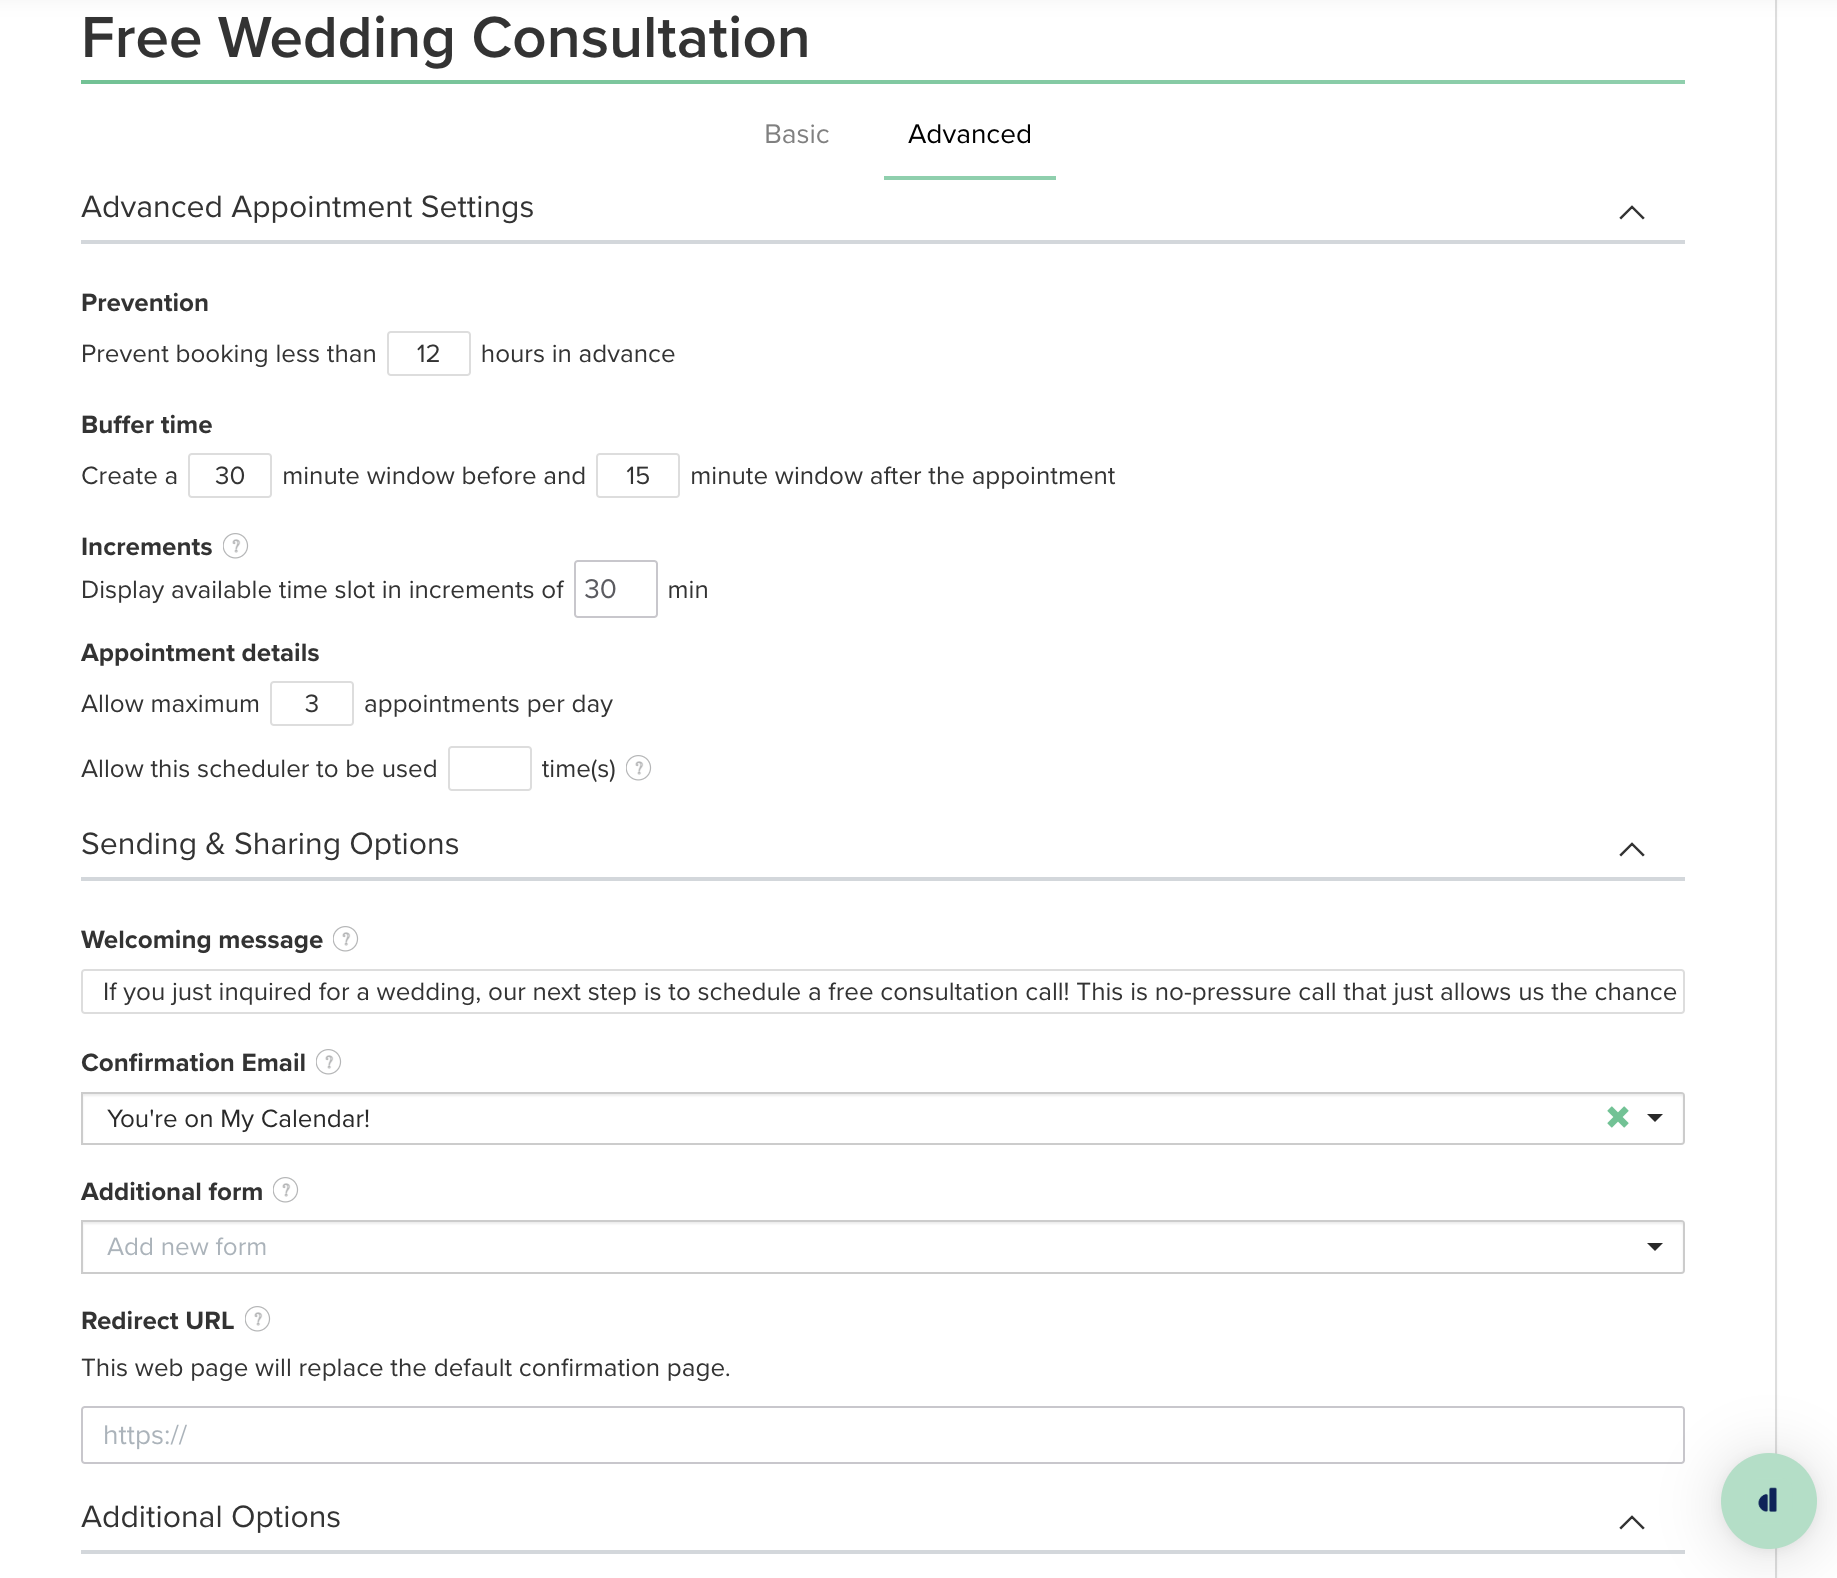
Next, edit the “Advanced Settings” to fit your needs. You can see mine below if you’re having a hard time wrapping your mind around what everything means. For the “Confirmation Email” section, you will choose a canned email that you made separately in the “canned email” section.
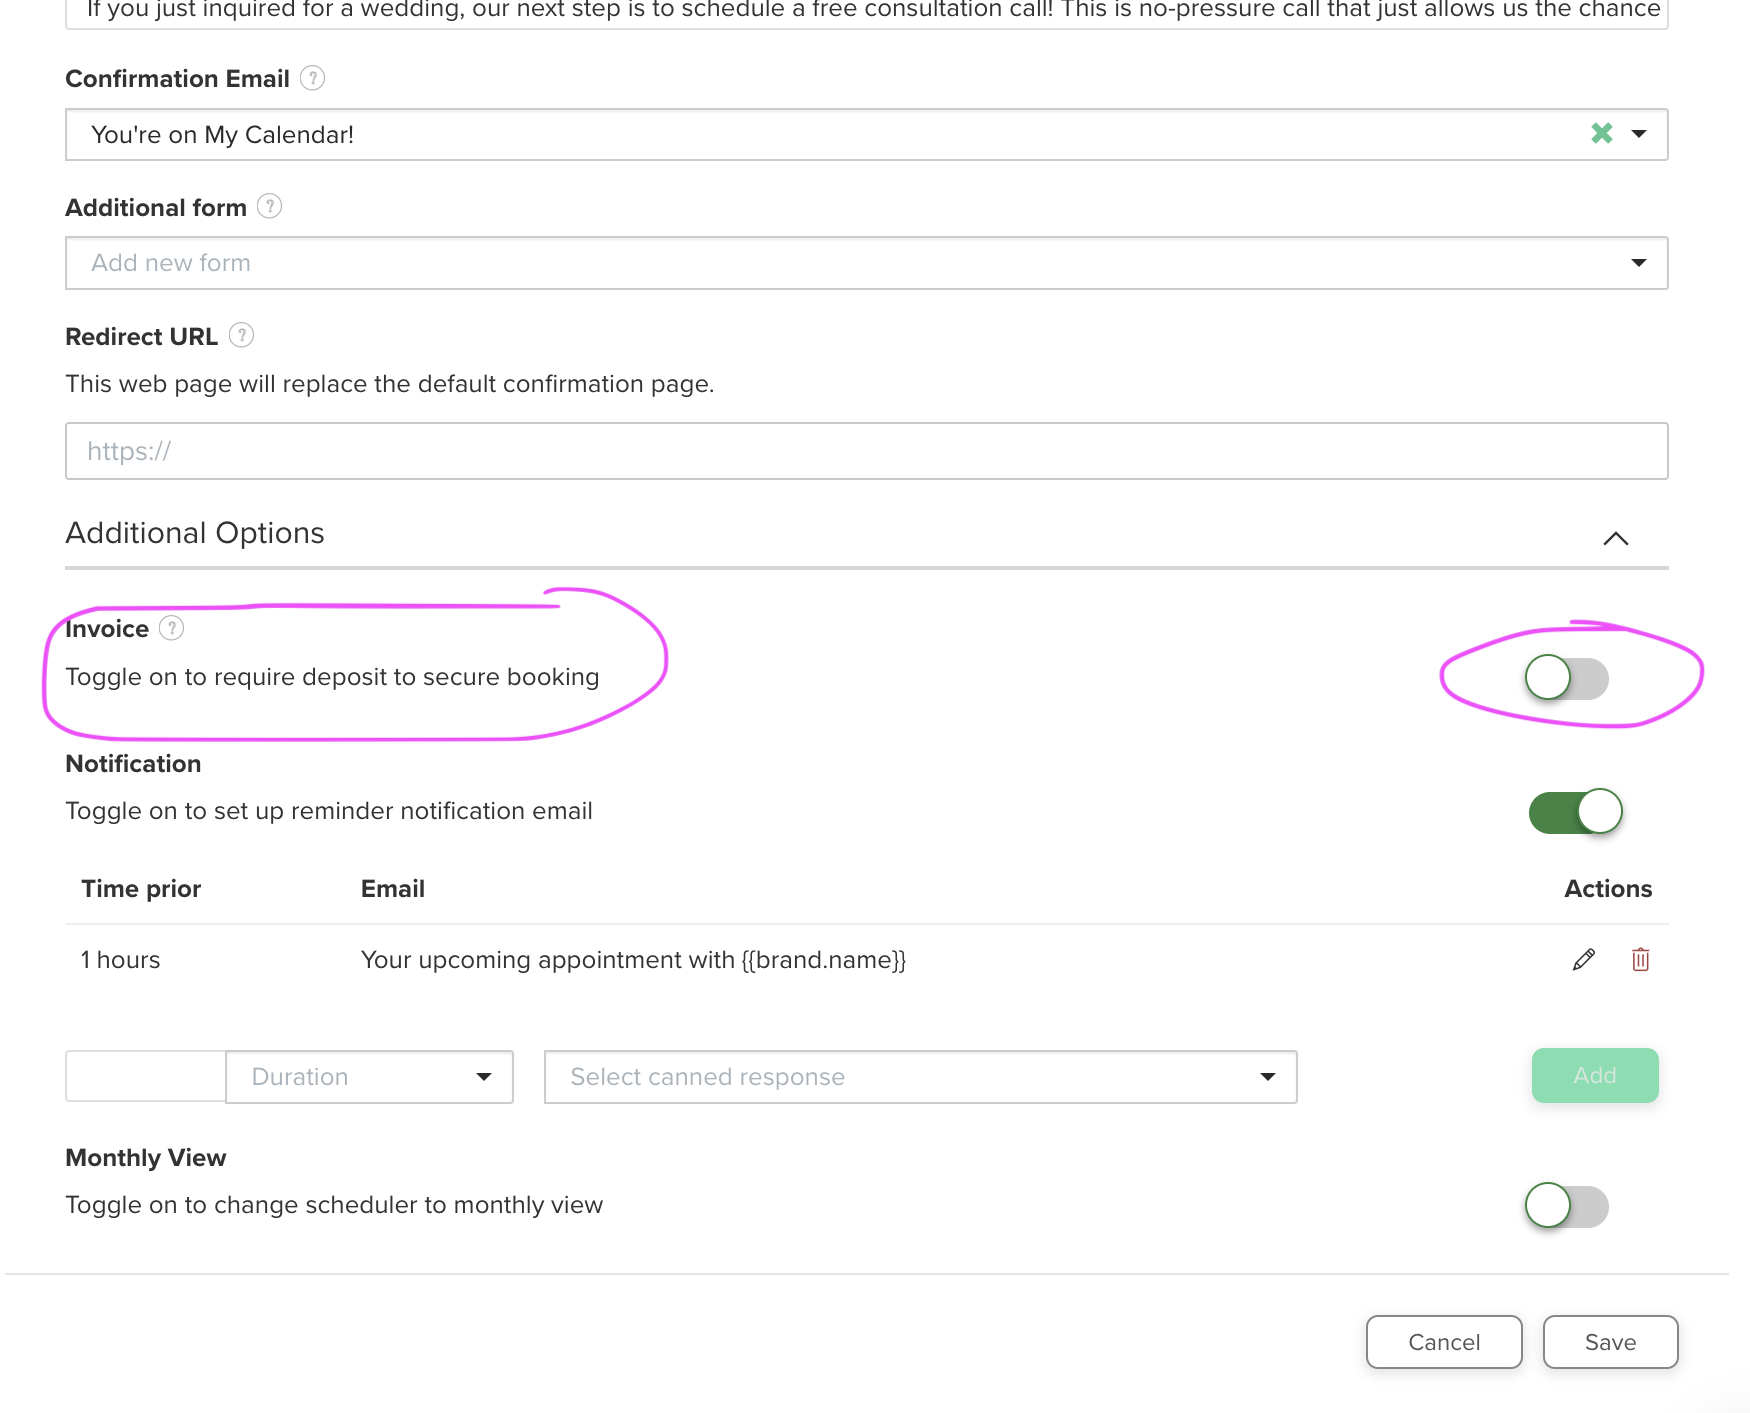
If you are creating meetings that are not free, such as paid coaching sessions, then you’ll want to toggle on the “Invoice” section and add a line item to determine how much the client will have to pay in order to get on your calendar.
You can also add a reminder email, chose when it will send to the client, and add another canned response template for what that email will be. As you can see in the image above, I kept mine at the default response, sending one hour before the appointment time.
packages
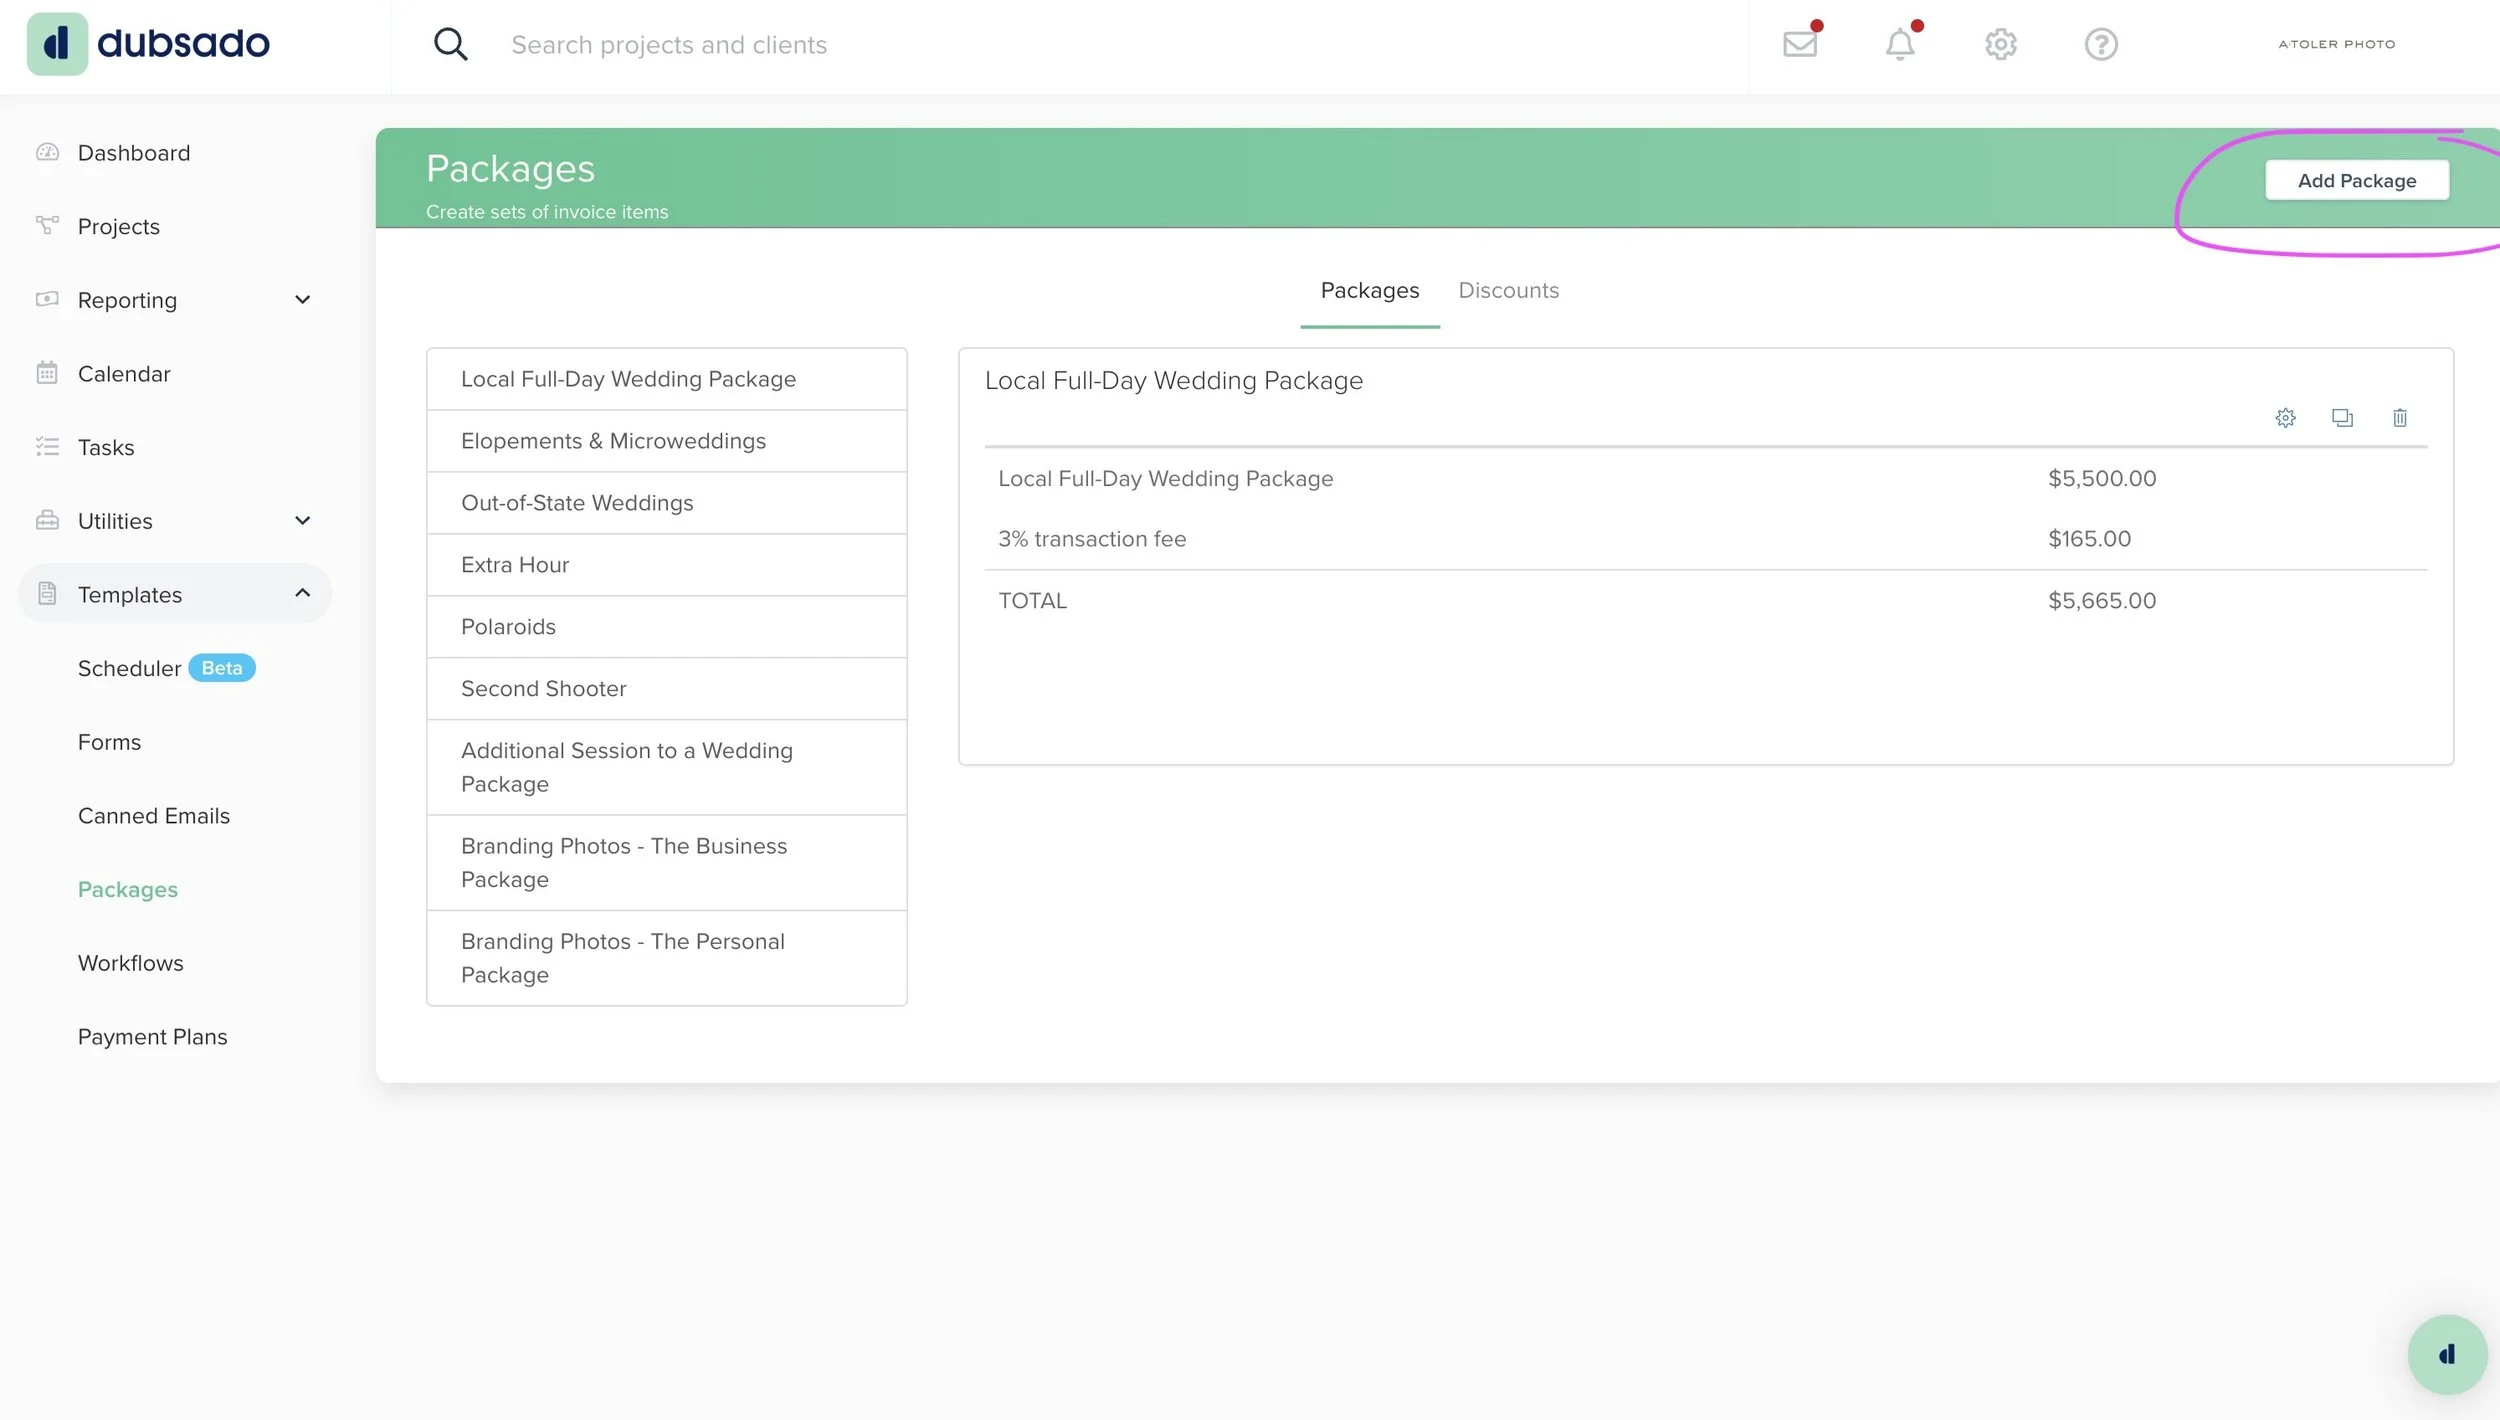
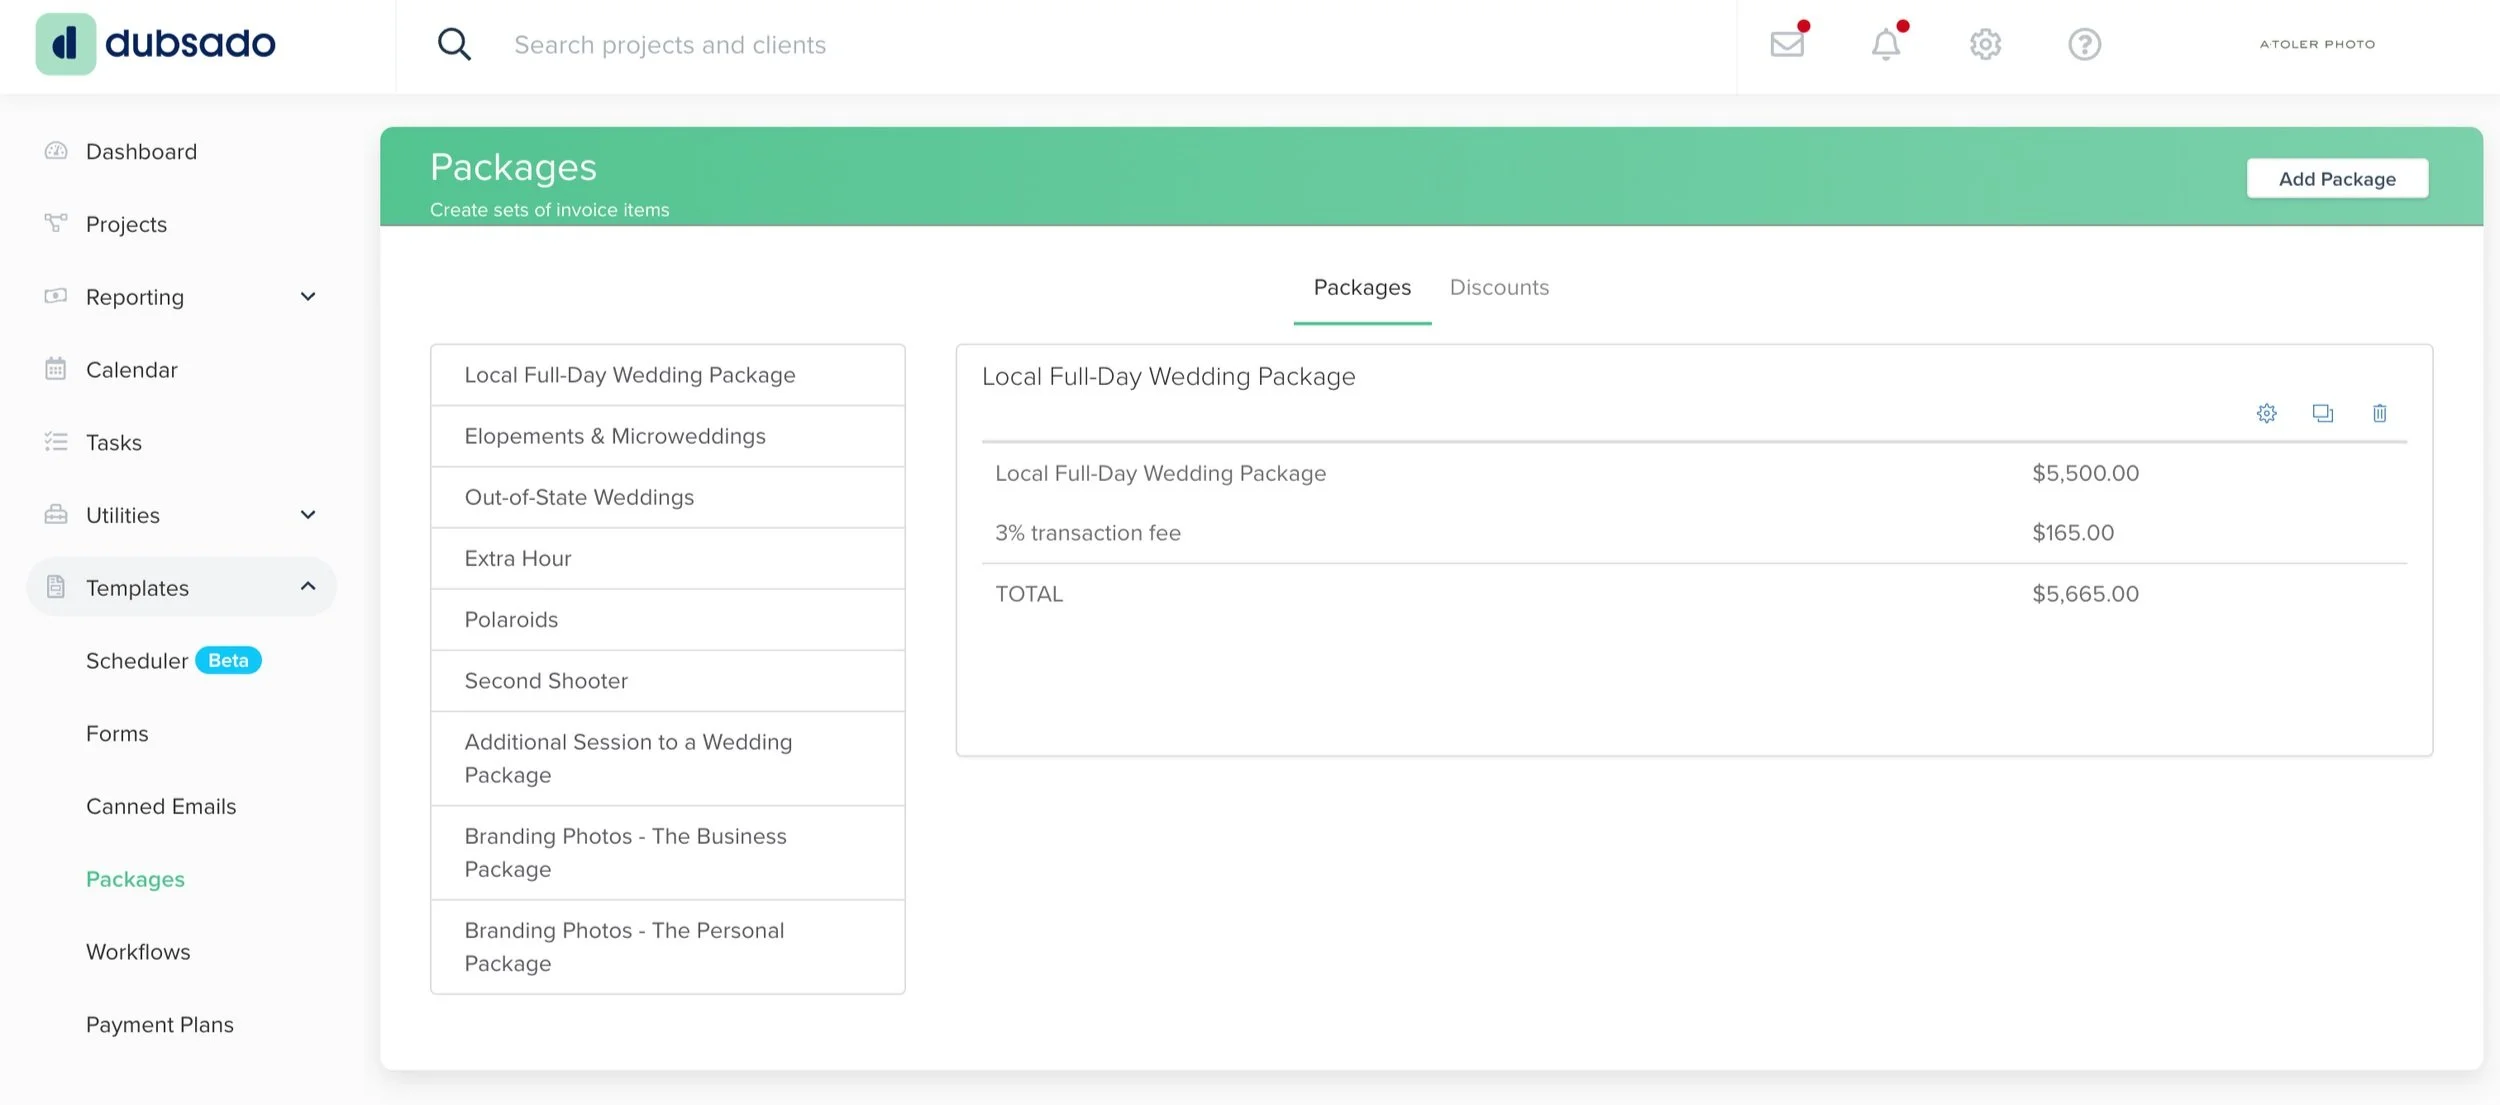
The Packages feature is where you set up the packages you insert into your invoices. Having them set up here makes sending invoices extremely easy. Click “add package” in the upper right corner to get started.
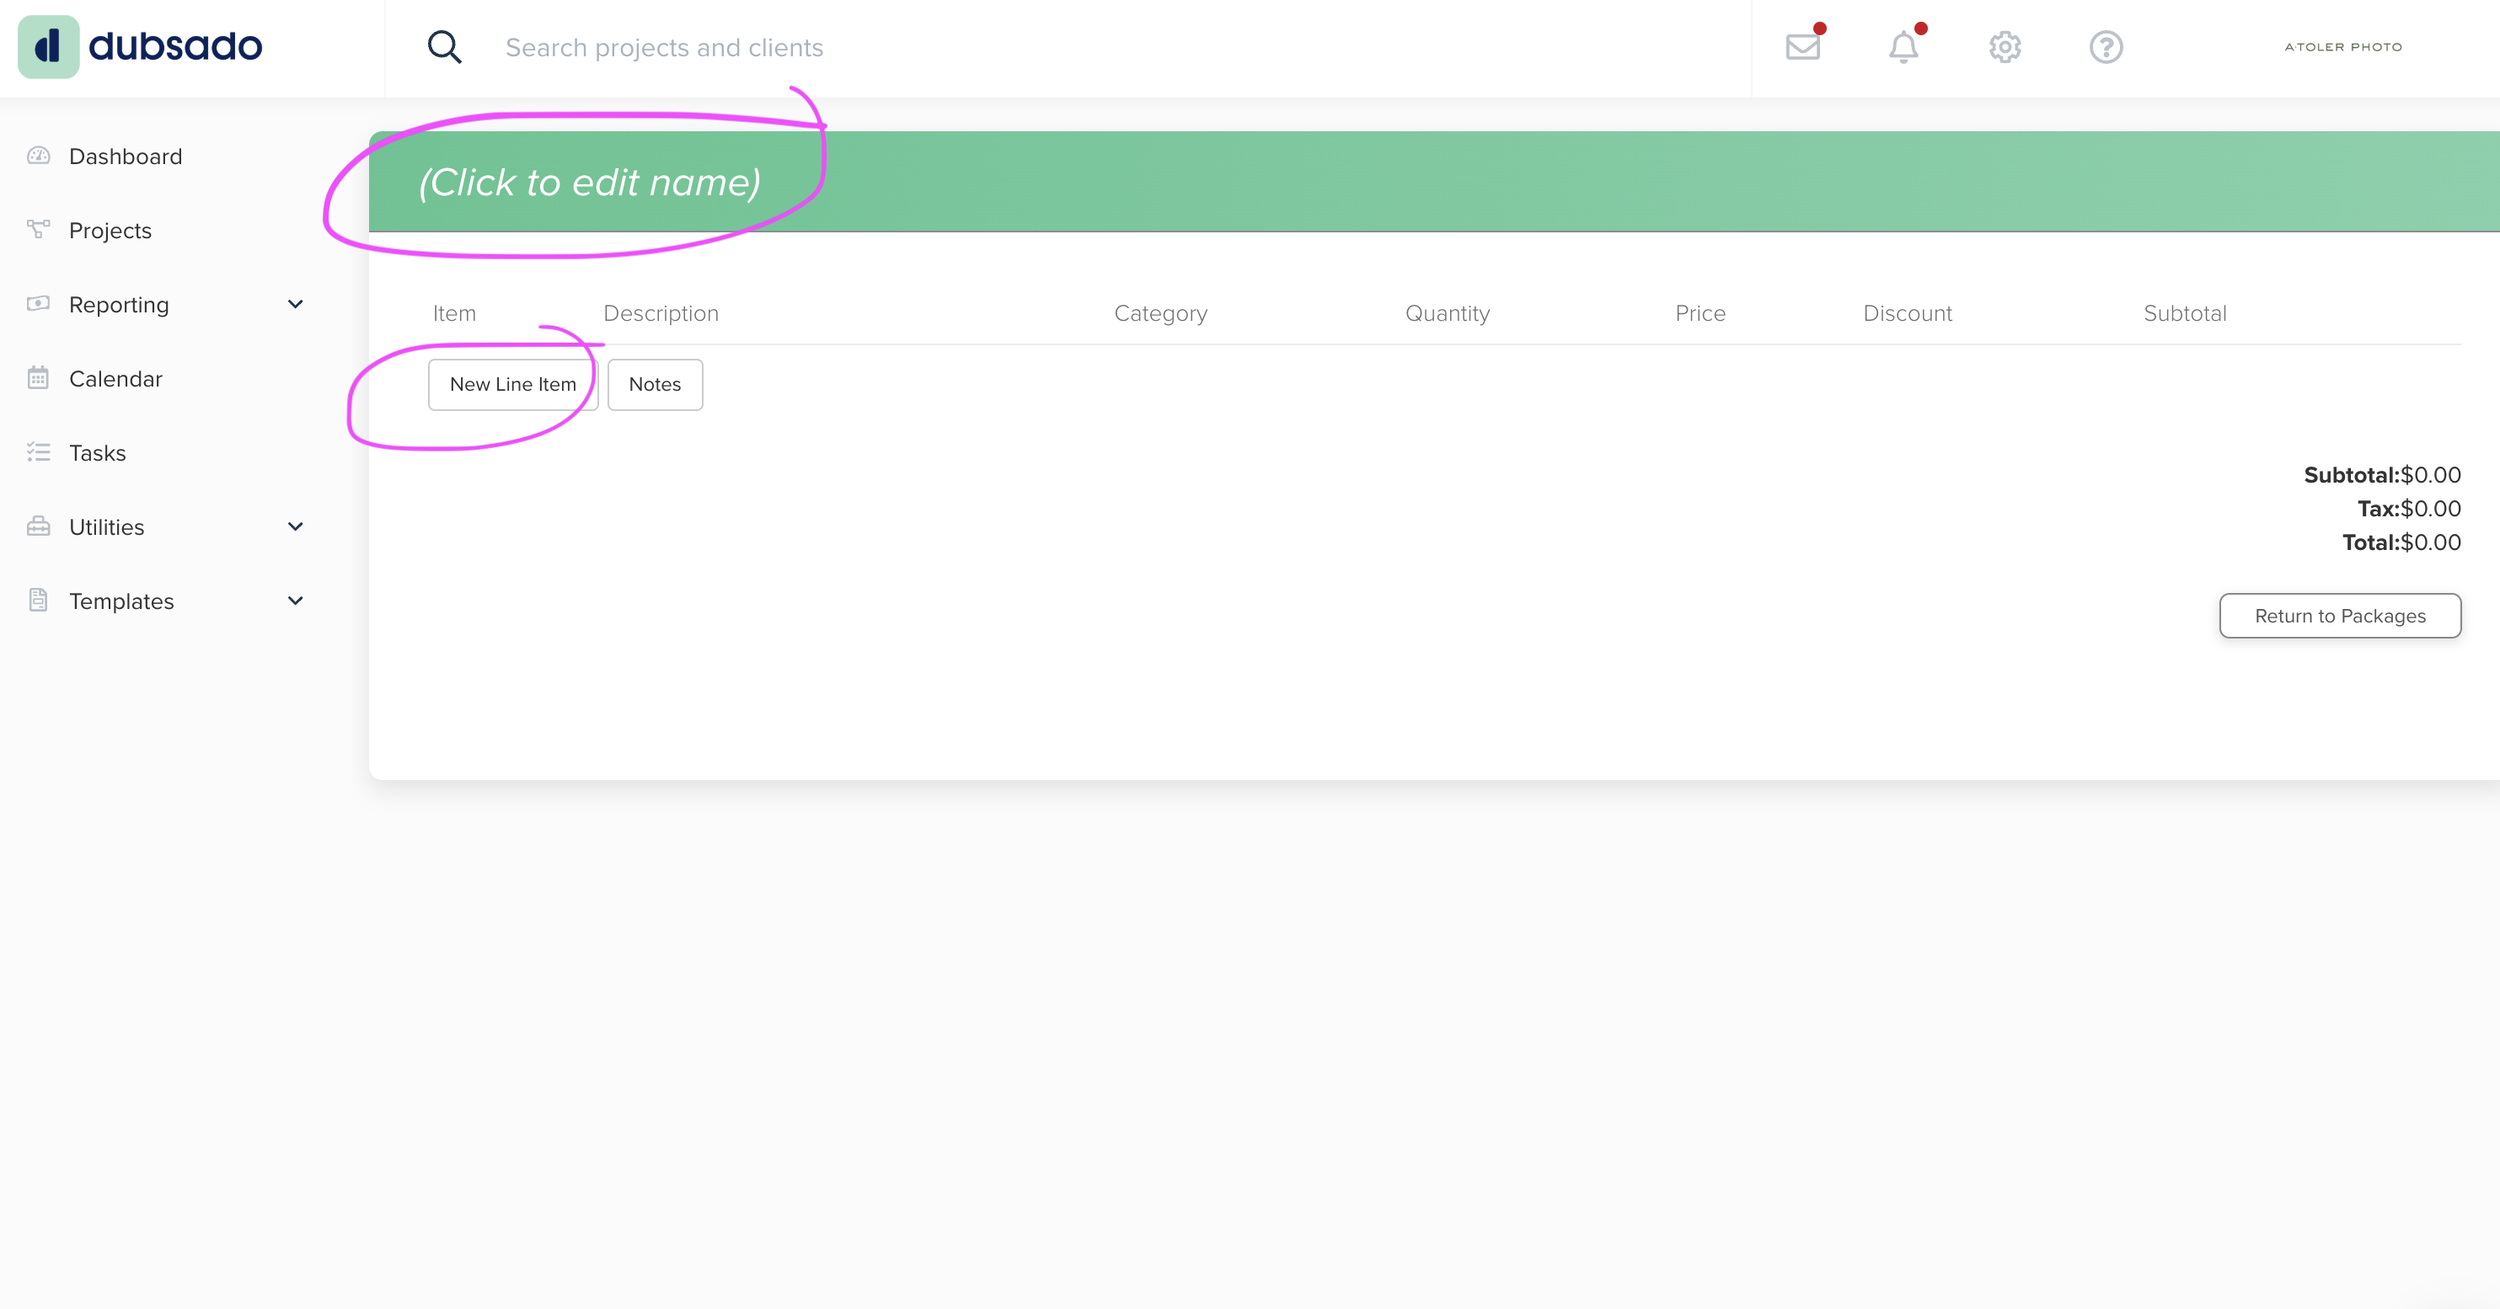
Give your package a name at the top, then add a line item.
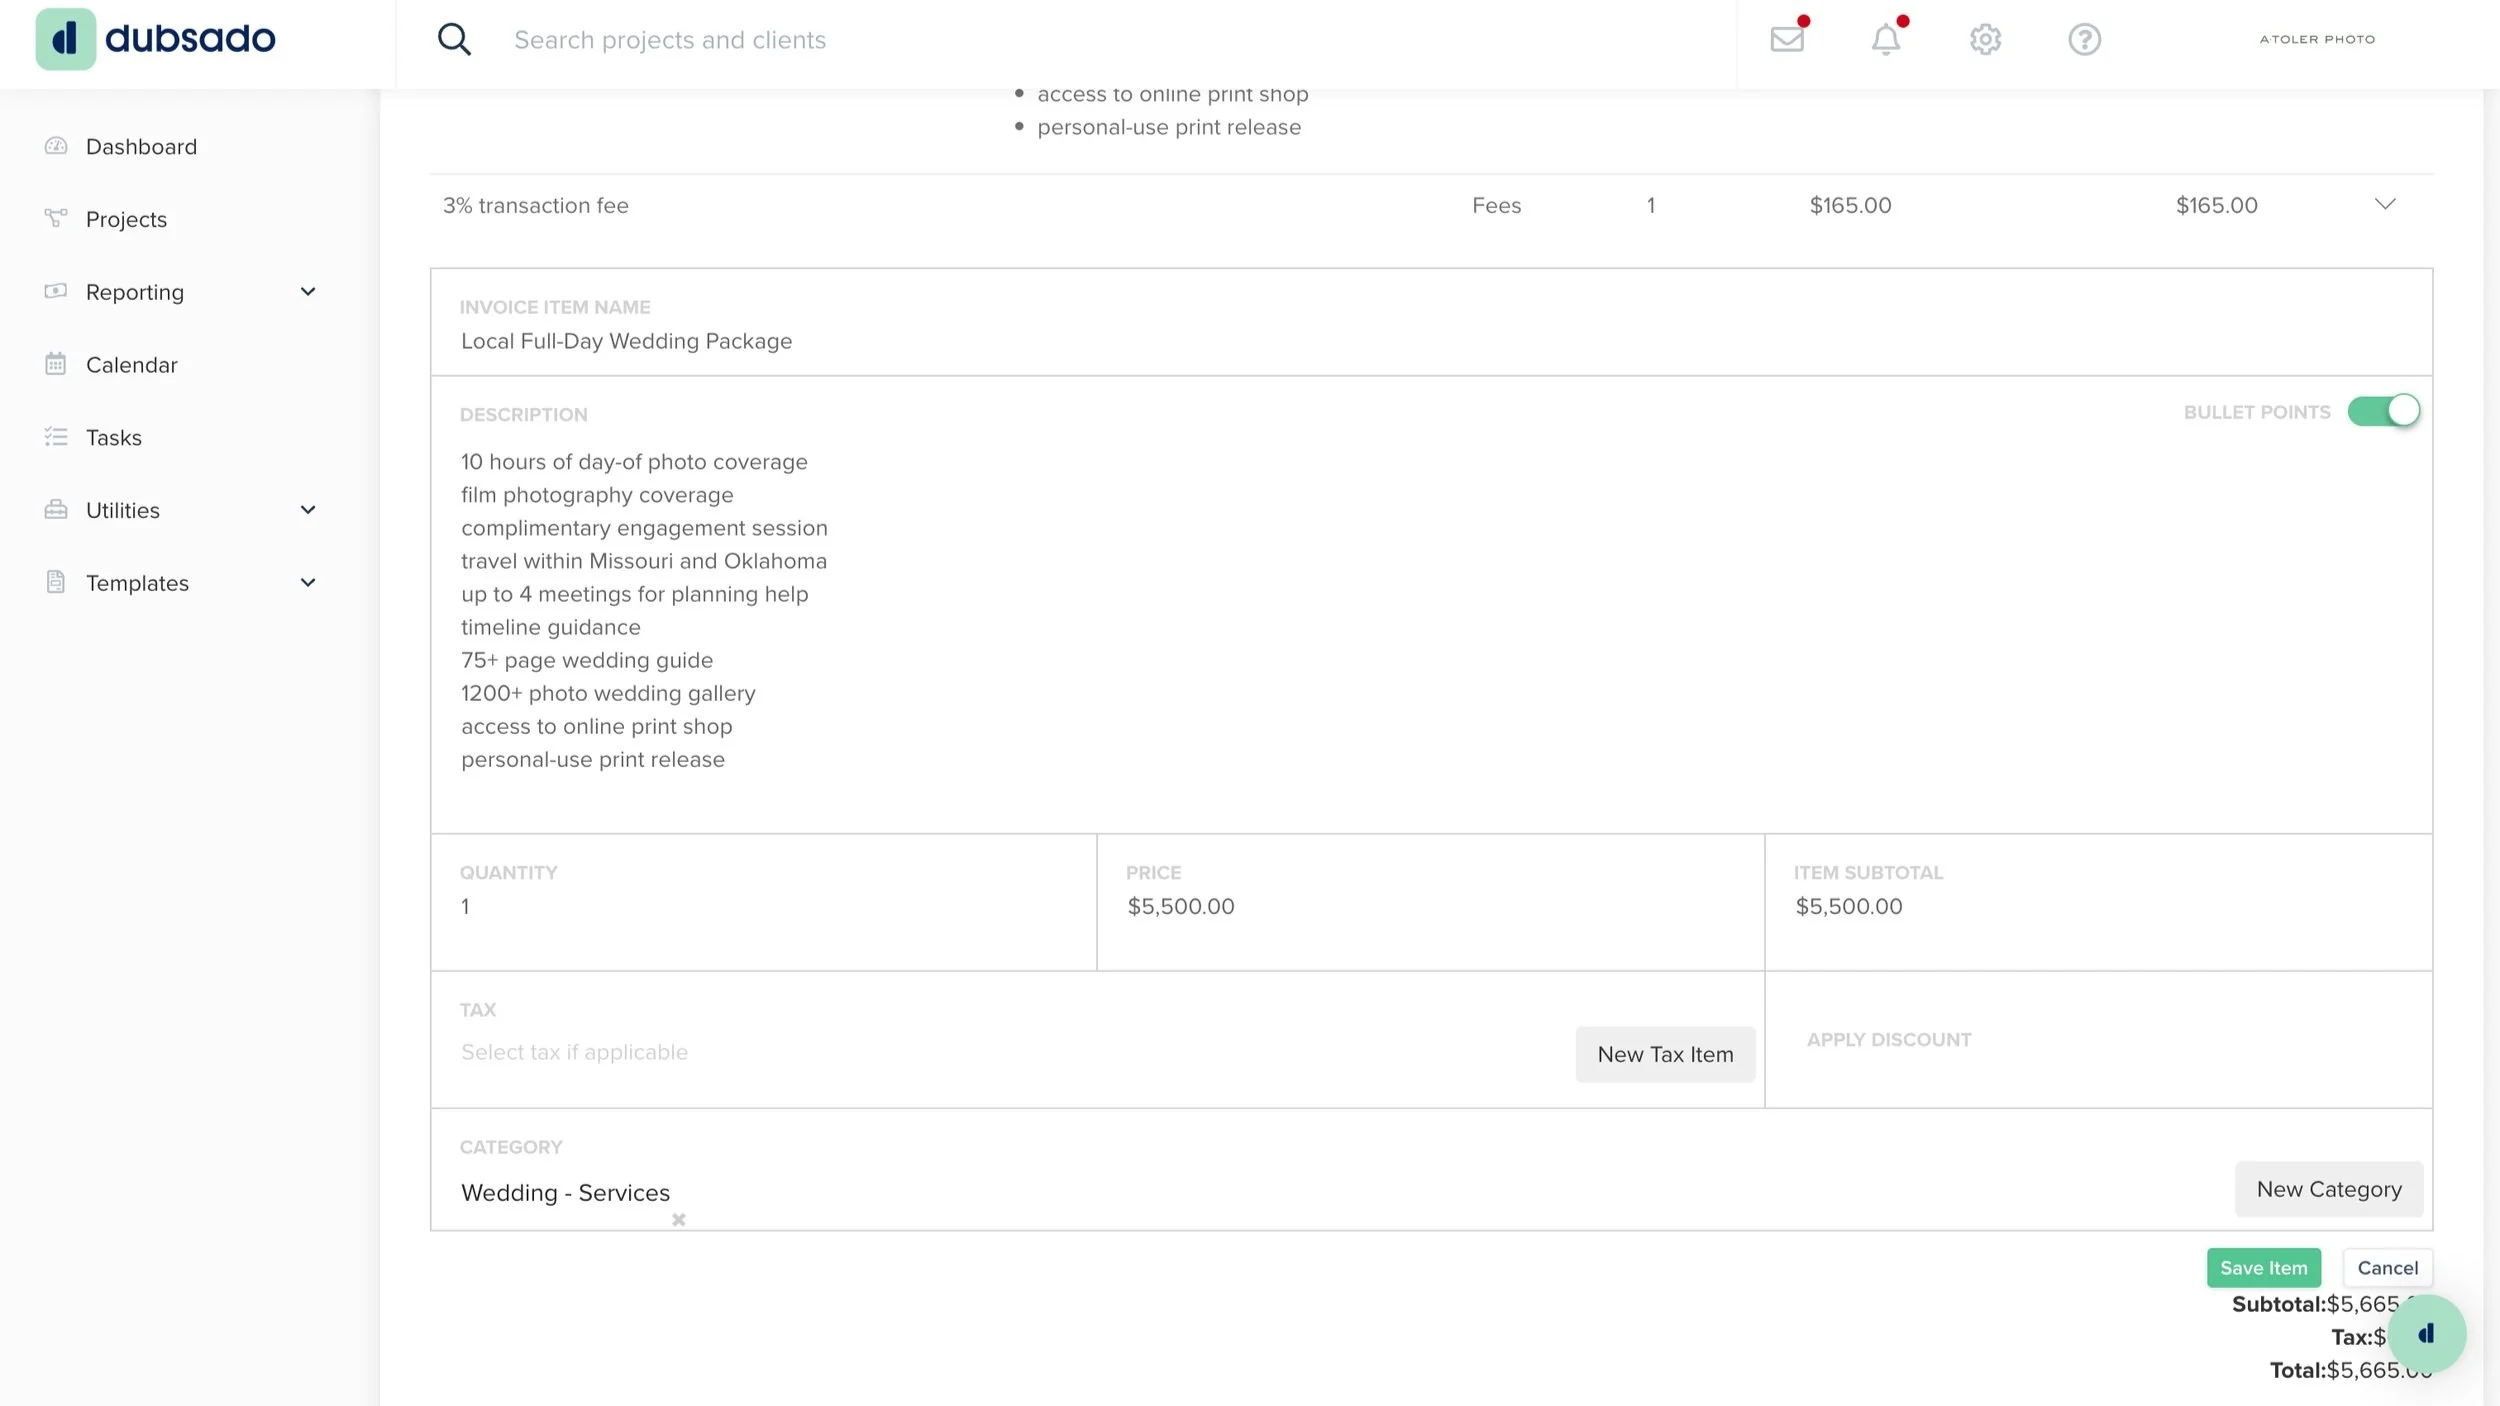
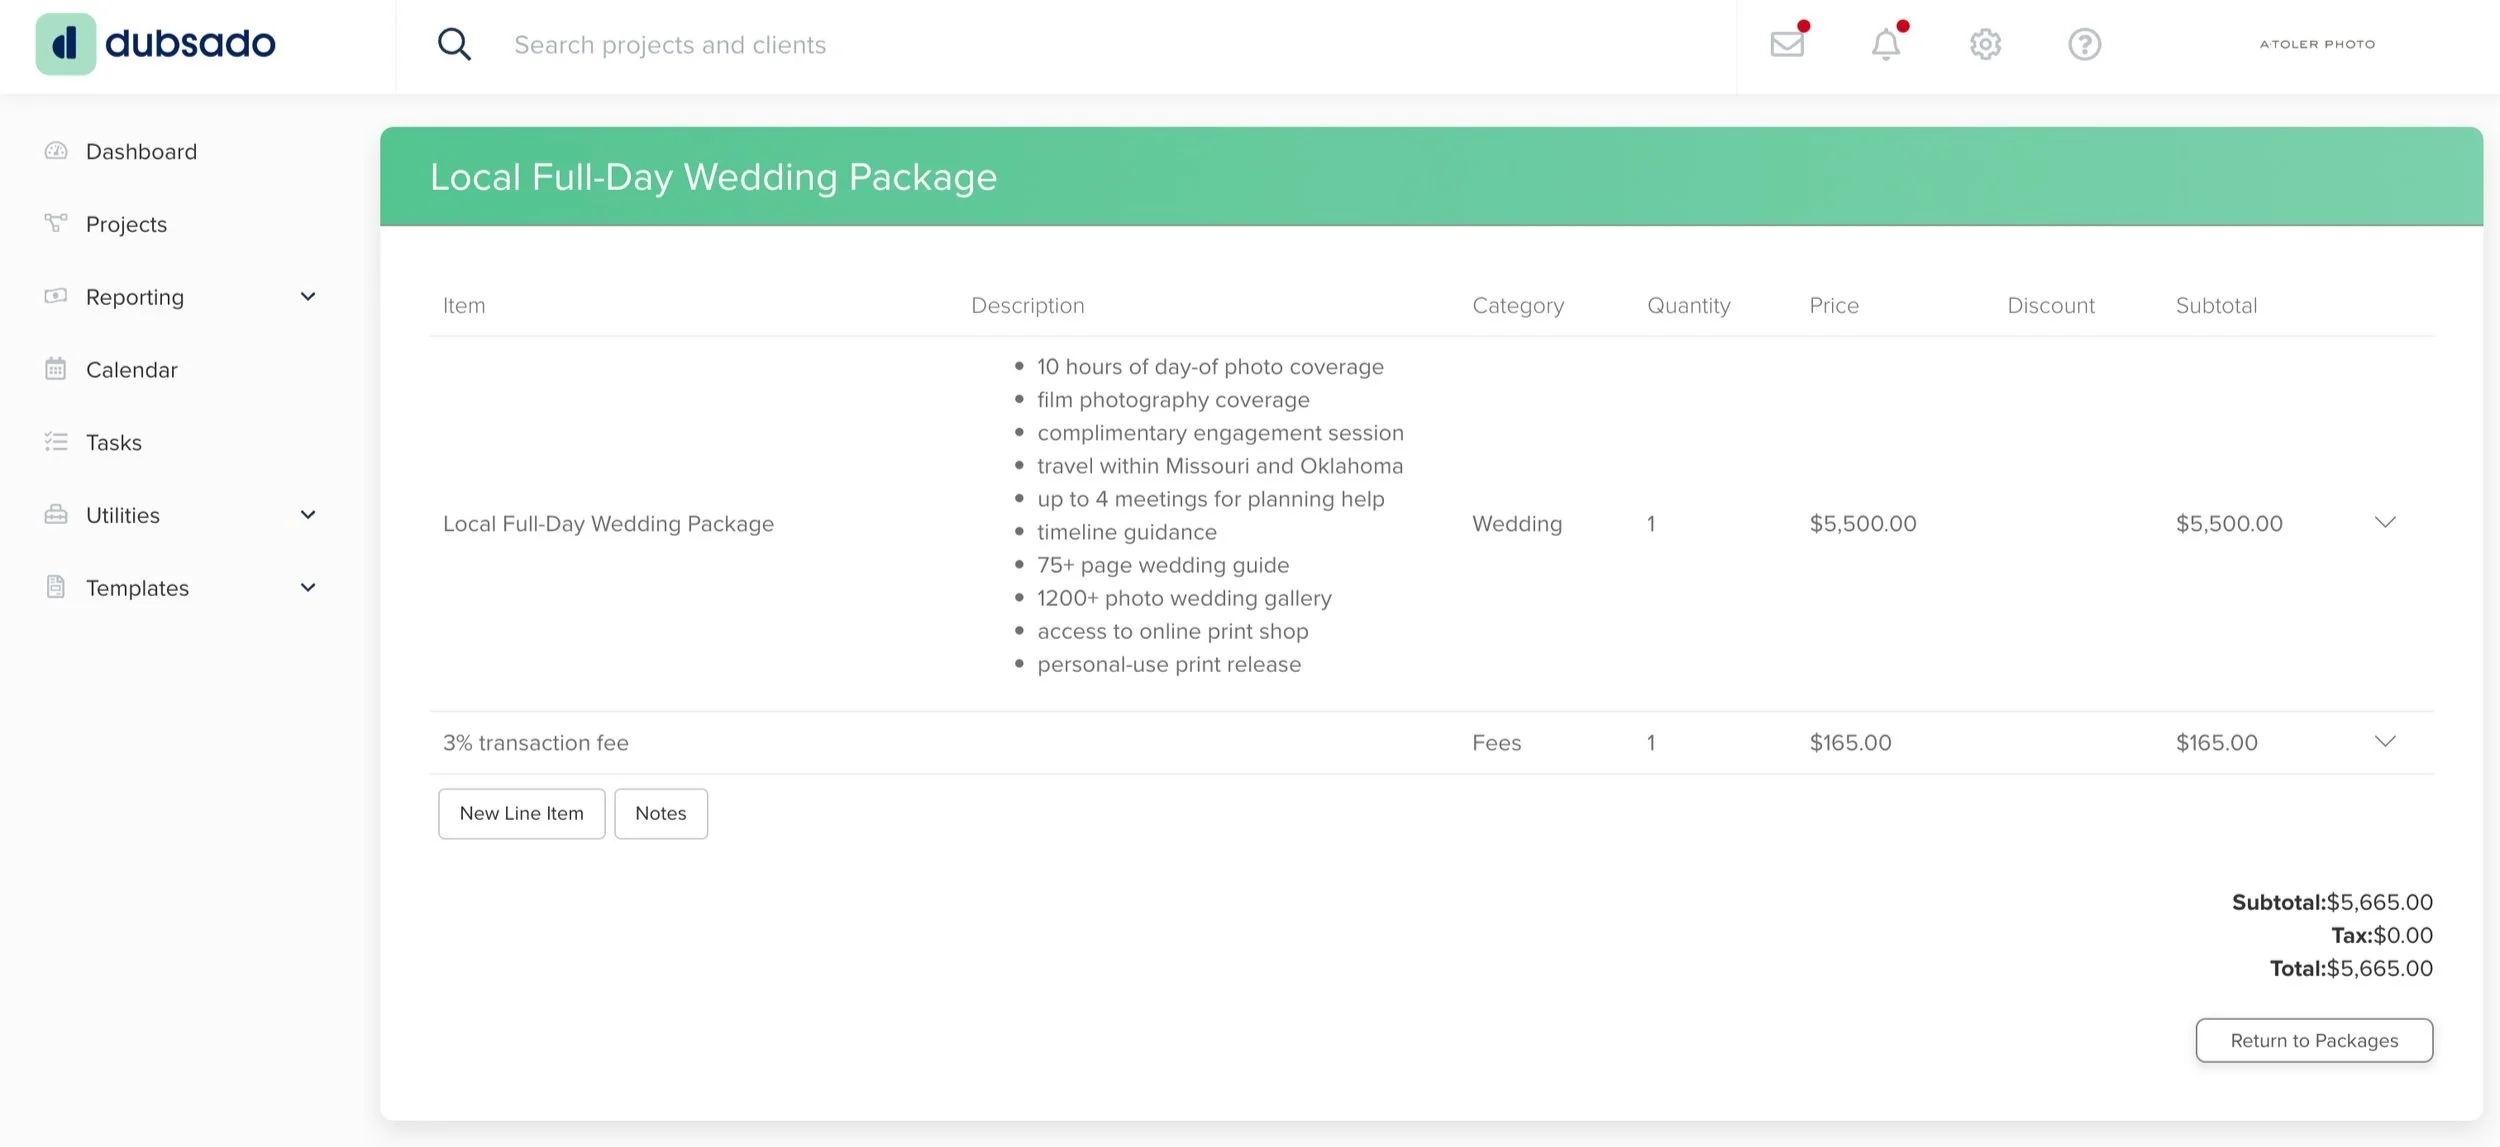
Fill in the line item name, a description of the item, the quantity, price, and necessary tax. You also assign it to a category. For example (see below), I made a wedding package, and in the description included what is in the package. I then changed the quantity to 1 and added the price. At the bottom, I put this package in the “weddings” category. Once you’ve added all of the features you will use in the package, you’re welcome to add all of your packages. If you wanted to add a “travel fee” package, then under “price” you would enter what you charge per mile, and then enter the number of miles in the quantity category when assigning it to a project. I also added all of my “add-on” features and put them in a new category labeled “weddings - add-ons.” This makes it easy for me to keep everything extremely organized, and to add these different packages together when making a custom invoice for a client.
You will add these packages to invoices when you make them for clients, and then smart fields will carry over all of the information, descriptions and prices and all, into your contracts. It’s so streamlined, easy, and wonderful!
payments plans and workflows
Payment Plans and Workflows are pretty self-explanatory after you’ve set up the other sections. Just click the button in the upper right corner of the page to make a new one and add installments accordingly. Once they are made, you can apply them to different projects.
transferring PROJECTS + clients
You’ve made it to the last part of set up that will get your business up and running again! Now it’s time to transfer all of our projects from Honeybook to Dubsado. While Honeybook does not have a way to export projects as a single file, or even in a slightly cohesive way, I took the time to figure out the most efficient and effective way to move everything over so you don’t have to take more time than you already are to get it switched over.
downloading honeybook content as pdfs
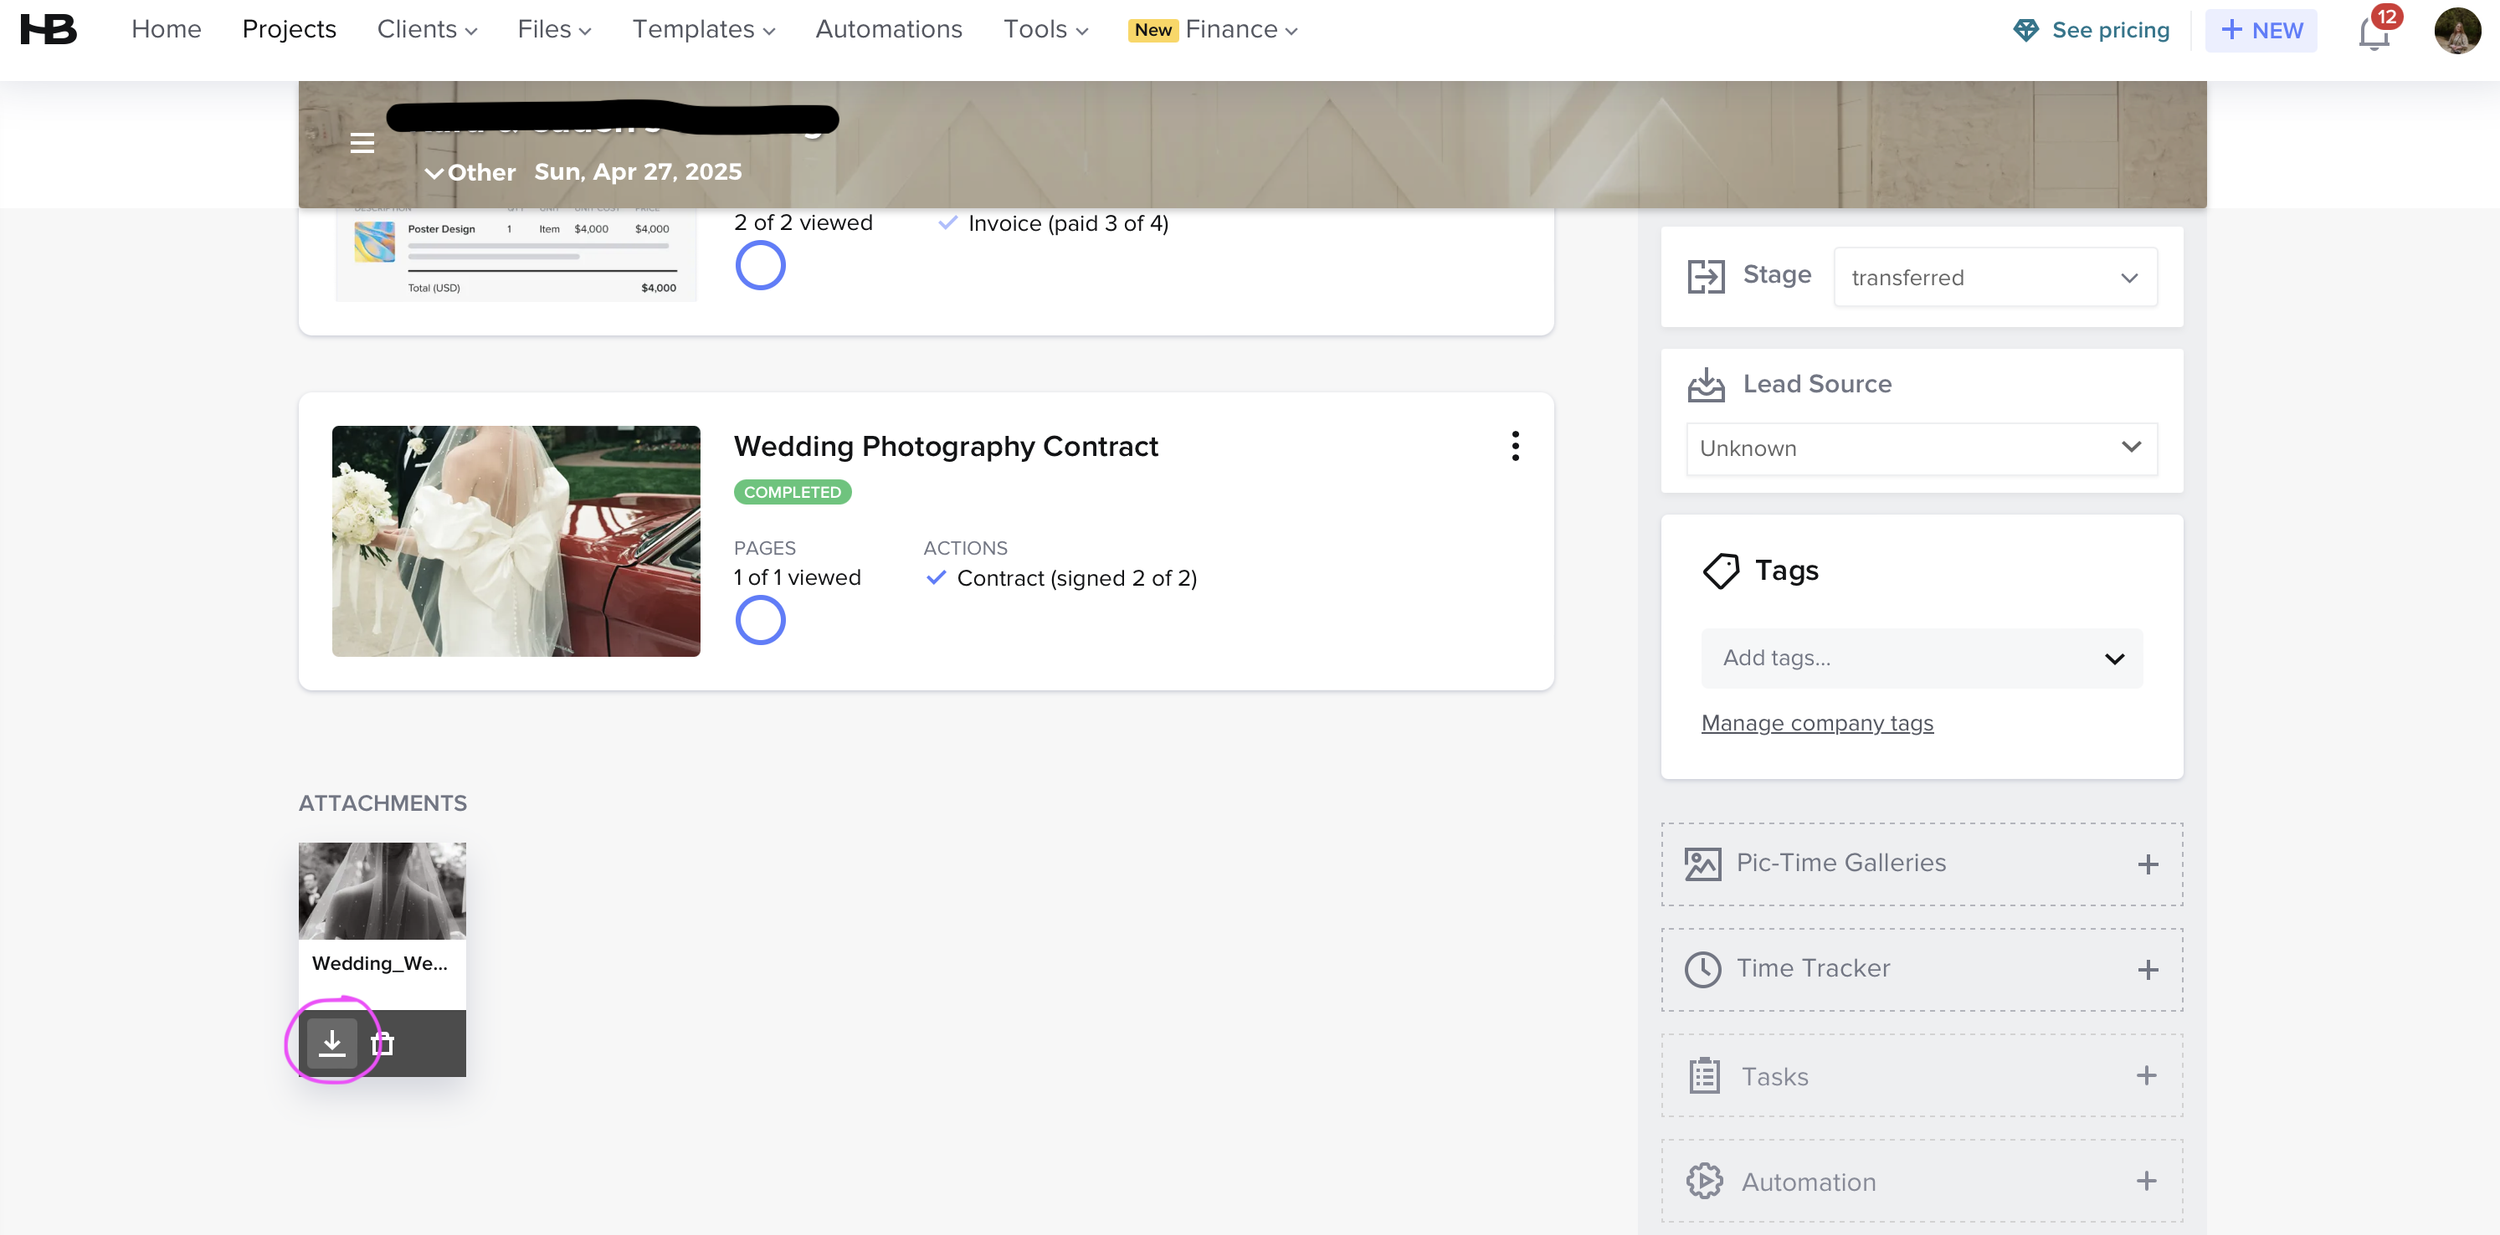
To get started, create two new project categories in Honeybook - one labeled “Transferring” and one labelled “Transferred.” Move all of the projects you’re wanting to transfer into the “Transferring” category, then select the first project. Next, make a folder on your desktop or in your documents called “client transfers.” I also made folders for each project within that folder, but you can do whatever works best for your brain.
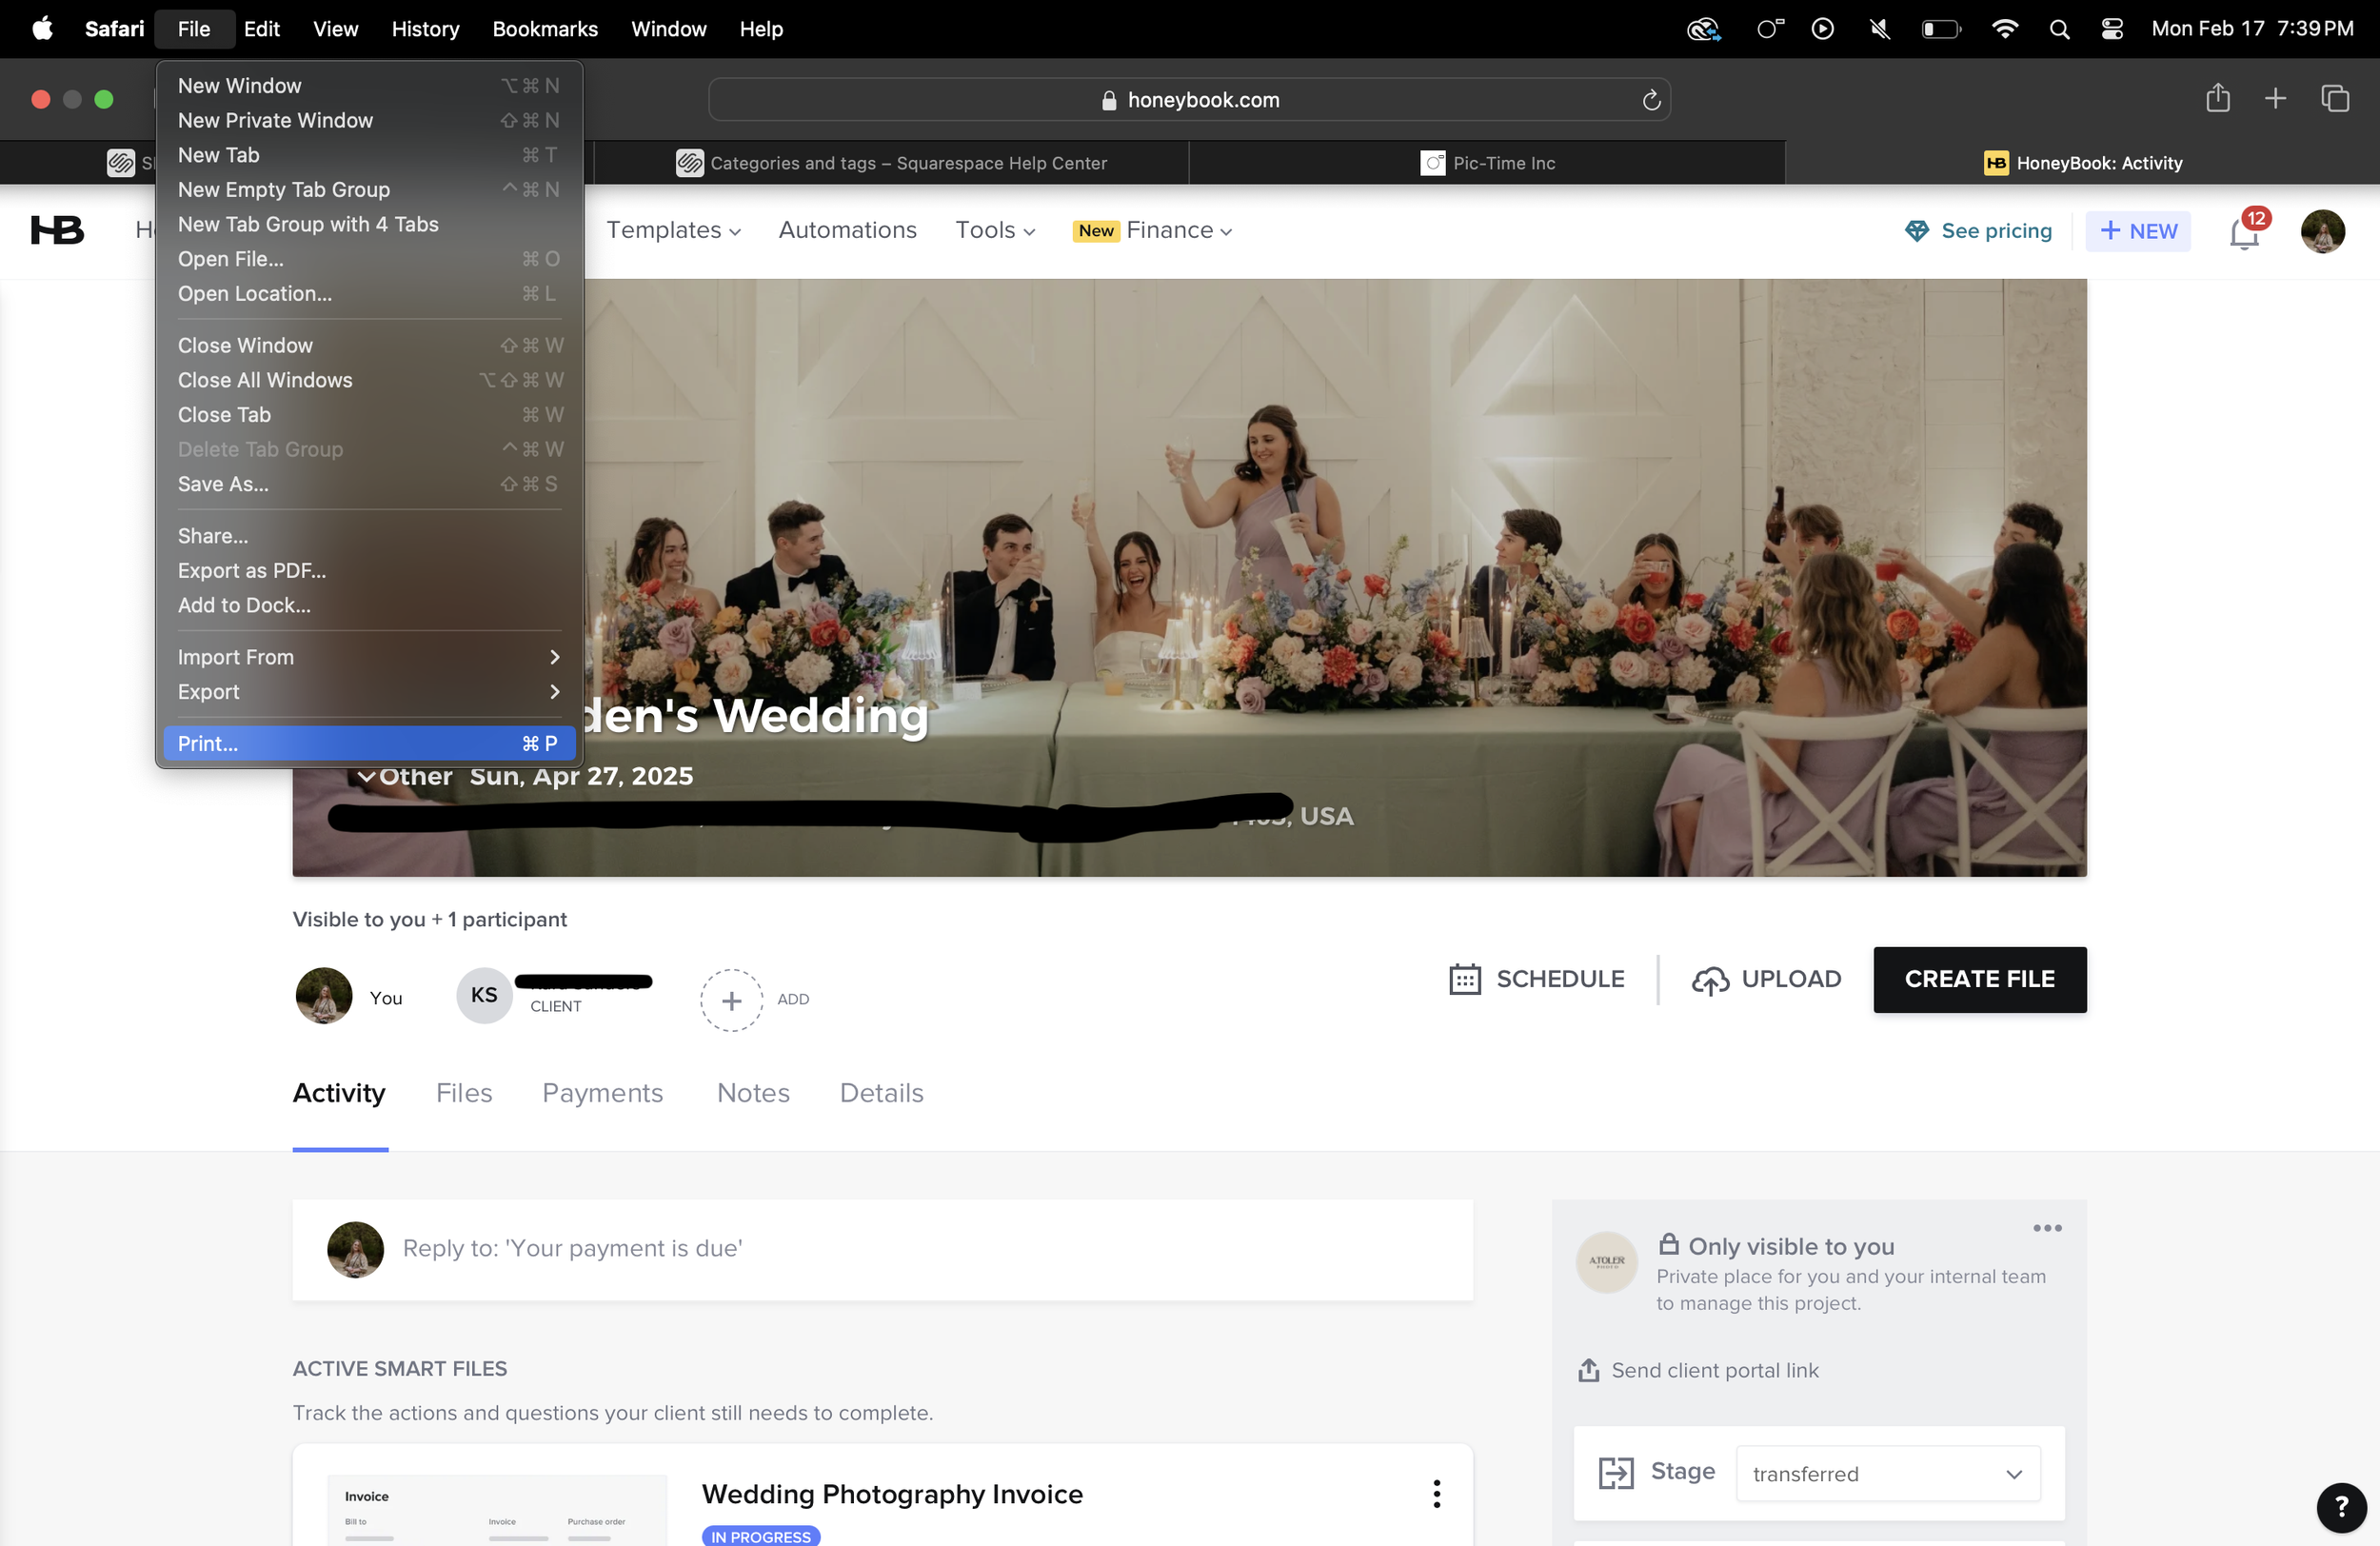
First, we’re going to save the email thread of the first project as a PDF. To do this, open the first project in the “transferring” category, go to “file” in your browser, and select “print”, as shown below.
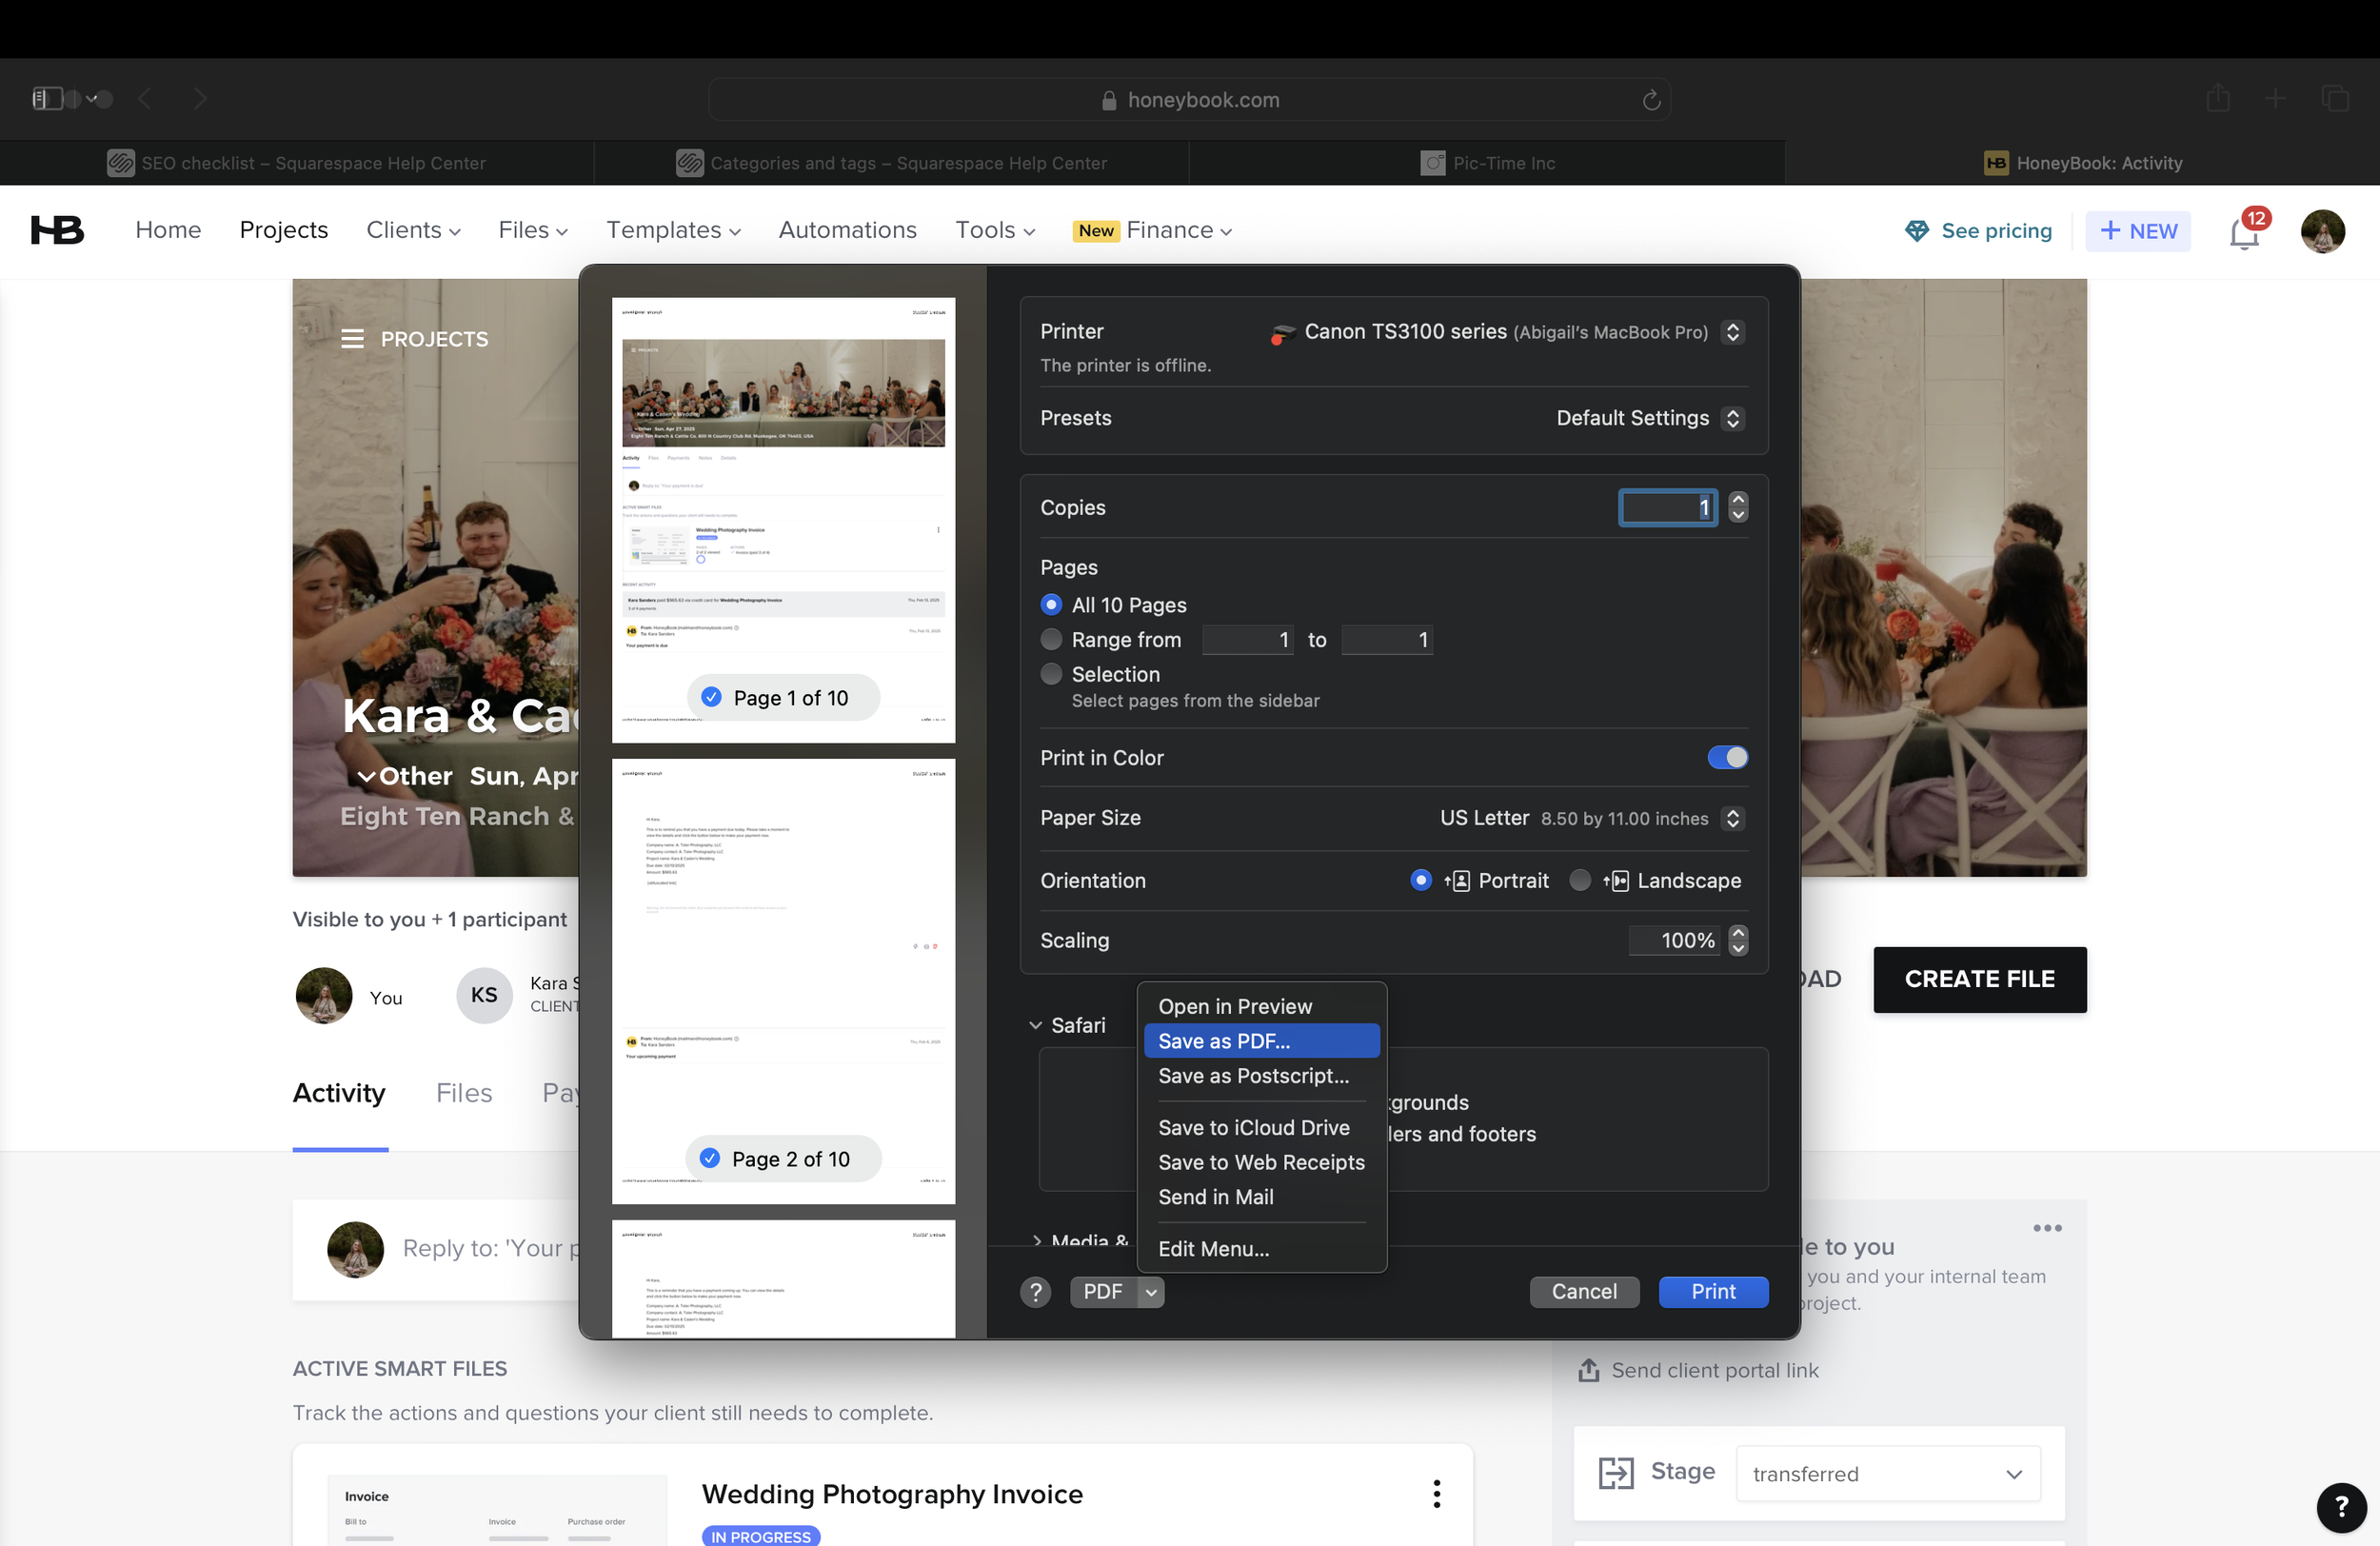
The following menu should pop up. Click “PDF” at the bottom of the pop-up, and “save as PDF”, as shown below.
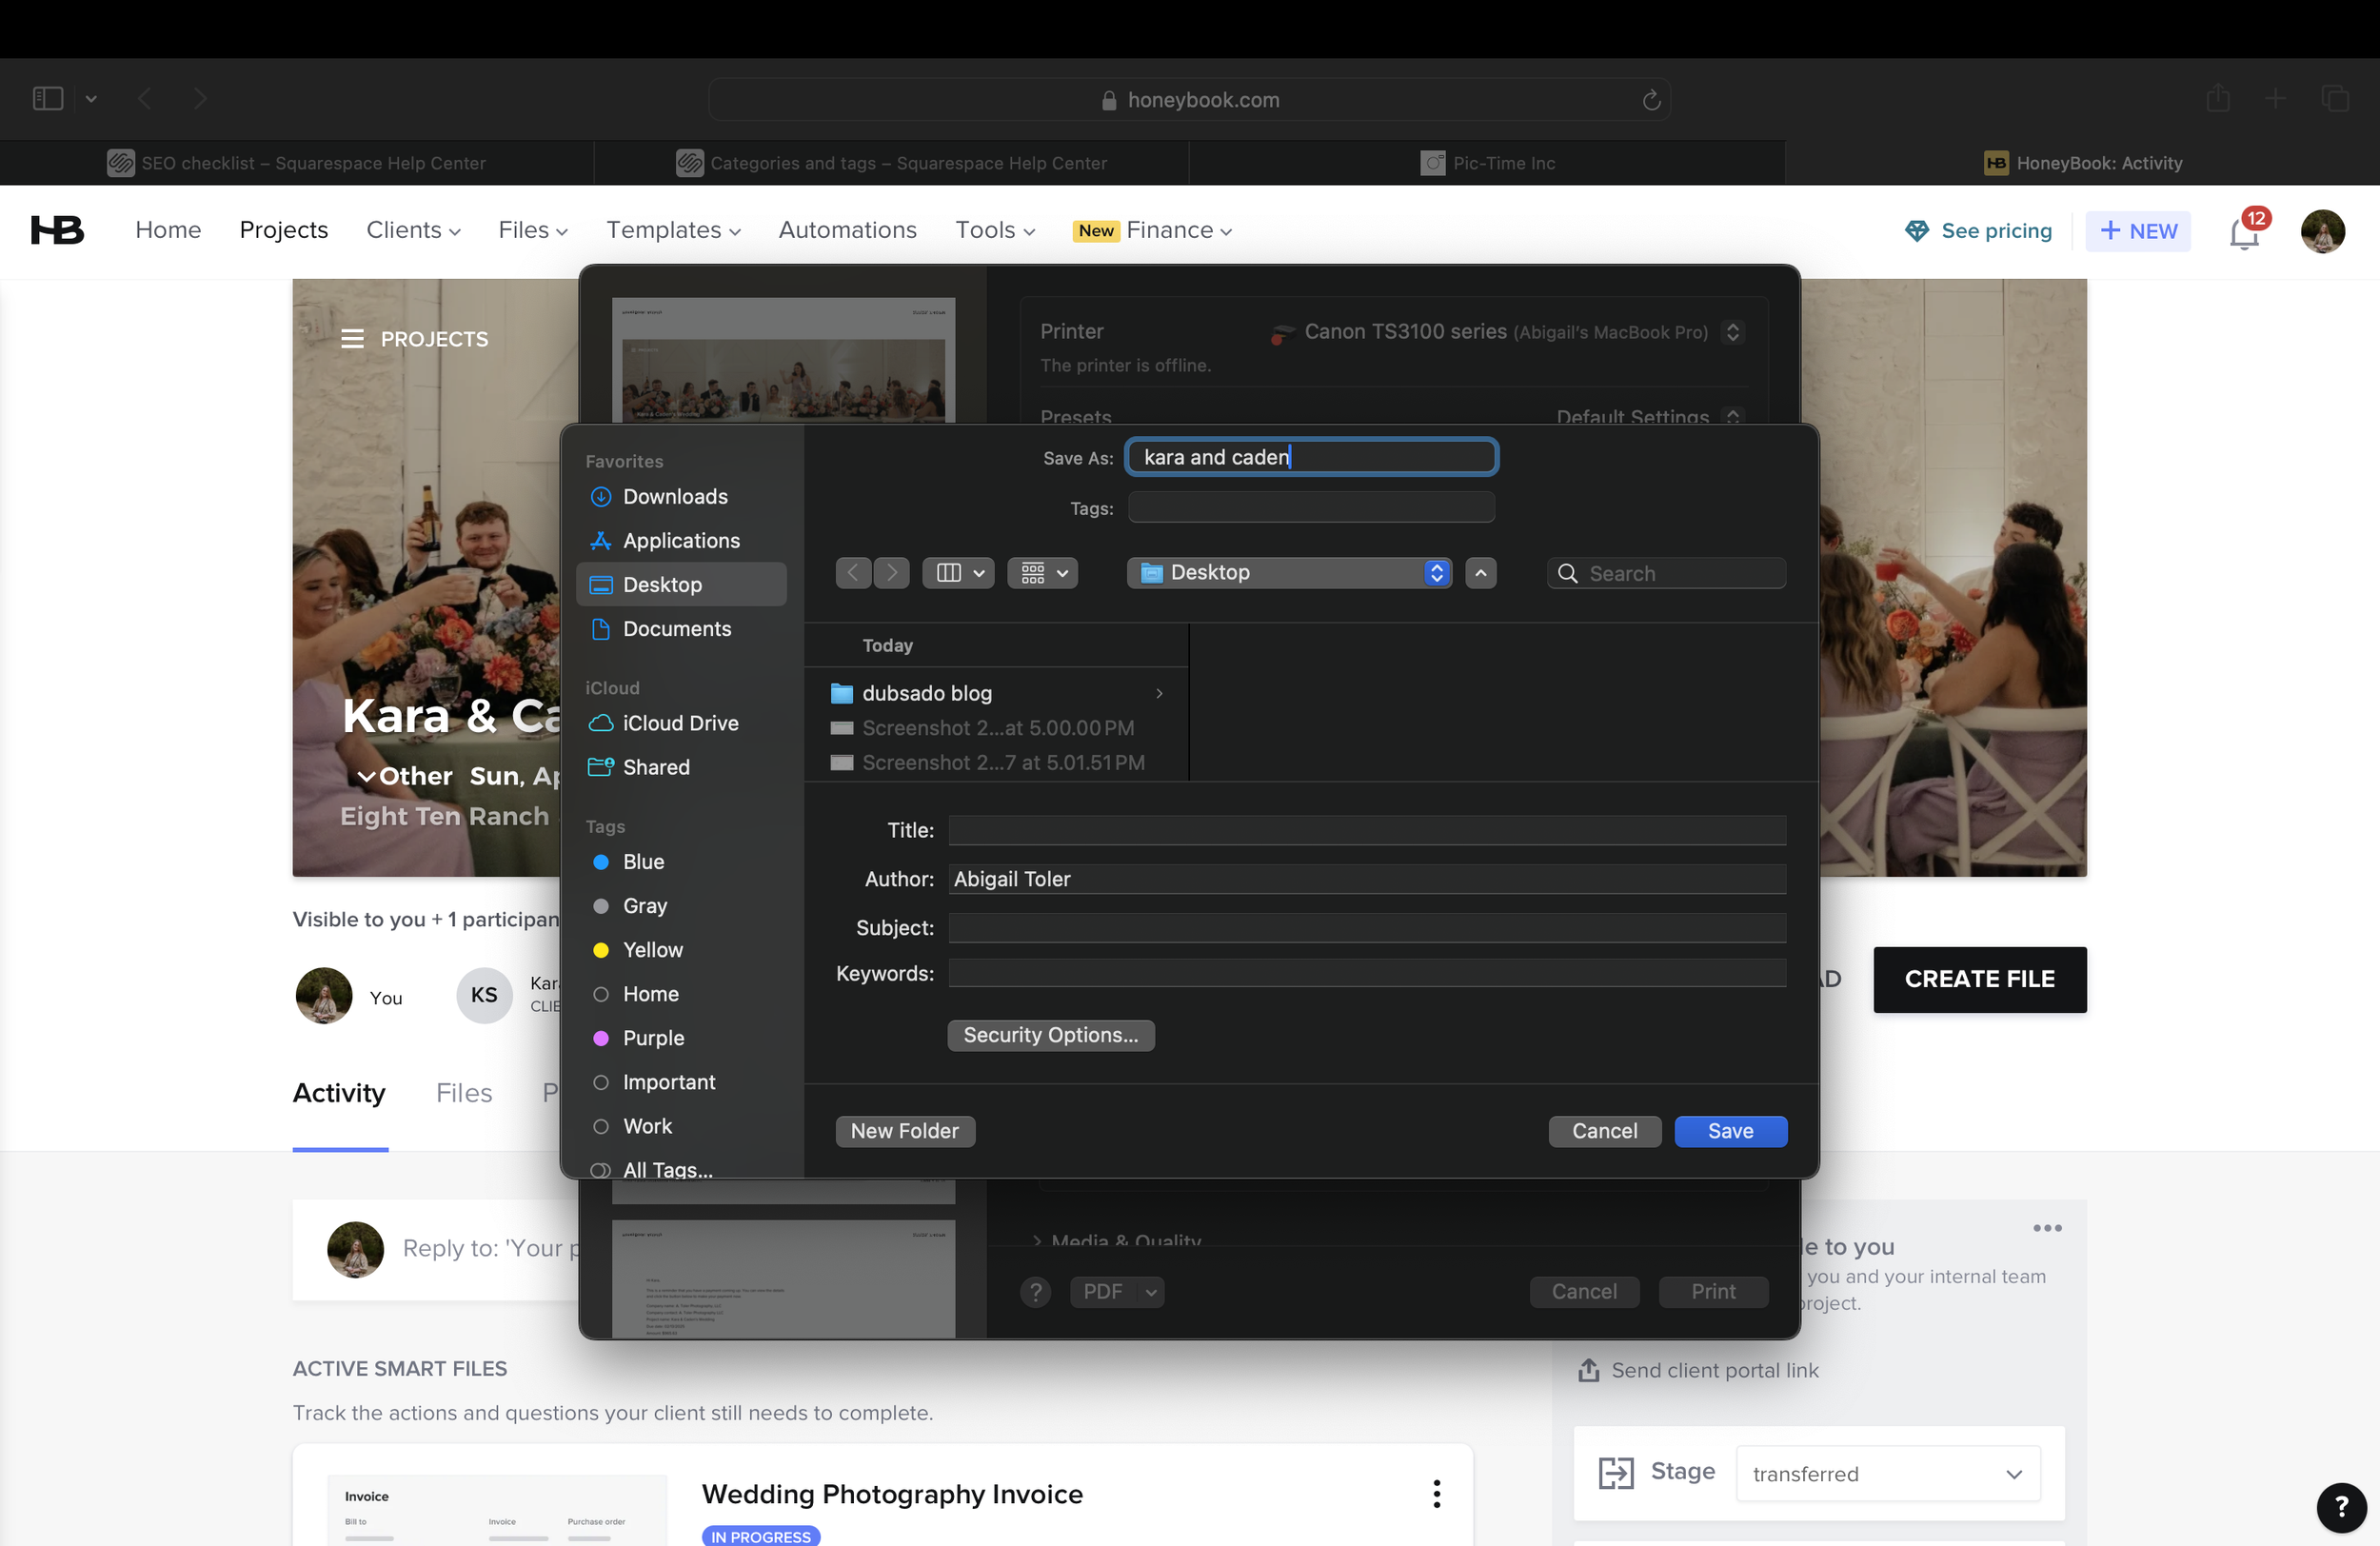
Title the document and select where you want to save it. I labeled all of mine with the couple’s initials followed by “email thread.”
Now there’s a PDF of all of your previous email threads from Honeybook. It’s not pretty, but it gets the job done.
Next, head back to the Honeybook project and open the “files” section. We’re also going to save their contract and invoice as PDFs. I tested doing it many different ways, but the way I’m about to show you was the only one that kept the file from glitching and text overlapping.
Click on the invoice and scroll down to “view invoice”. Once you click on that button, you’ll see a “print” button in the upper left corner.
We’re going to do the same thing we did before - click PDF in the bottom left corner of the pop-up, then title the file “K+C invoice” and save it to the couple’s folder in “client transfers”. Click back to the “files” section of your honeybook project and select the contract this time. Scroll down and click the button “view contract.” When the contract opens, you’ll see the “print” button in the upper left corner again. Once the pop-up opens, select PDF, and save the file as “K+C Contract” to their folder.
Lastly, we’ll download any other documents we sent to the client, like pricing guides, to the same folder.
start a new project in dubsado
In honeybook, open the “details” section of the project you’re switching over. I have honeybook and dubsado open in two separate full-screen tabs, and I am swiping between them. In Dubsado, click on the projects tab on the left of the page. On the right side of the page, click the colored button that says “New Project.”
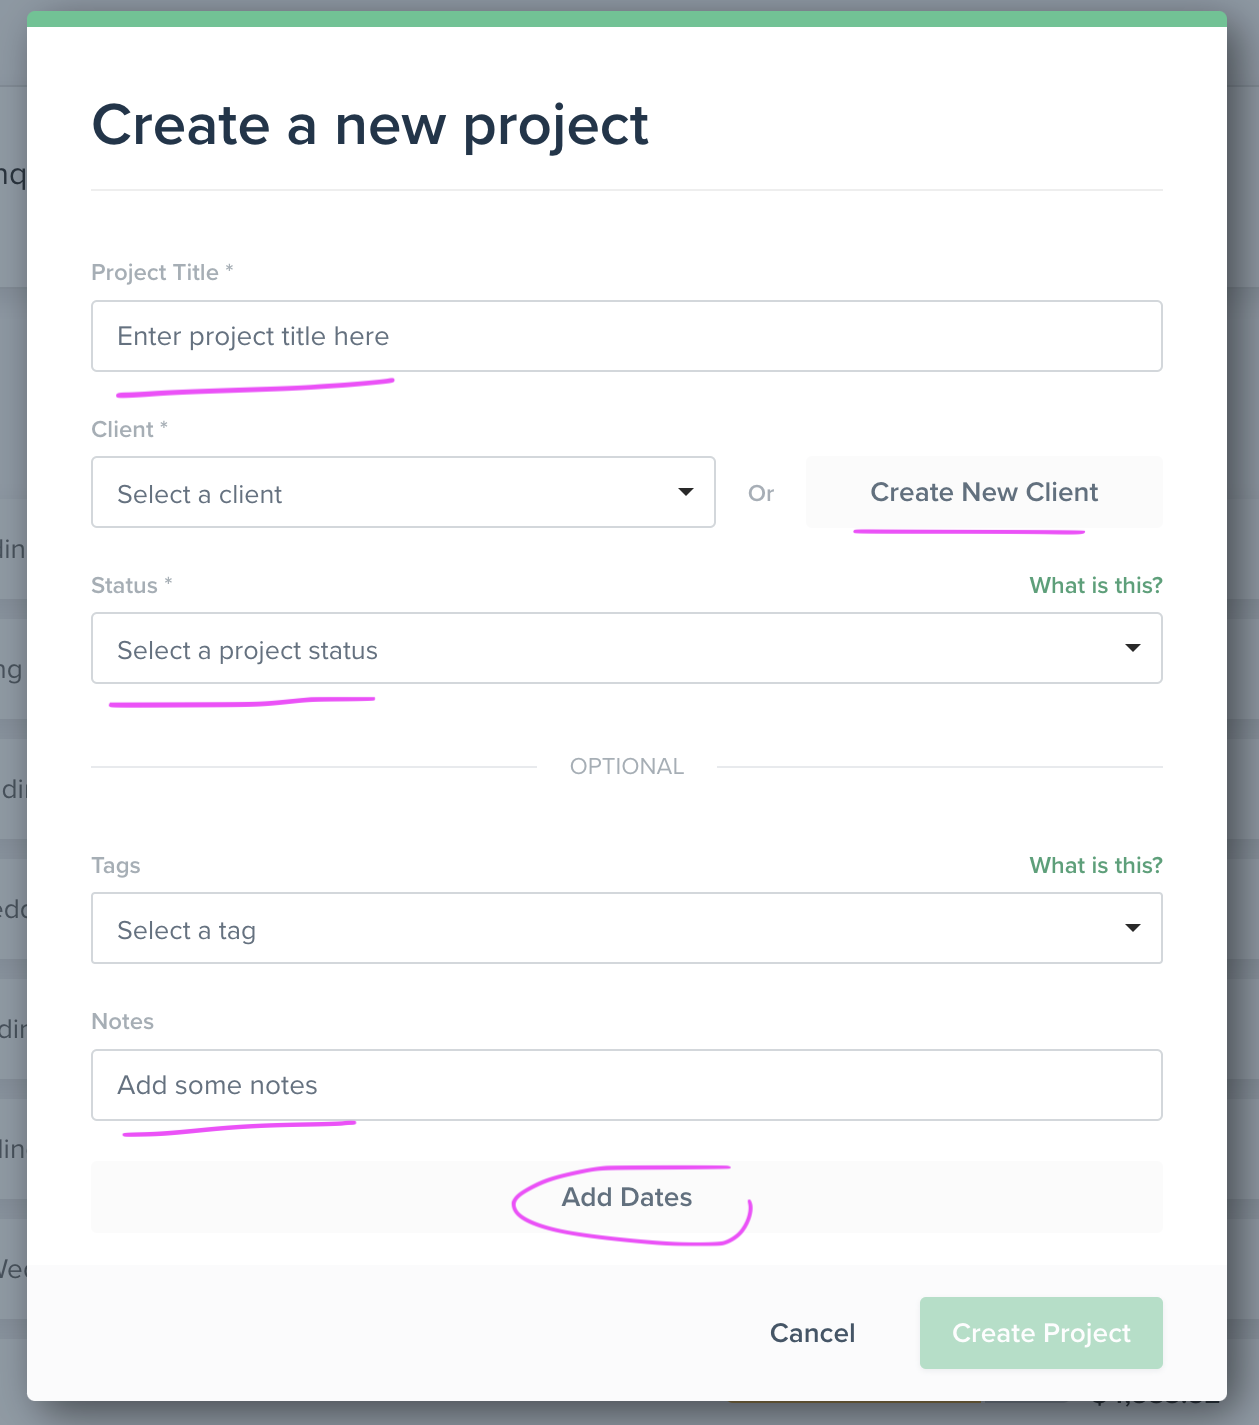
Title the project, click “create new client” and copy over your client’s information into the contact card. Select the project status category, the ones we made near the beginning of the process, and copy and paste your notes from the honeybook interface. Lastly, add the dates and times at the bottom.
Now you see your new project interface. While this project interface probably feels foreign, you’ll more than likely be feeling very familiar with it (and better about it) before you’re done transferring your clients. It’s pretty self-explanatory and easy to navigate. The first thing I do once the new project pops up is scroll down a bit and input the project location/address and the referral source. I love how you can make your own referral sources, and color code them to based on what makes most sense to you. Lastly, I activate the client portal by clicking the drop down arrow next to “portal” and “activate.” I’ll show you how to send it to the client in a minute.
uploading pdfs to the project
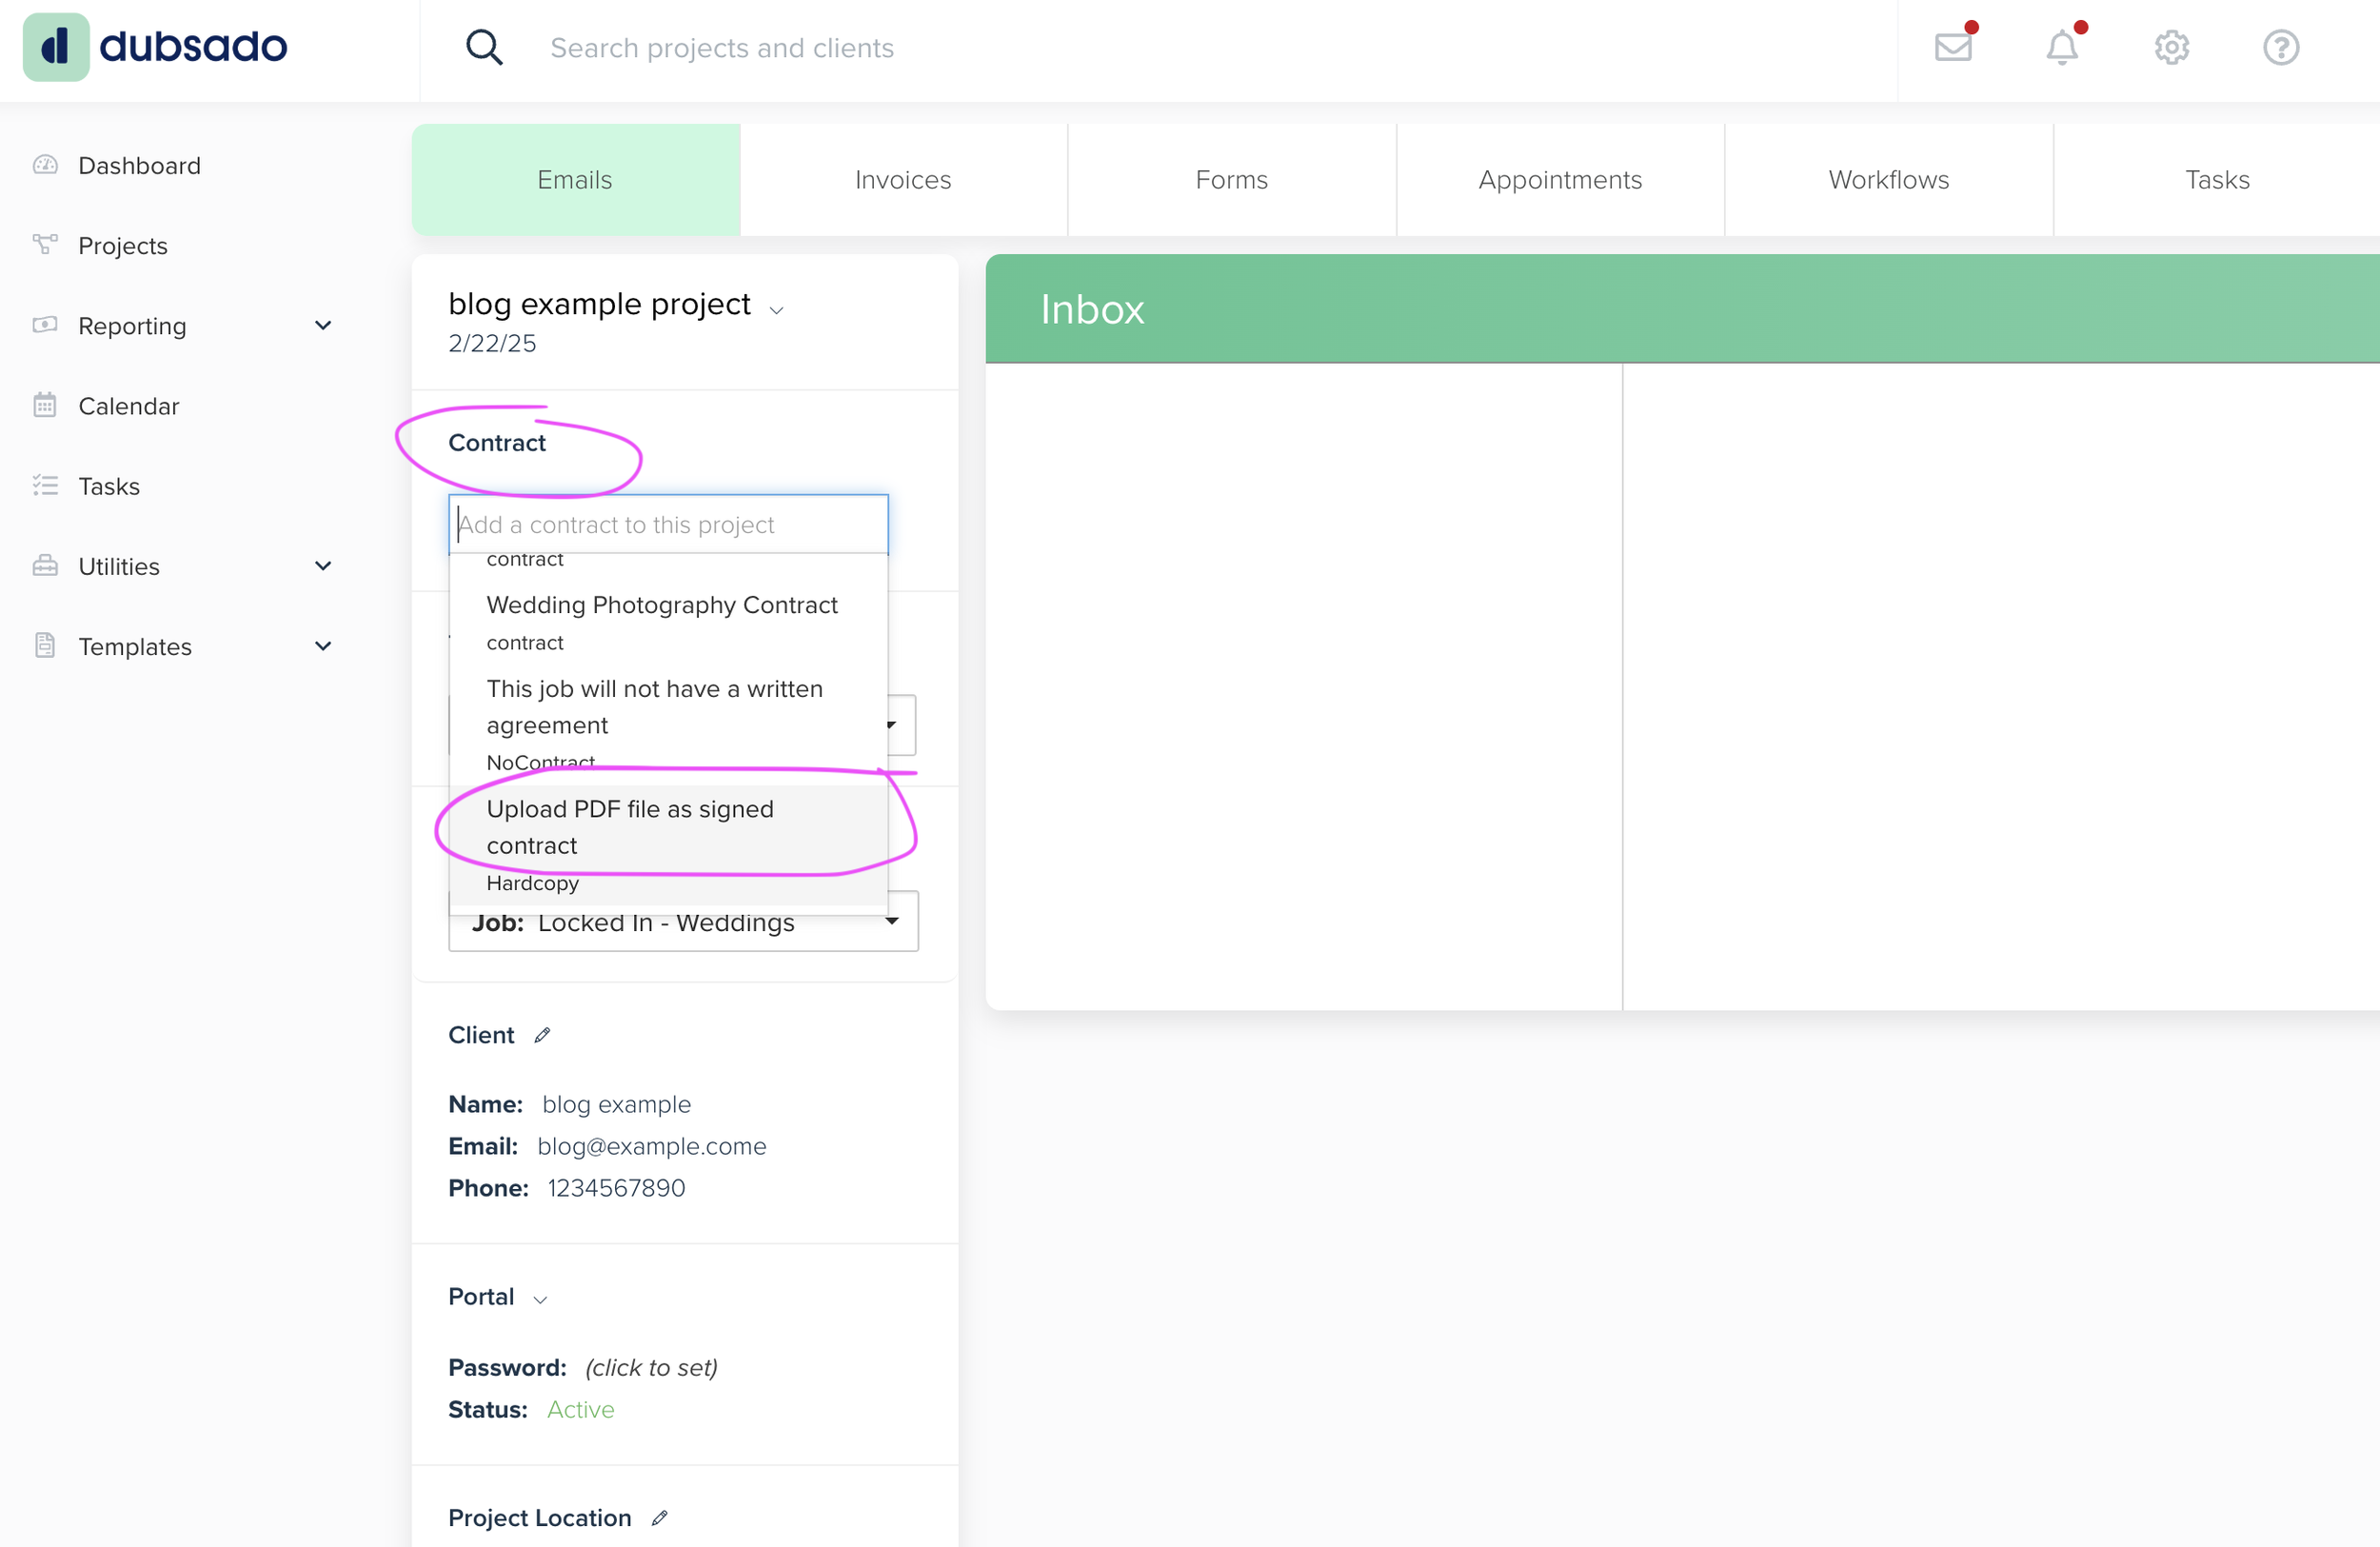
Now that we have a project interface and all the notes, contact info, and details, we can upload our previous documents. Scroll to the top of the project and select the drop-down menu under “contract”. Scroll through the menu until you find “upload PDF file as signed contract.” Click on that, then upload the Honeybook contract PDF we saved earlier. Now their contract is applied to the project in the proper place.
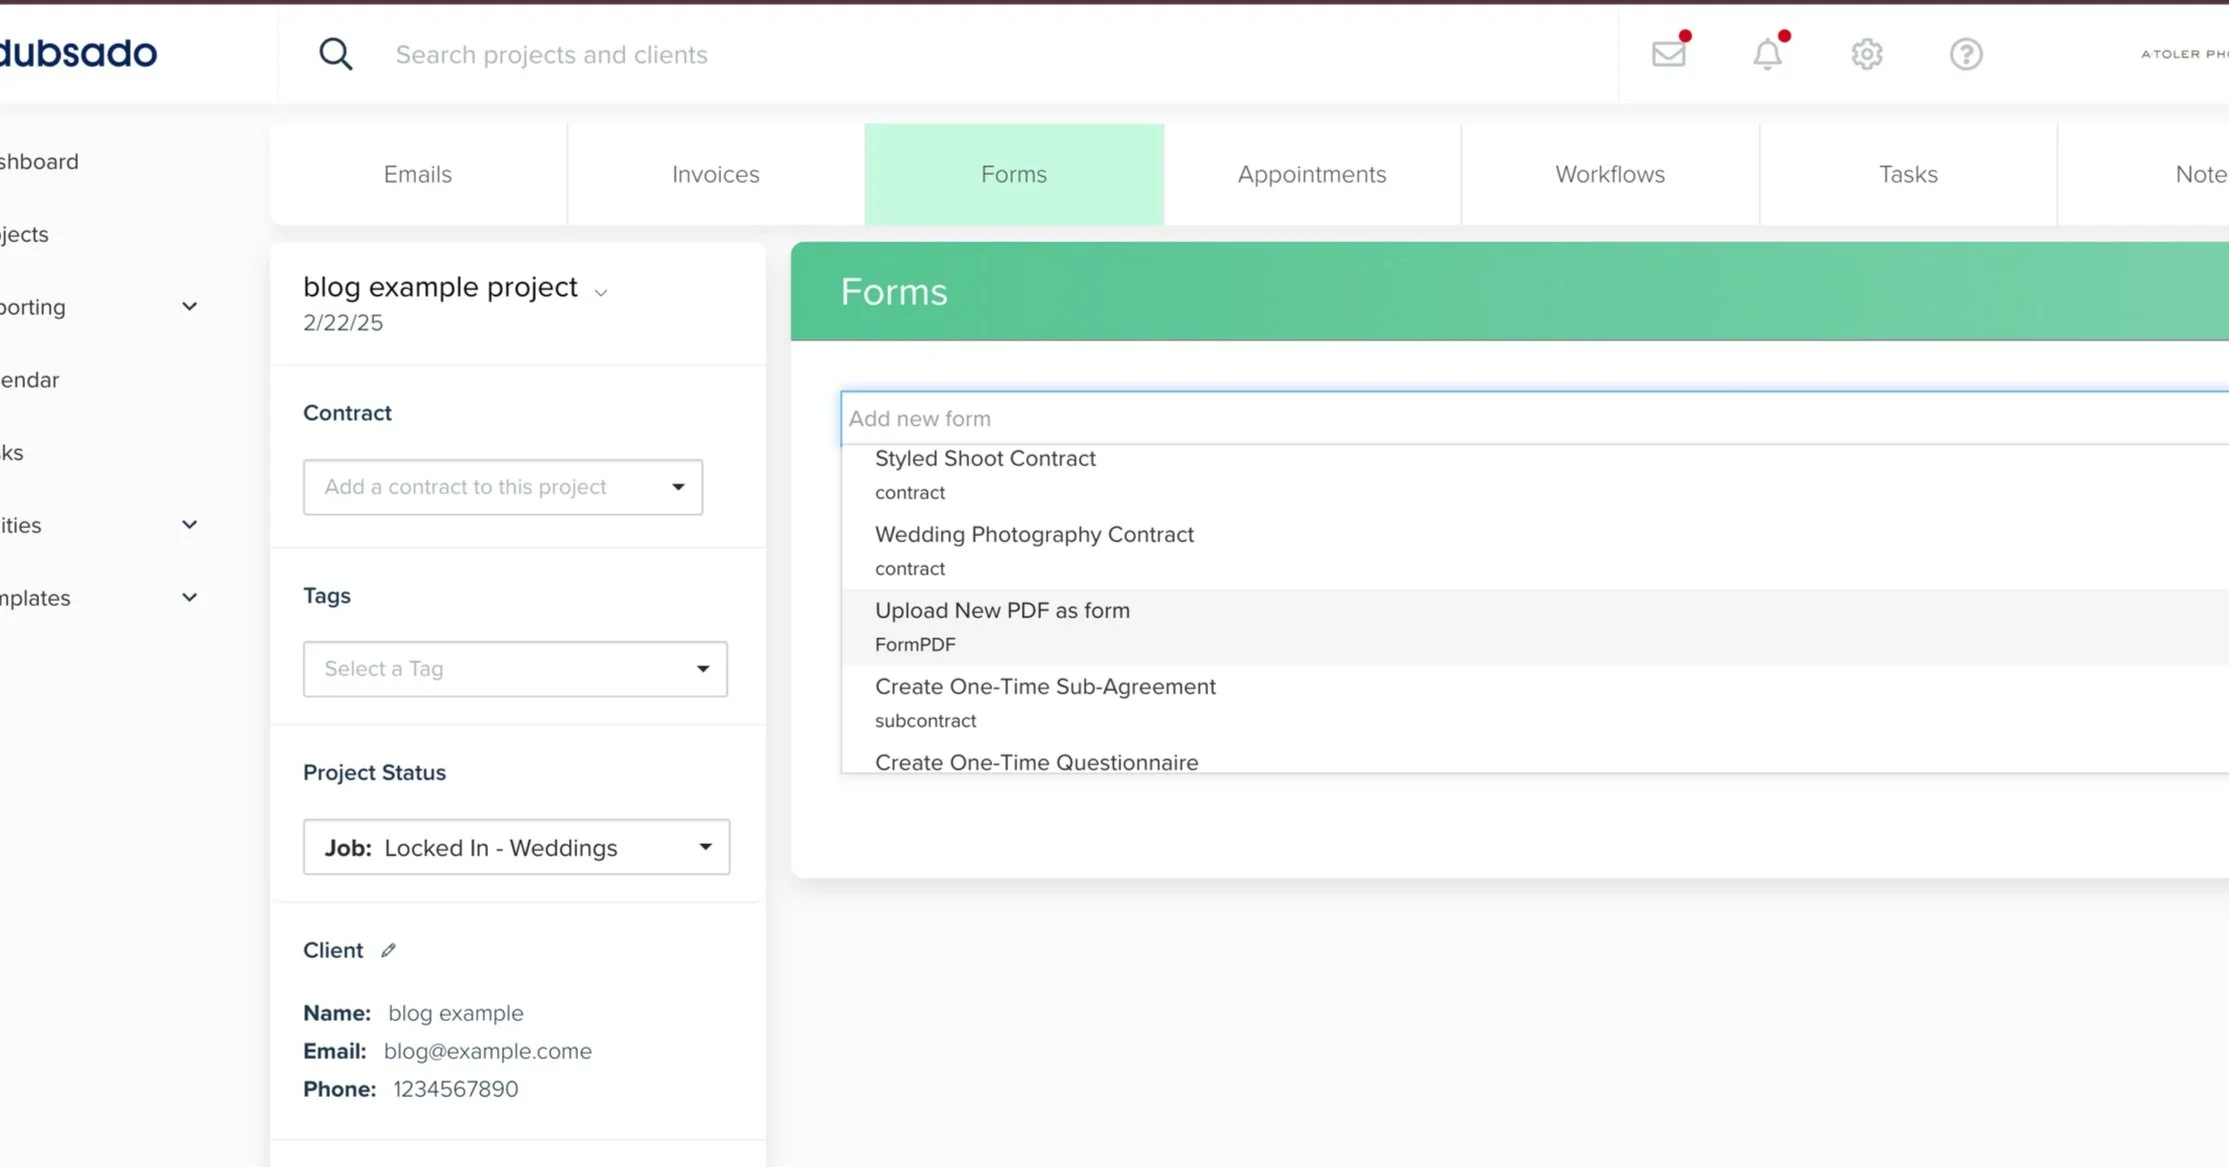
Click on the “forms” tab at the top of the page. This is basically the same as the “files” section in Honeybook. Click “add new form” and scroll through the drop-down menu until you find “upload new PDF as form.” One at a time, upload the Honeybook invoice and the email thread PDF, as well as any other documents you sent them before, like pricing guides.
re-creating the invoice
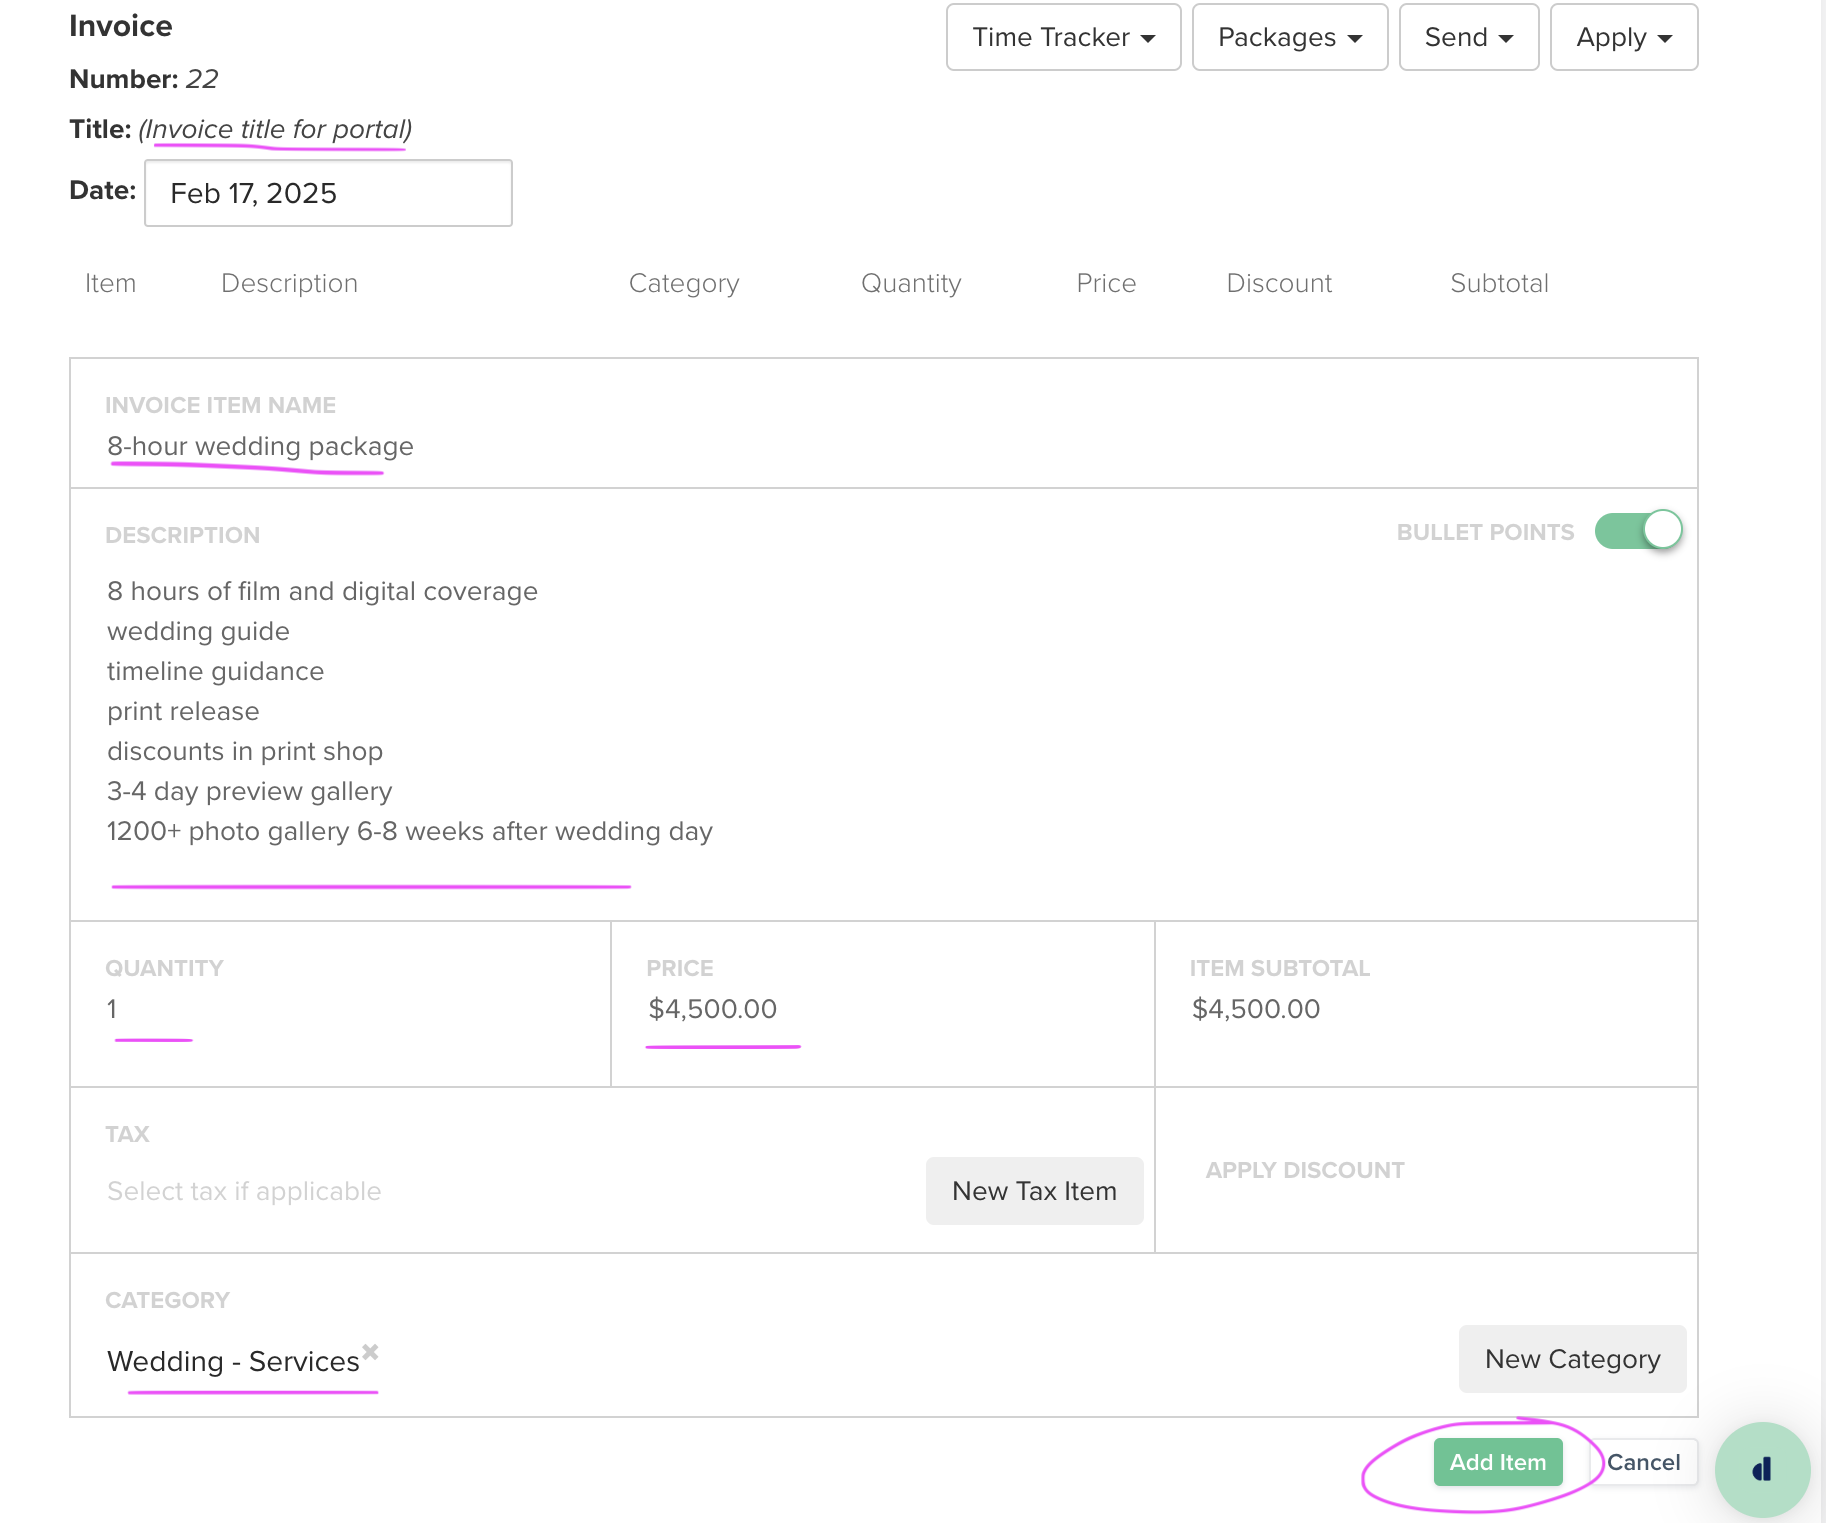
Since we still want our clients to be able to pay their invoices, we need to remake the invoice in Dubsado. Don’t worry - the process is quick. I suggest opening the PDF we made of their previous Honeybook invoice to reference. Select the “invoices” tab at the top of the page and click “add.” Enter an invoice title and click the checkmark to confirm it. Then click “new line item” to add the details of their booked package. You can also click the “packages” button at the top and select one of the packages you made earlier and it will automatically add it to the invoice. If their package is more custom, you can type it up manually. You can look at the image below as an example.
Add the rest of their package offerings using “new line item”, exactly as they were from their last invoice. When it’s finished, it might looks something like this.
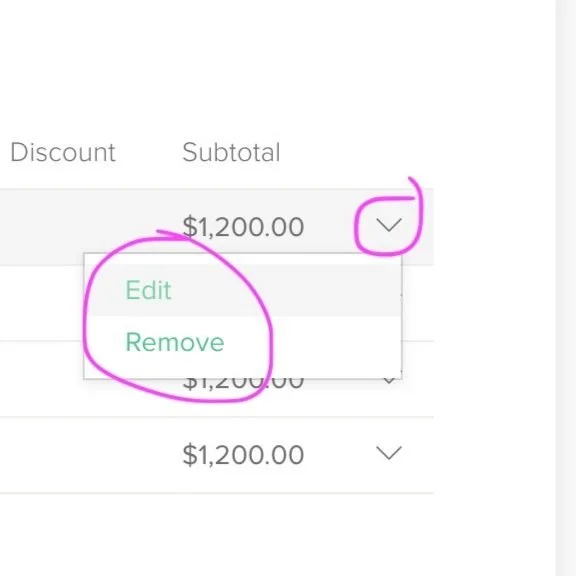
If you need to edit or remove any of the items, click the drop-down arrow on the right side.
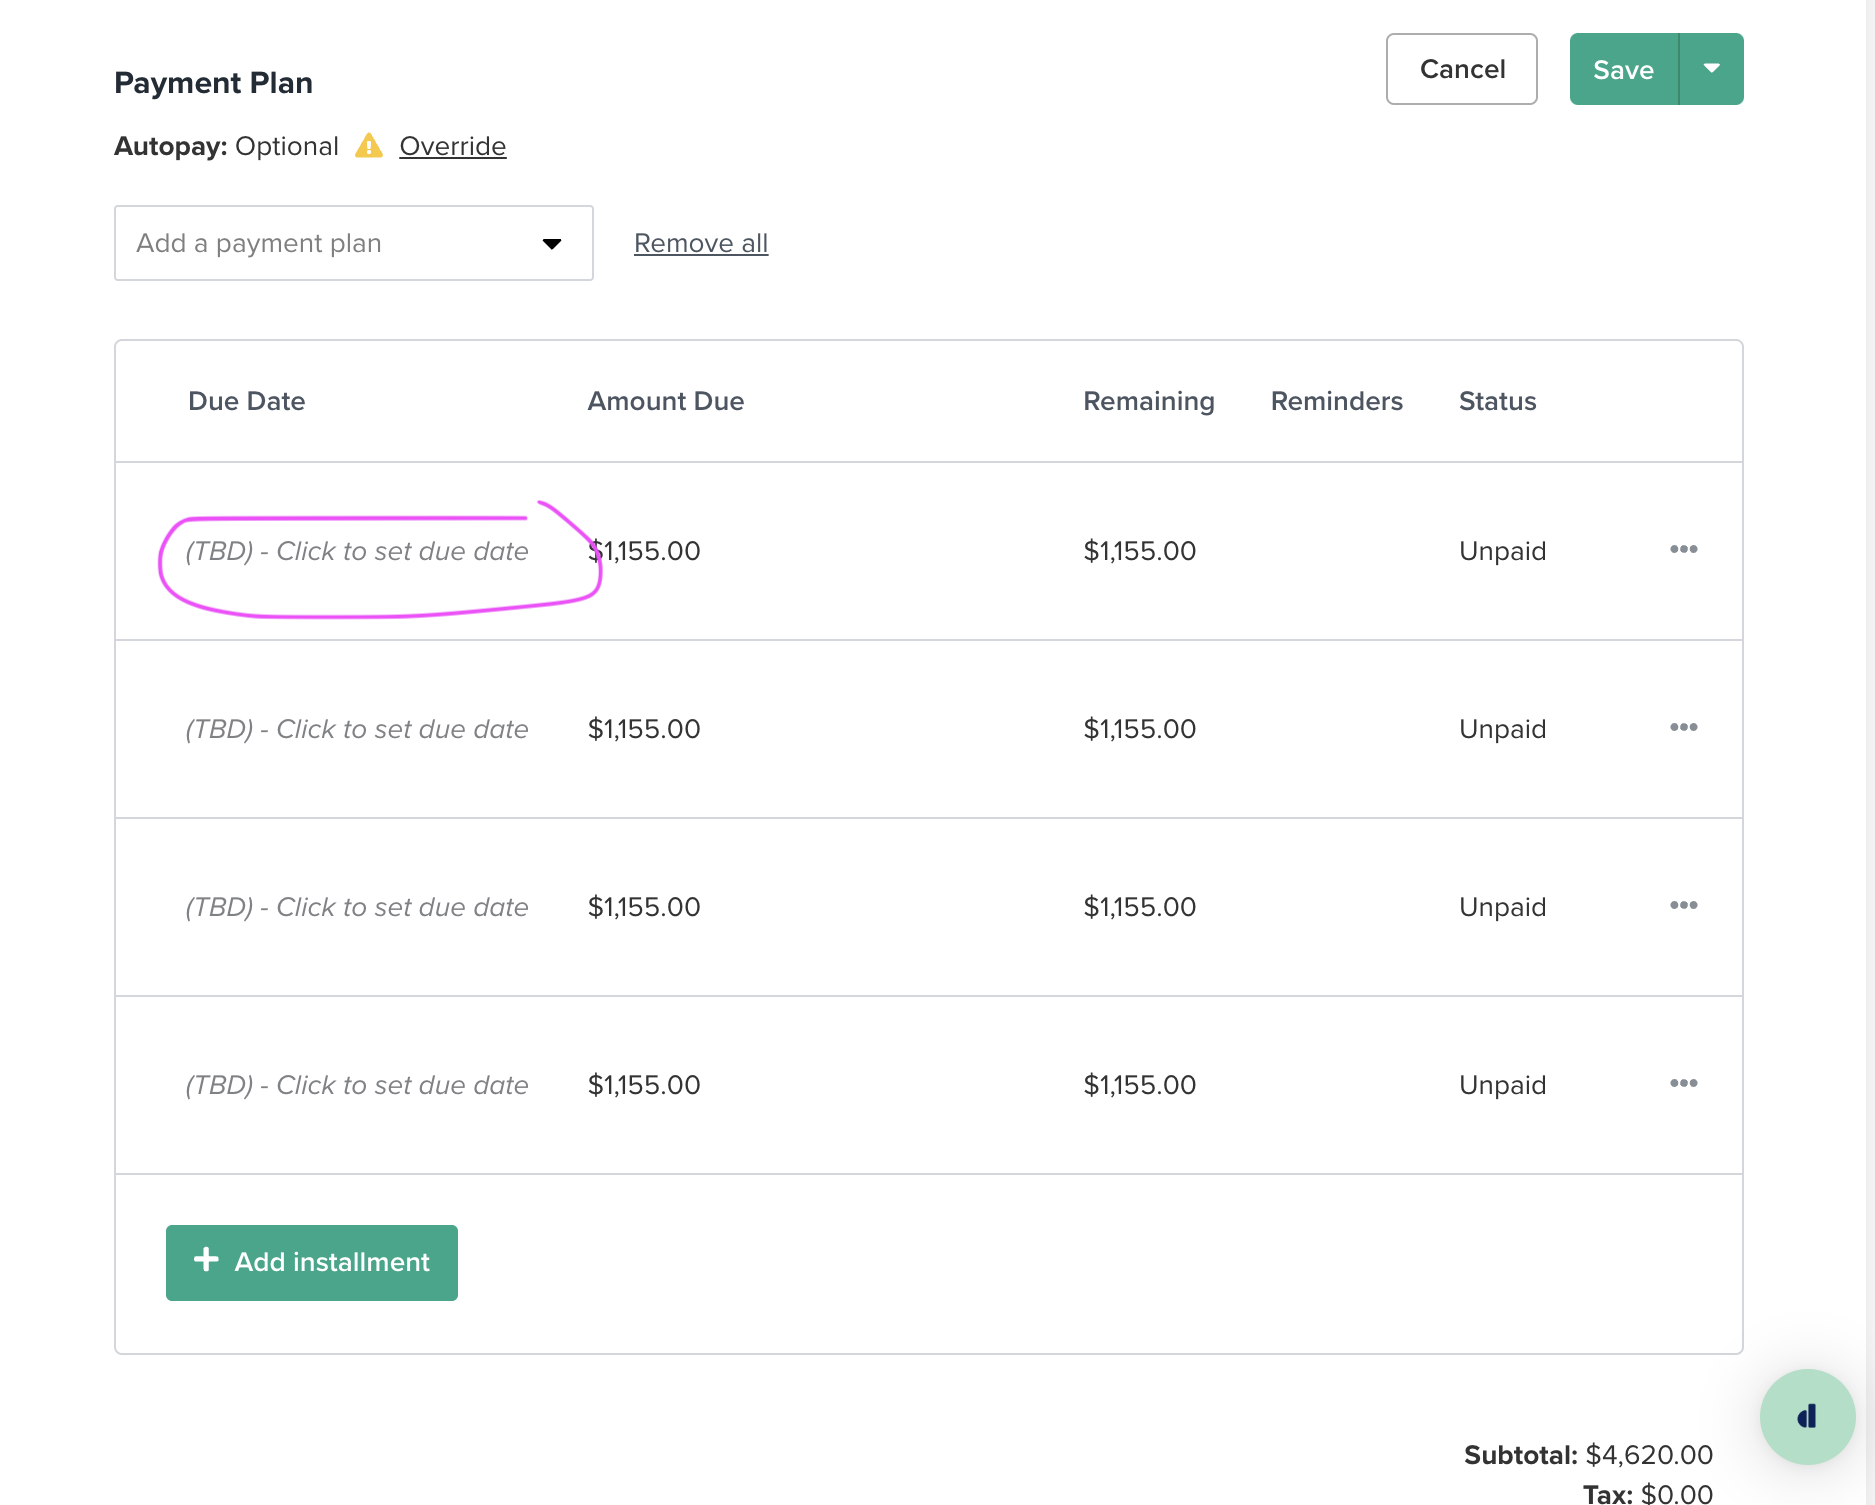
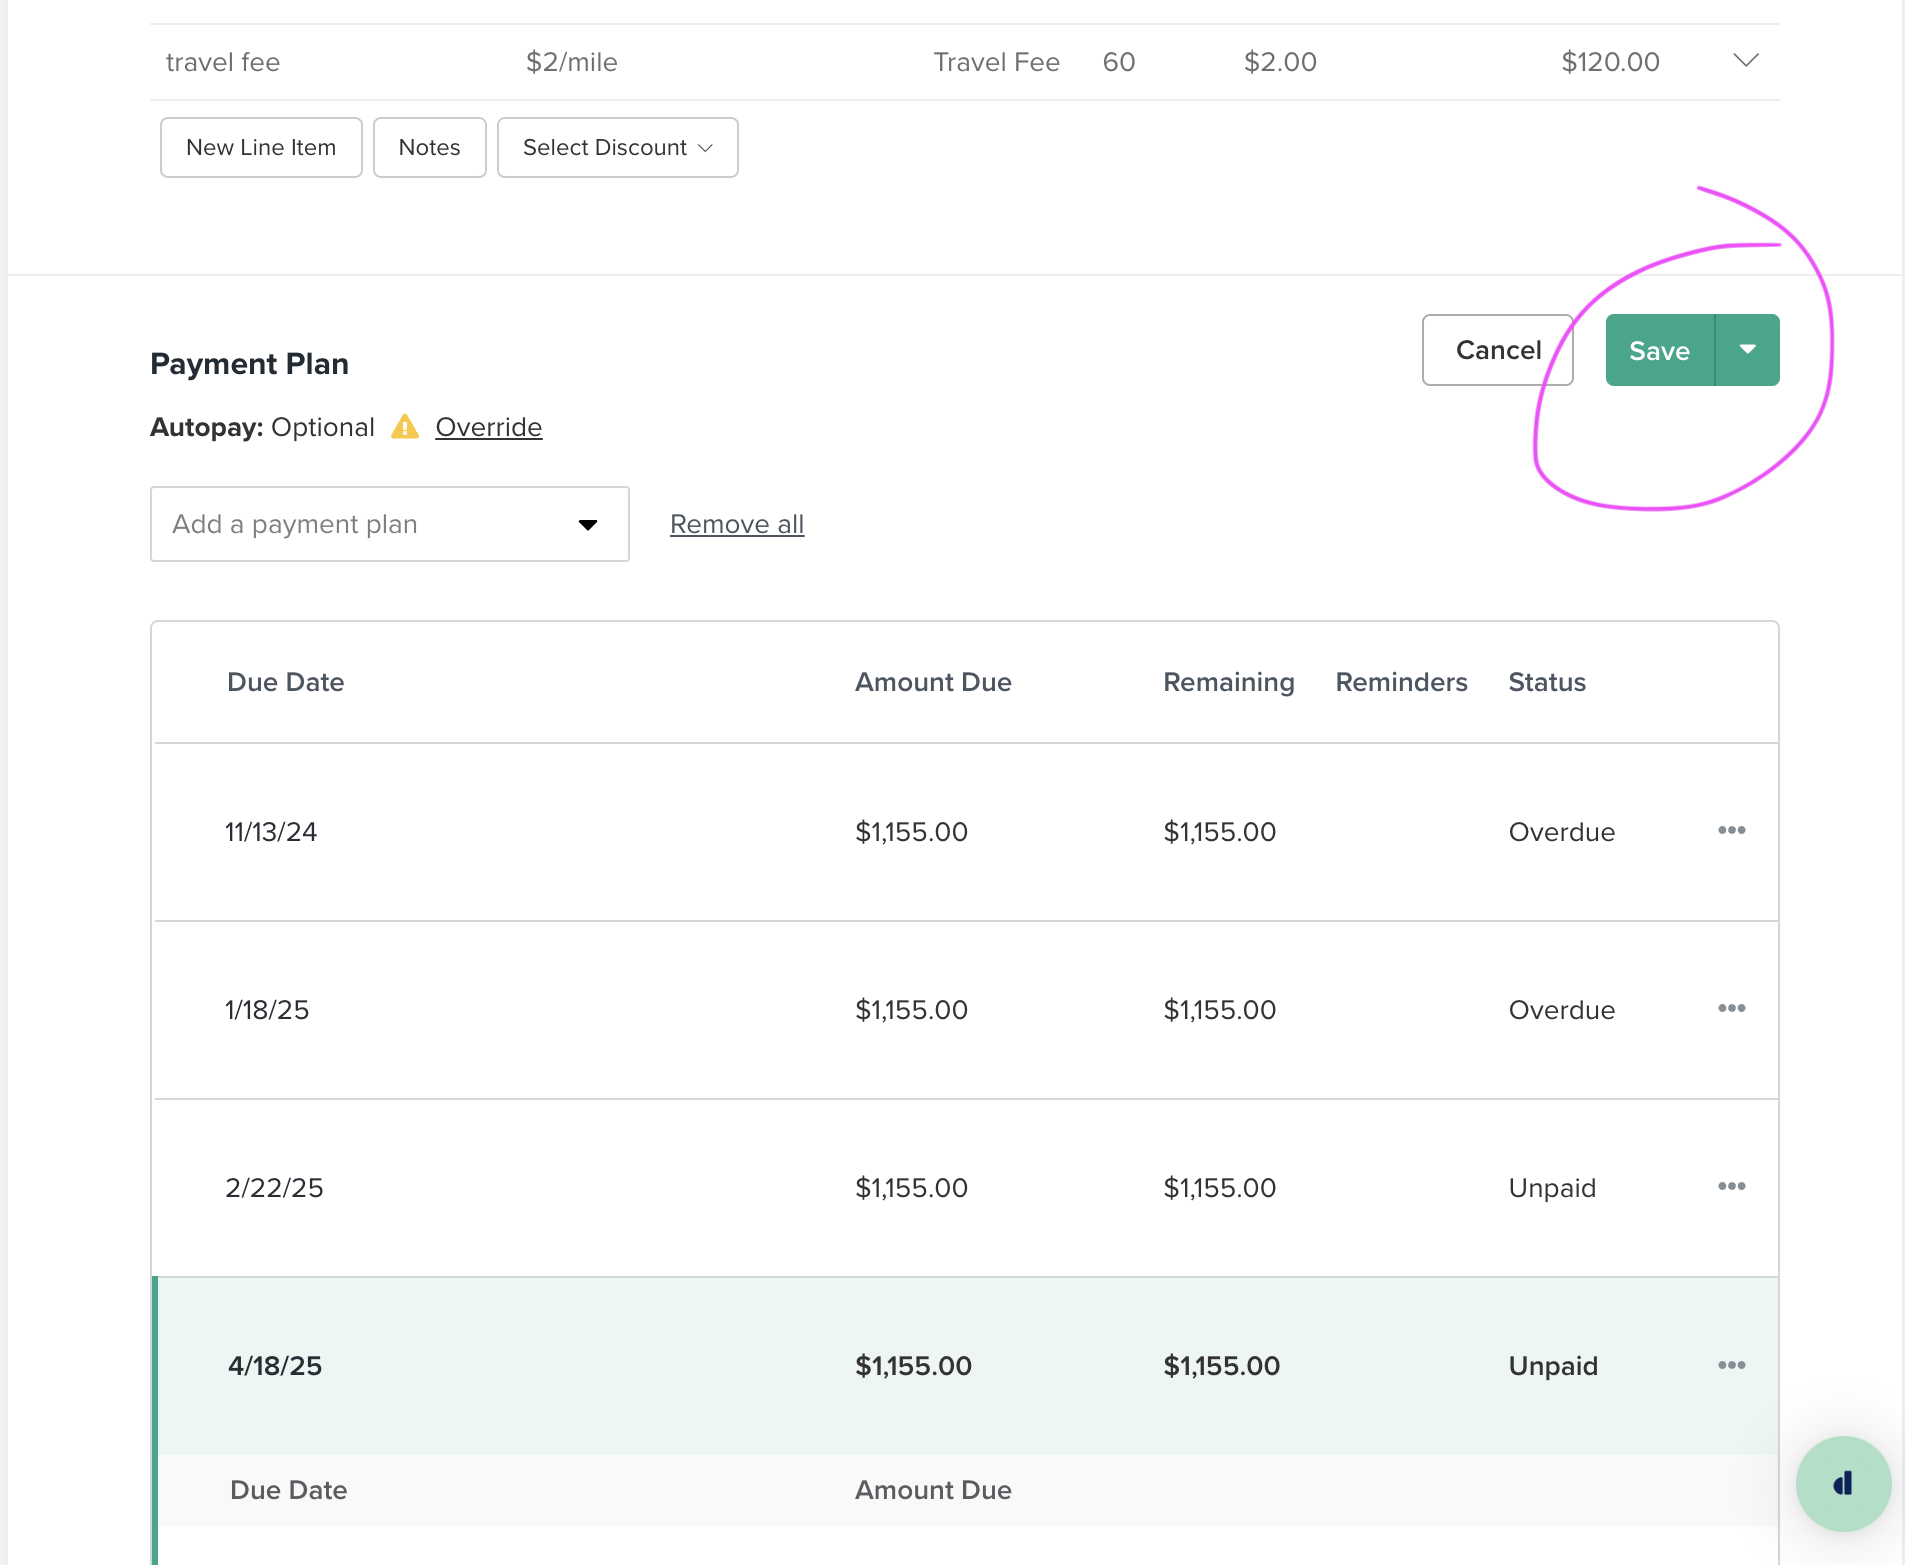
Now apply the payment plan they had in their previous invoices. Dubsado provides some common ones by default, but if you want to add more payments, just keep clicking “add installment” until it shows the number of payments the client had agreed to make. When you’ve added the correct amount of installments, it’ll look like the image below. Click the text on the left to determine the due date of the payment and how the payment is portrayed. Since the client probably already made this payment, then its due date will probably be in the past. Update the due dates and amounts to match the old invoice. The status will change to “overdue” but don’t worry - we’ll fix that next.
Once your payment schedule is set, click “save” in the top right corner.
Click the “apply” button, and then click “payment.” Add the date it was paid, a description if necessary, how it was paid, and the amount, then click “apply.” The payment will be added to the invoice. Repeat this step for any payments the client previously made.
finishing touches
Now for the finishing touches - if you had any upcoming meetings scheduled with this client, make sure to add them to the “appointments” tab. If you stick to a specific workflow for this type of project, apply it from the workflows you made in the “templates” section under the “workflows” tab. Lastly, add any future tasks you had assigned to this project under the “tasks” tab. We should have already added the notes when we made the project earlier, but in case you forgot, copy and paste your notes or call logs from Honeybook.
send it to the client
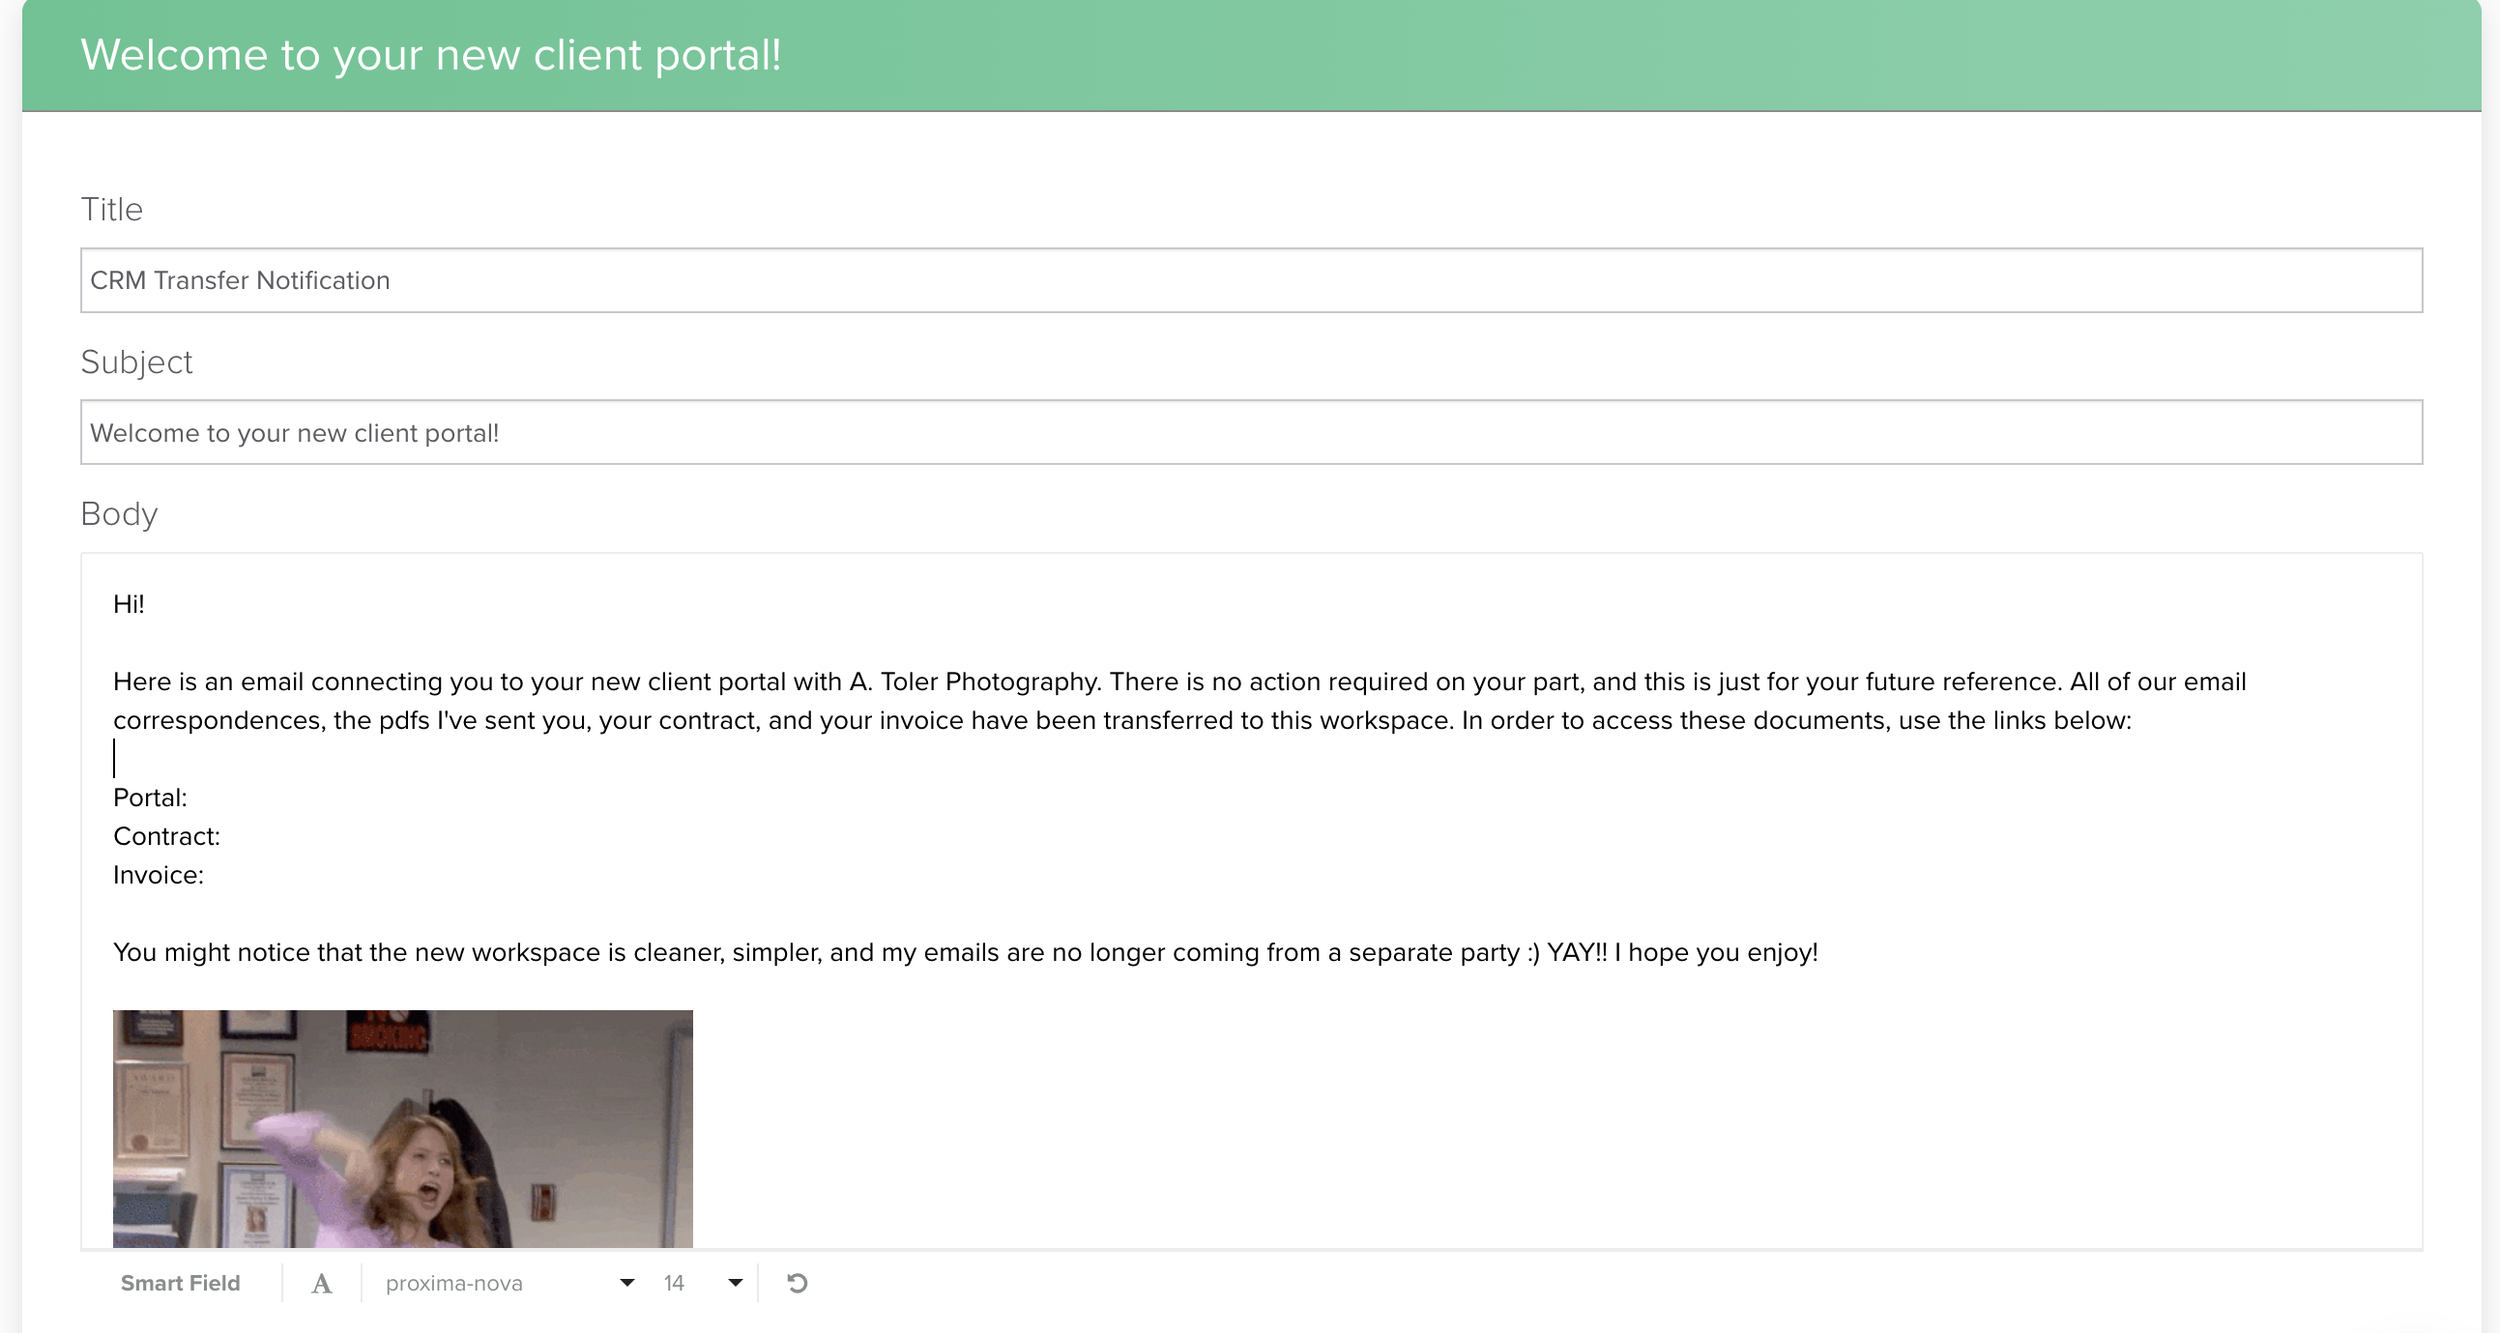
Now all we have to do is show the client their new workspace and portal! I made a customized “welcome to your new client portal” email in the “canned email” section, and I will apply it to all my new projects. Since your brain power is probably very depleted at this point, you are welcome to reference the email I sent below:
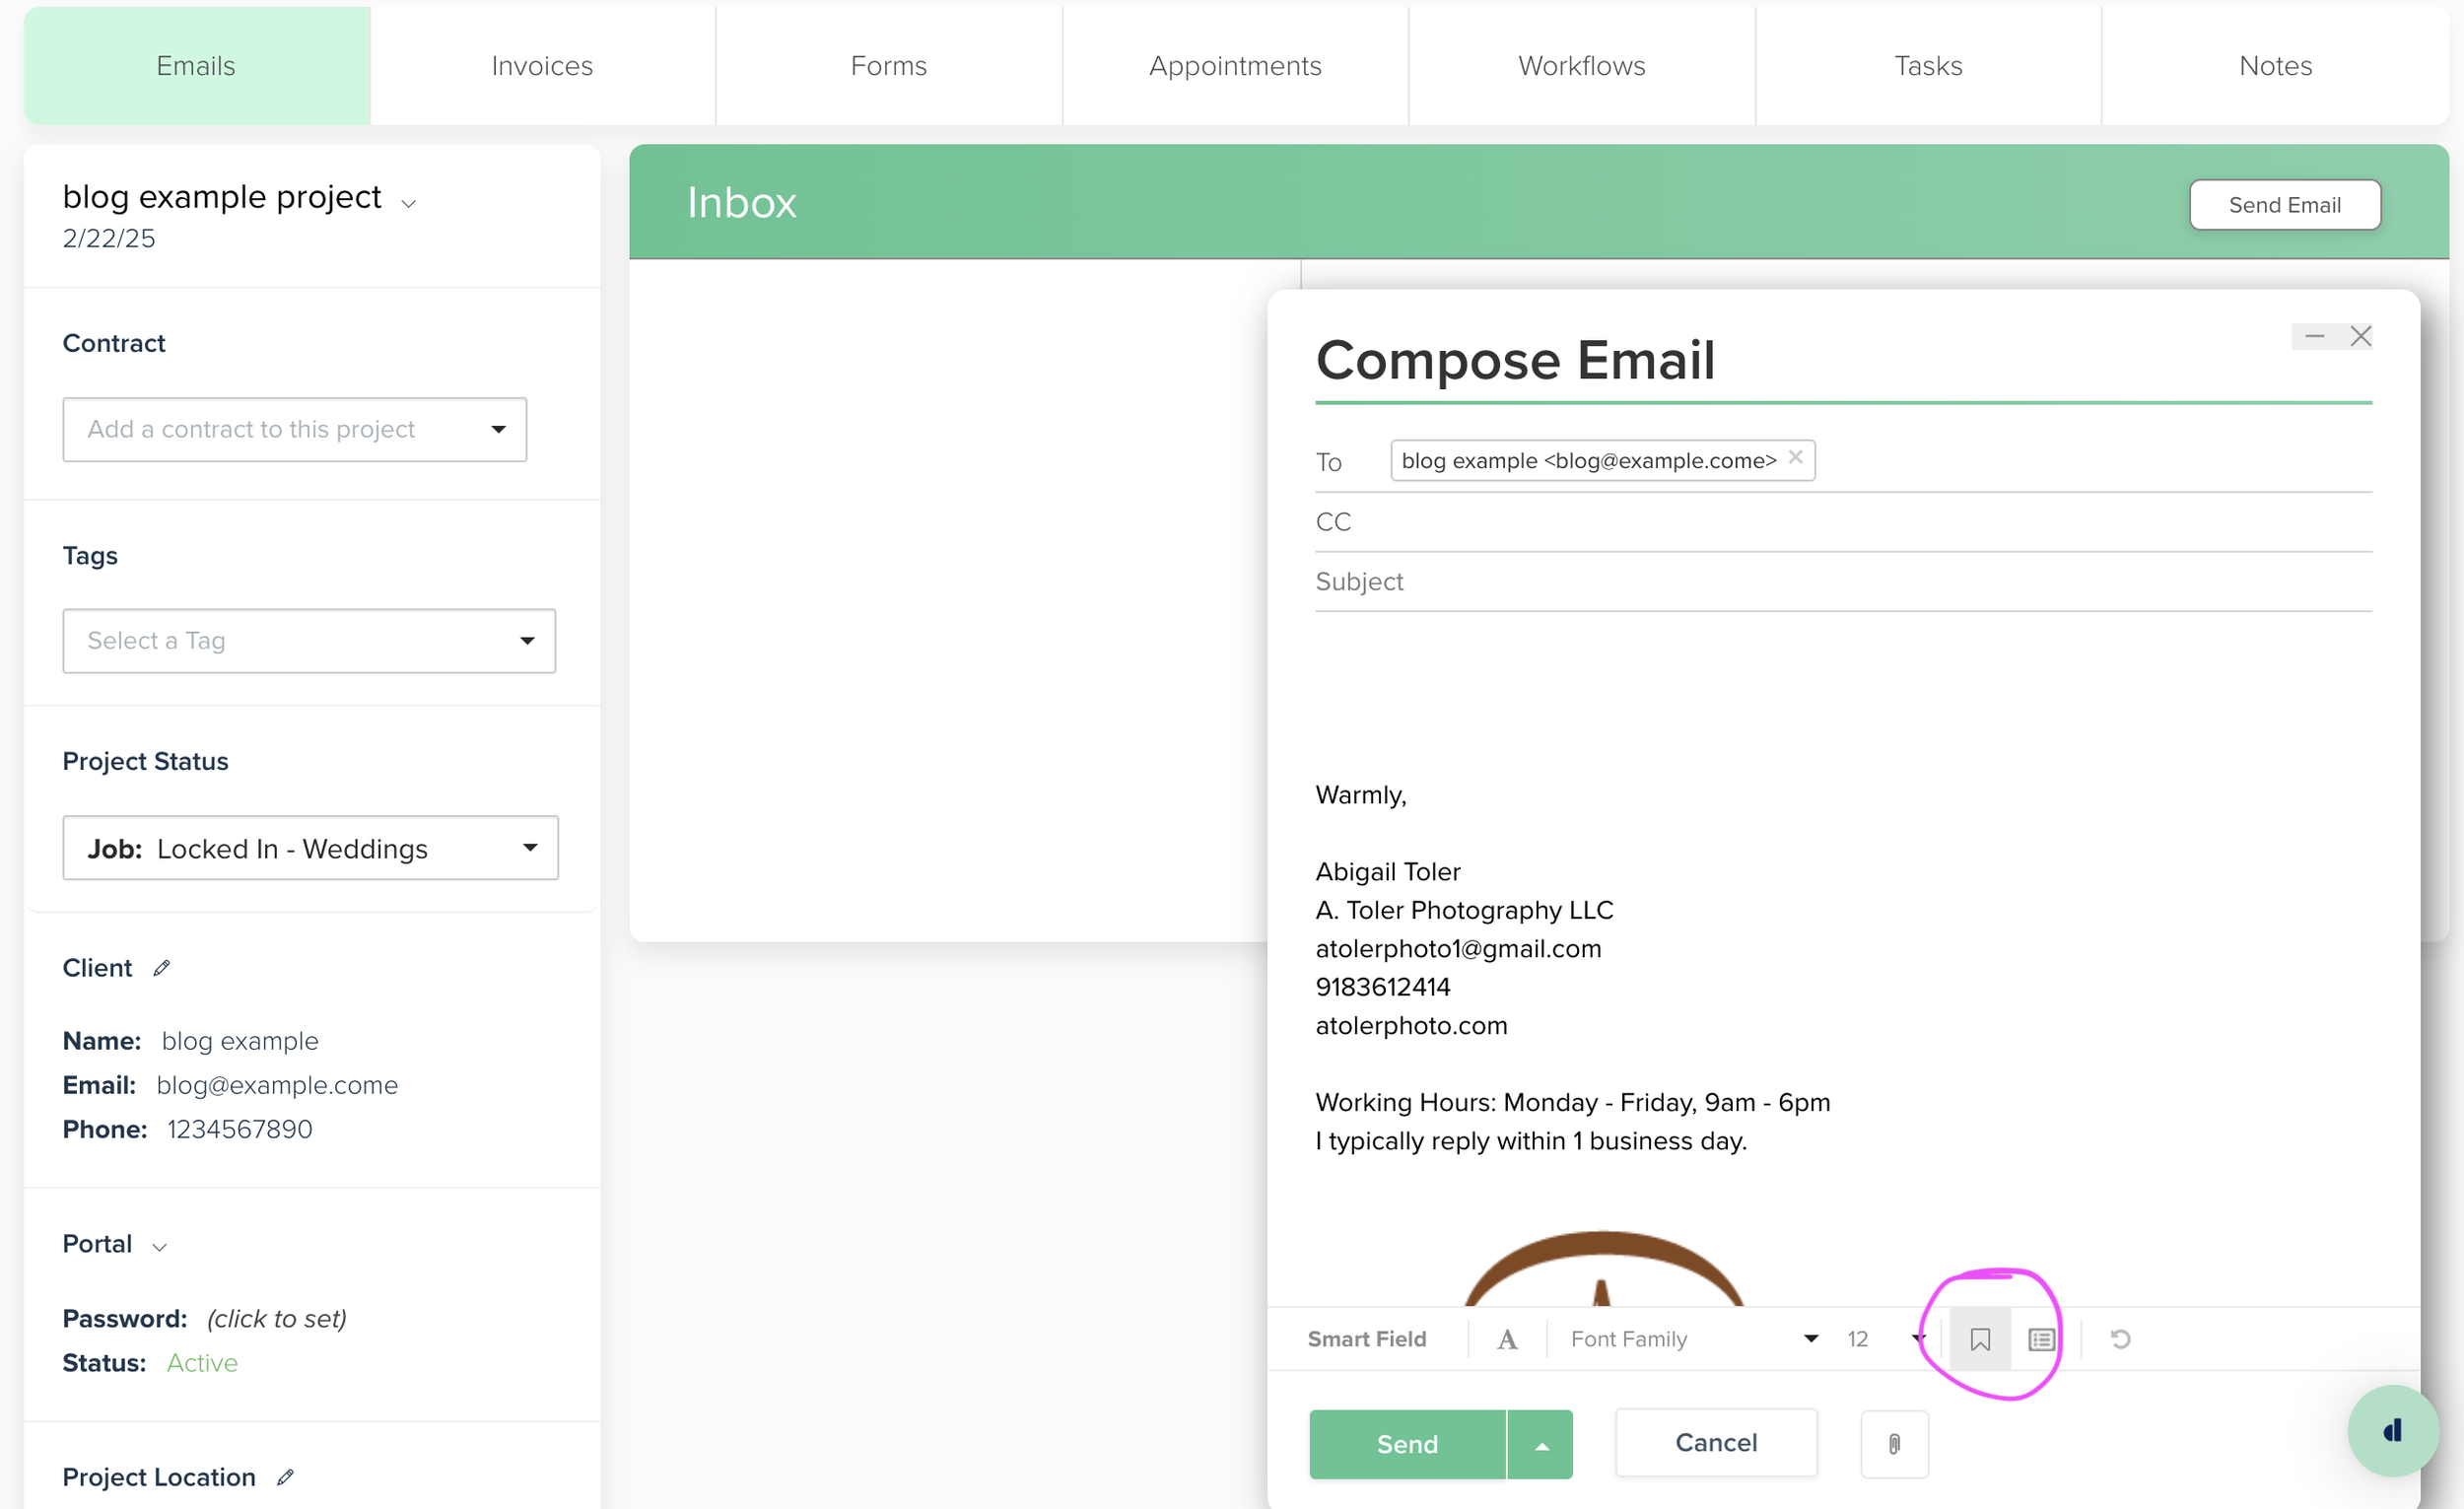
In order to send this to your client, go to the “emails” tab, and click “send email” in the upper right corner.
In the email box, click the “saved” icon in the lower right corner. This is where all of your canned emails, or email templates are. Click on the email template you made to introduce your new clients to their workspace.
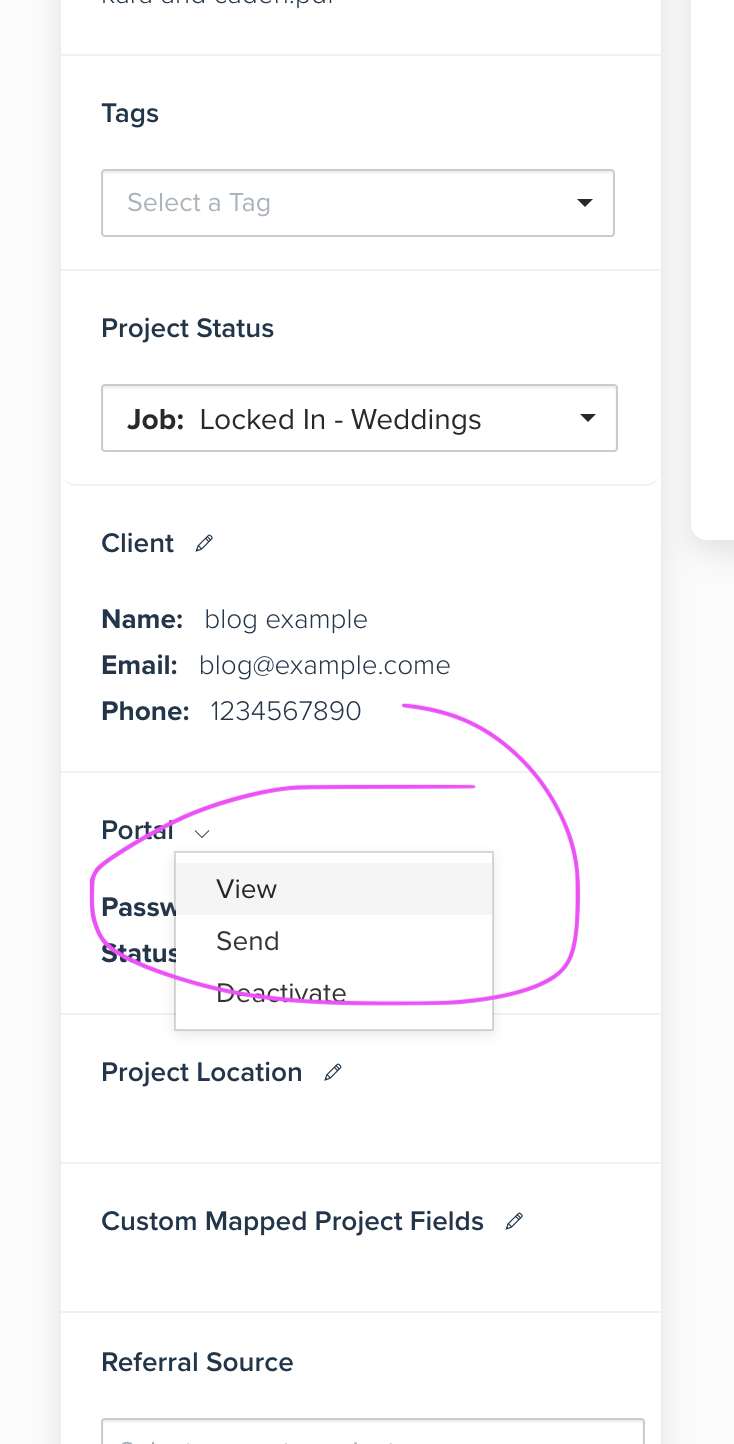
To show them the new links to their portal, select the drop-down arrow next to “portal” on the left side of the screen, and click “view.” A new link will open with the portal log-in. Copy and paste the link from that tab into the email. (Do not click “send” instead of “view.” This button should open a default email for sending the portal link to the client, but since you are already writing an email, it will do nothing. Copying and pasting the link from the tab that opens when you click “view” is the fastest and easiest way to do it.)
To get the contract link, do the same - open the drop-down arrow next to “contract” and click “open.” Copy and paste the link from the new tab.
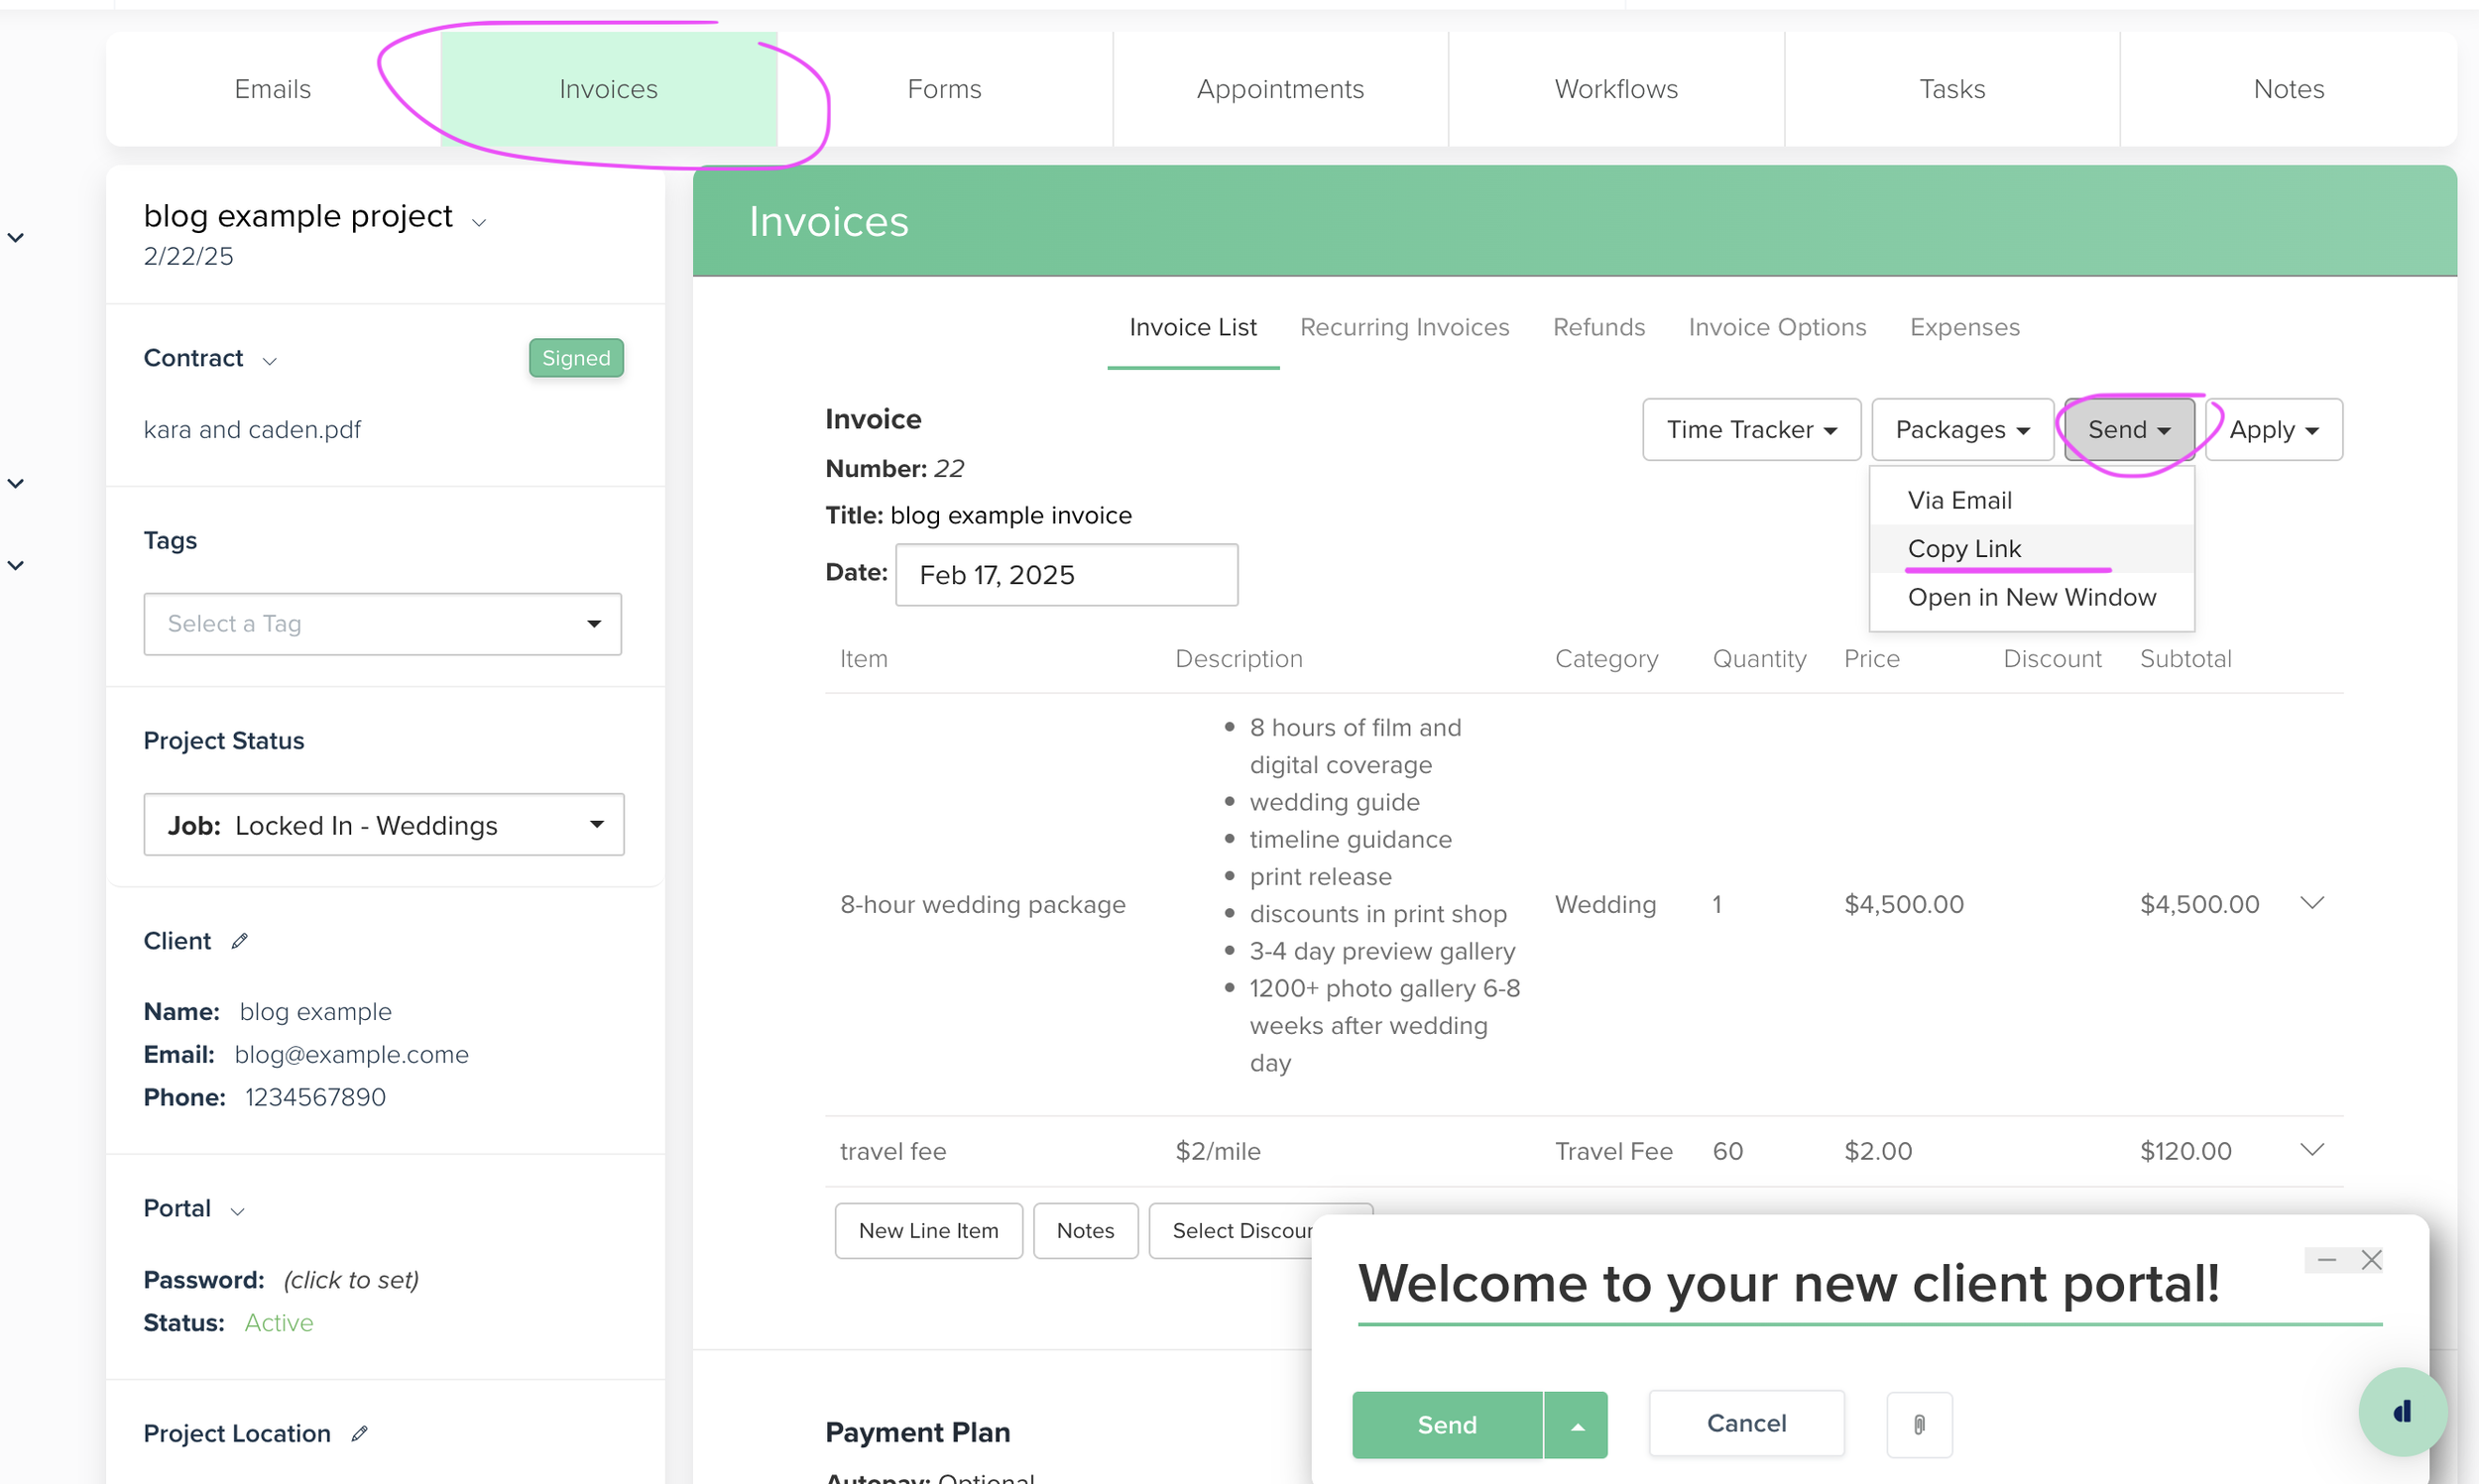
Finally, click on the “invoices” tab at the top of the project. Click the “send” button, then “copy link”. Paste it into the email. And SEND! You did it! Your client now has access to their new workspace, as well as their new invoice link. And the best part - you’ve laid it out for them so simply that they will have no room to be confused. All of my clients have been able to navigate the transition without any hiccups at all and are all using the new invoice and email portal easily.
RECAP
In this blog, we’ve covered every step in detail from setting up your Dubsado account to transferring your content and workflows, to downloading old project information from Honeybook and creating your new client projects. It might seem overwhelming at this point with all this information, but if you follow the steps in the blog, you should be much farther ahead in the process than you would be if you spent the time to figure it out alone. Figuring out the most efficient way to do this, watching videos, reading help article, and trouble shooting took me about two weeks, and I want you to be able to familiarize yourself with the platform and the process COMPLETELY in just one or two days!! If you set aside a full work day to do it, it will be done all at once and you’ll be able to move on with your life and your business. So try not to be discouraged by the mass of content - it’s truly worth it to make your life (and your clients’ lives) easier in the long run! And it’s easier on your bank account.
There are a few other pages and features within Dubsado that are extremely useful, and might become integral to your workflow. In order to save you time, I only outlined the parts of the software that were necessary to understand to geting you up and running and your new client workspaces operating. If you need more help understanding the other parts of Dubsado’s interface, they have a great youtube channel that explains everything you want to know! Access it here.
Please please reach out to me at abigail@atolerphoto.com if you have any thoughts, corrections, questions, or comments on the content in this blog. I’d love to talk with you! And I truly truly hope this saves you as many hours (and as much brain power) as possible!


